3 Admin Console User Manual
The User Manual is available for Max and Standard. Use the tabs below to switch between editions.
- Max
- Standard
PalmAI Admin Web is the visual management console provided to customers of the Tencent PalmAI identity verification system. It supports routine administration and operations for enterprise customers, including device access, user registration, scene configuration, verification rule settings, and data viewing.
The platform uses a multi-tenant, multi-role permission architecture, with a tenant serving as the basic unit for organizational and data isolation. Each tenant manages its own devices, users, scenes, and business data, and data is isolated between tenants. Within each tenant, different types of administrator accounts can be configured according to actual job responsibilities, and role permissions control the business scope each account can manage. A tenant represents an enterprise or organization, while an administrator represents a specific management account and its operating permissions. The platform's Super Administrator is responsible for platform-level administration and can centrally maintain different tenants and related system configurations.
Through these mechanisms, the platform supports the hierarchical management requirements of different enterprises while providing business data isolation and granular control over management permissions.
This chapter uses the following terms:
| Term | Description |
|---|---|
| Super Administrator | The role with the highest platform permissions. It can manage all tenants and configure system information, and is maintained by Tencent technical support by default. |
| Tenant Administrator | The role with the highest permissions within a tenant. It manages business data such as devices, users, scenes, and rules for its tenant, but cannot view or operate data belonging to other tenants. |
| Device Administrator | The role responsible for device and scene management within a tenant. It can add, delete, modify, and query scenes and devices in its tenant, but has no user management or permission assignment capabilities. |
| User Administrator | The role responsible for user management within a tenant. It can add, delete, modify, and query user information and palm data in its tenant, but has no device management or permission assignment capabilities. |
| Basic Administrator | A basic view-only role within a tenant. It can view devices, users, scenes, and other data in its tenant, but cannot add, modify, delete, import, or export data. |
| Tenant | The platform's customer entity and the highest-level boundary for data isolation and resource allocation. Each tenant has independent devices, users, scenes, and verification records. |
| Closed Scene | A scene mode that can be configured separately for each tenant in PalmAI Admin Web. Only users on that tenant's preconfigured access list can access it, and an administrator must add users in advance before they can pass verification. |
| Open Scene | A scene mode in which users in the tenant can register by themselves through enabled registration methods without being added by an administrator in advance. |
| Primary Palm | The first palm activated and registered by a user. |
| Secondary Palm | A palm added by the user later. |
| Palm Database Quota | The maximum number of palms that a tenant can register. When Dual Palm Registration is enabled, each user can consume up to two quota units (one per palm). There is no per-tenant Palm Database Quota limit. |
| Additional Verification (Secondary Verification) | An additional identity confirmation step performed after a successful Palm Scan. Supported methods include the last four digits of a phone number, a custom numeric field, and device QR code scanning. |
| Device QR Code Scan Verification | After a successful Palm Scan, the user enters Additional Verification information on the device QR code scan verification H5 page to generate an authentication QR code. The device then scans the QR code to complete Additional Verification. |
| Custom Numeric Field Verification | After a successful Palm Scan, the user enters the configured custom numeric field, such as an employee ID or device number, on the device to complete Additional Verification. Values from 4 to 8 digits are supported. |
| Remote Command | An operation command dispatched from PalmAI Admin Web to a device to control device behavior remotely without on-site operation. |
3.1 Device Management
After a Palm Verification Device is delivered, it must be registered in PalmAI Admin Web before it can be used. Once registered, the device must also be activated and bound by scanning a QR code on the device and then associated with a business scene before it can upload verification records.
3.1.1 Device List
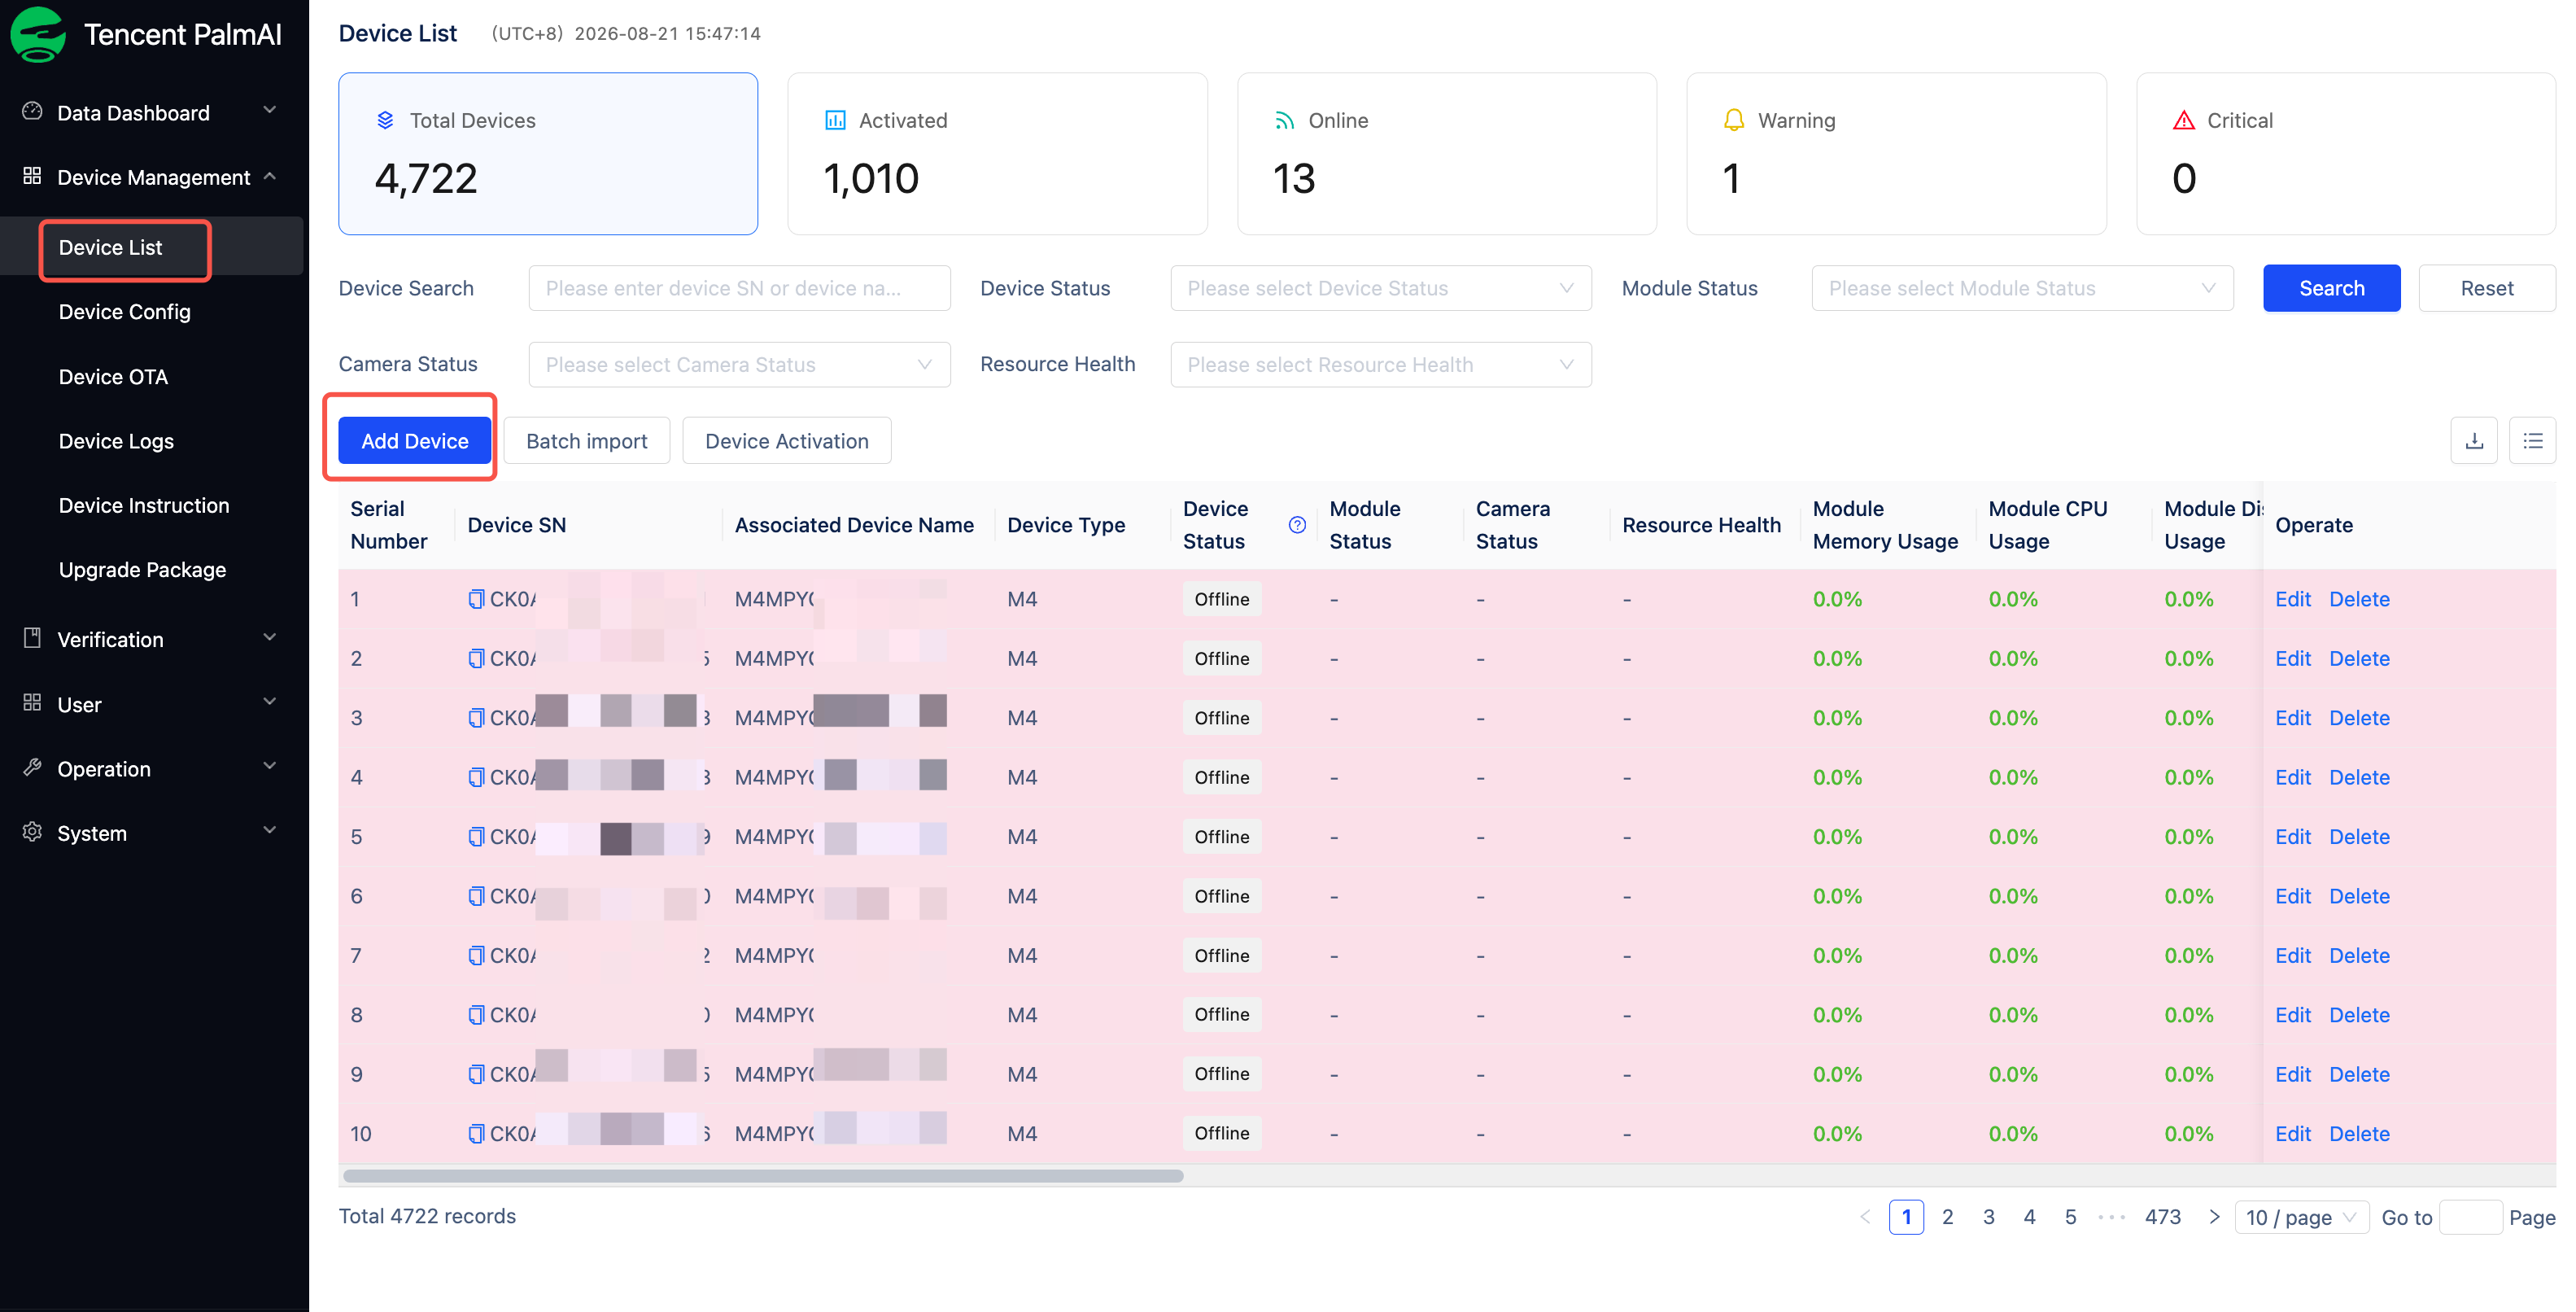
The Device List page provides centralized functions for viewing, searching, adding, importing, activating, editing, and deleting Palm Verification Devices, as well as monitoring their online status and resource health. The fields are described below:
| Field | Description |
|---|---|
| Device SN | The unique serial number of the device. |
| Associated Device Name | A custom device name. |
| Device Type | The device model, such as M3 or M4. |
| Device Status | Not Activated indicates that the device has not completed environment activation. After activation, the status is either Online or Offline. |
| Resource Health | An assessment of the device's resource health. |
| Module Memory Usage | The percentage of module memory in use. |
| Module CPU Usage | The percentage of module CPU in use. |
| Module Disk Usage | The percentage of module disk space in use. |
| Device Memory Usage | The percentage of overall device memory in use. |
| Device CPU Usage | The percentage of overall device CPU in use. |
| Device Disk Usage | The percentage of overall device disk space in use. |
| Module Type | The model of the module installed in the device. |
| Module SN | The unique serial number of the module. |
| Module Validity Period | The module authorization expiration time. |
| Application Version | The current version number of the device application software. |
| Module Version | The current version number of the module firmware. |
| System Version | The version number of the device operating system. |
| Algorithm Version | The version number of the Palm Print Recognition algorithm currently installed on the device. |
| Associated Scene ID | The unique identifier of the scene bound to the device. |
| Associated Scene Name | The name of the scene currently bound to the device. |
| Scene Group | The name of the scene group to which the device belongs. |
3.1.1.1 Registering Devices
Devices can be registered individually or imported in batches. Register devices individually when adding a small number of devices. Use batch import when adding multiple devices at one time.
Registering a Single Device
- Go to the Device List page.
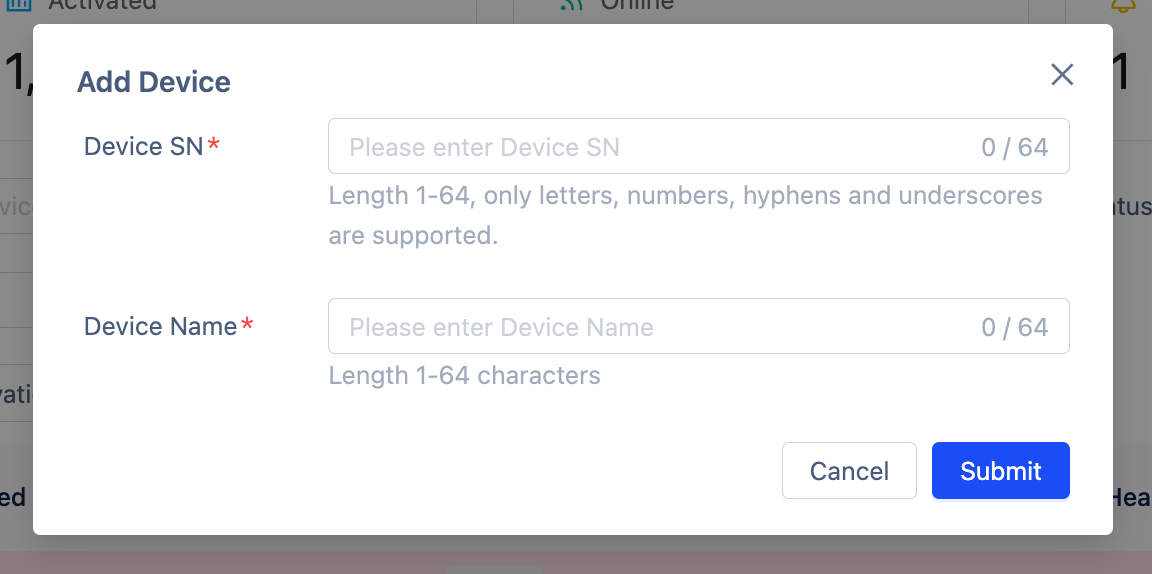
- Click Add Device.
- Enter the Device SN. You can find this information on the device label.
- Enter a Device Name as needed.
- Click the confirmation button to complete device registration.
Note
The same Device SN cannot be registered more than once.
Importing Devices in Batches
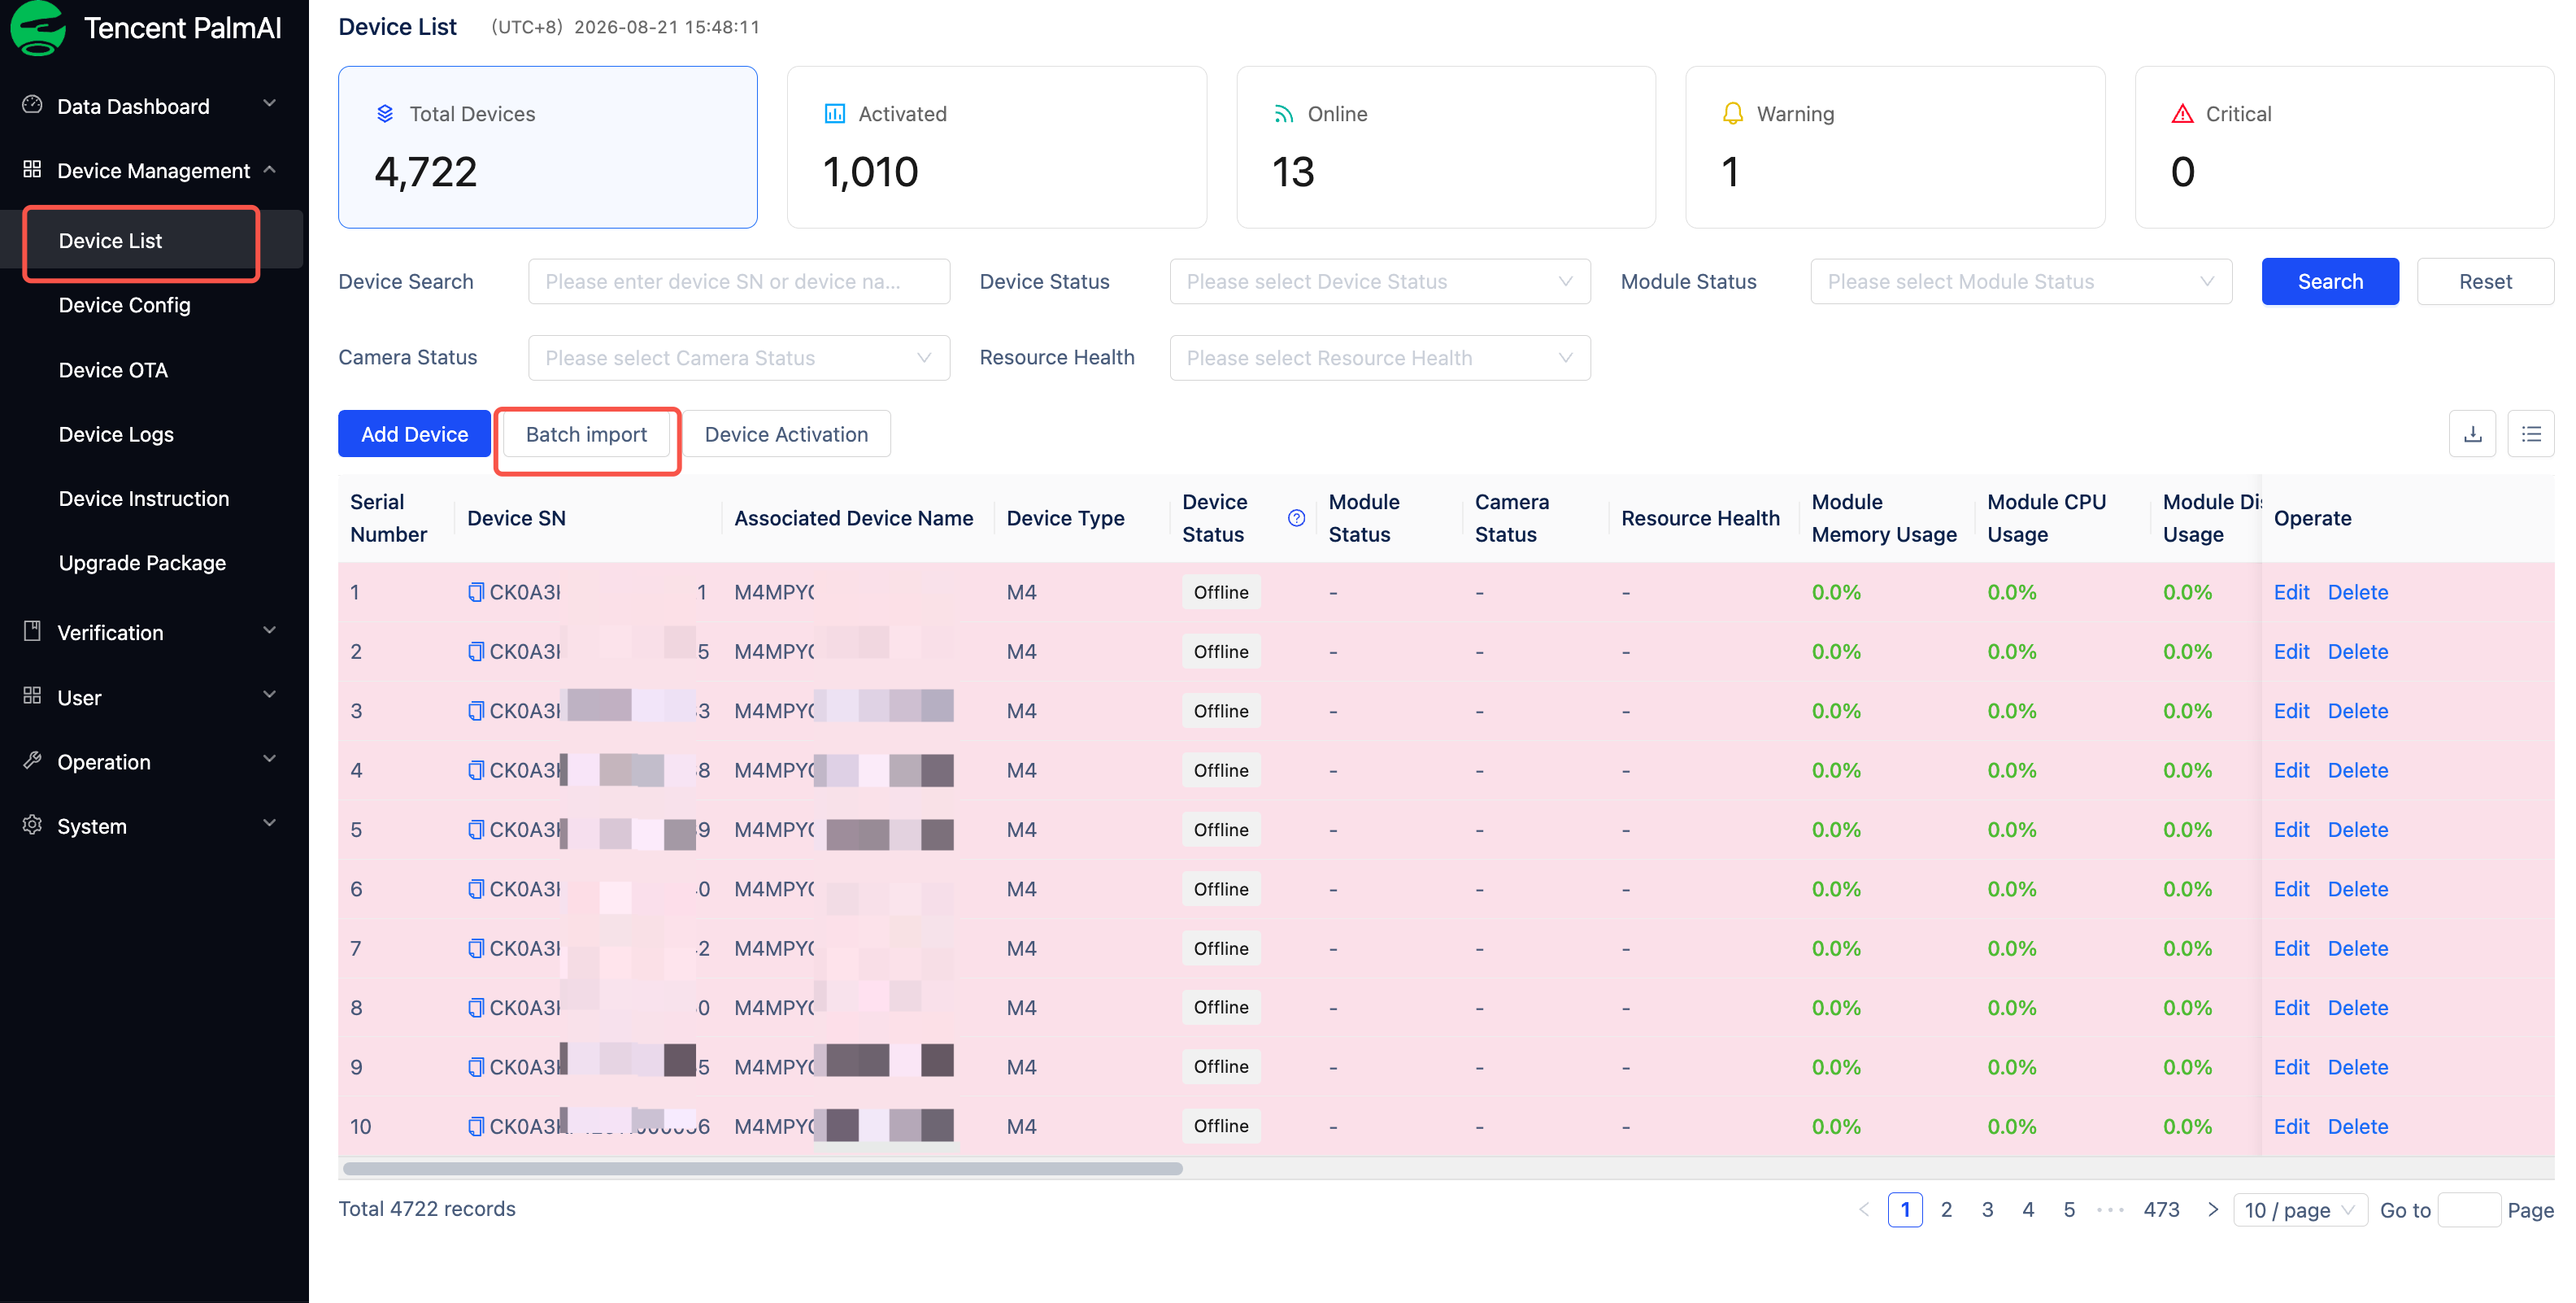
- Click Batch import.
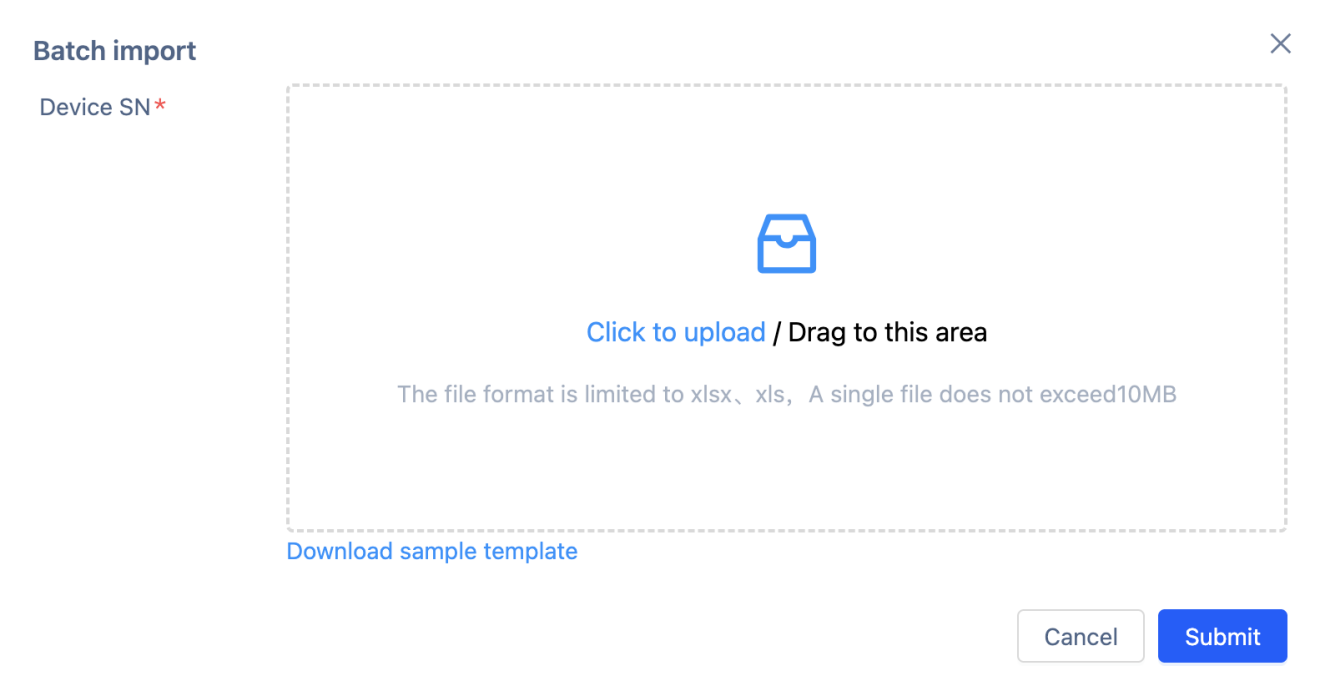
- Download the import template.
- Enter device information as specified in the template.
- Upload the completed template to finish the batch import.
Note
Do not modify the import template or delete its instructions. Device SN is the unique identifier and cannot be changed after import.
Note
When multiple Excel files are uploaded, the system displays a confirmation dialog with the message
Files are already pending upload. Overwrite the original files?
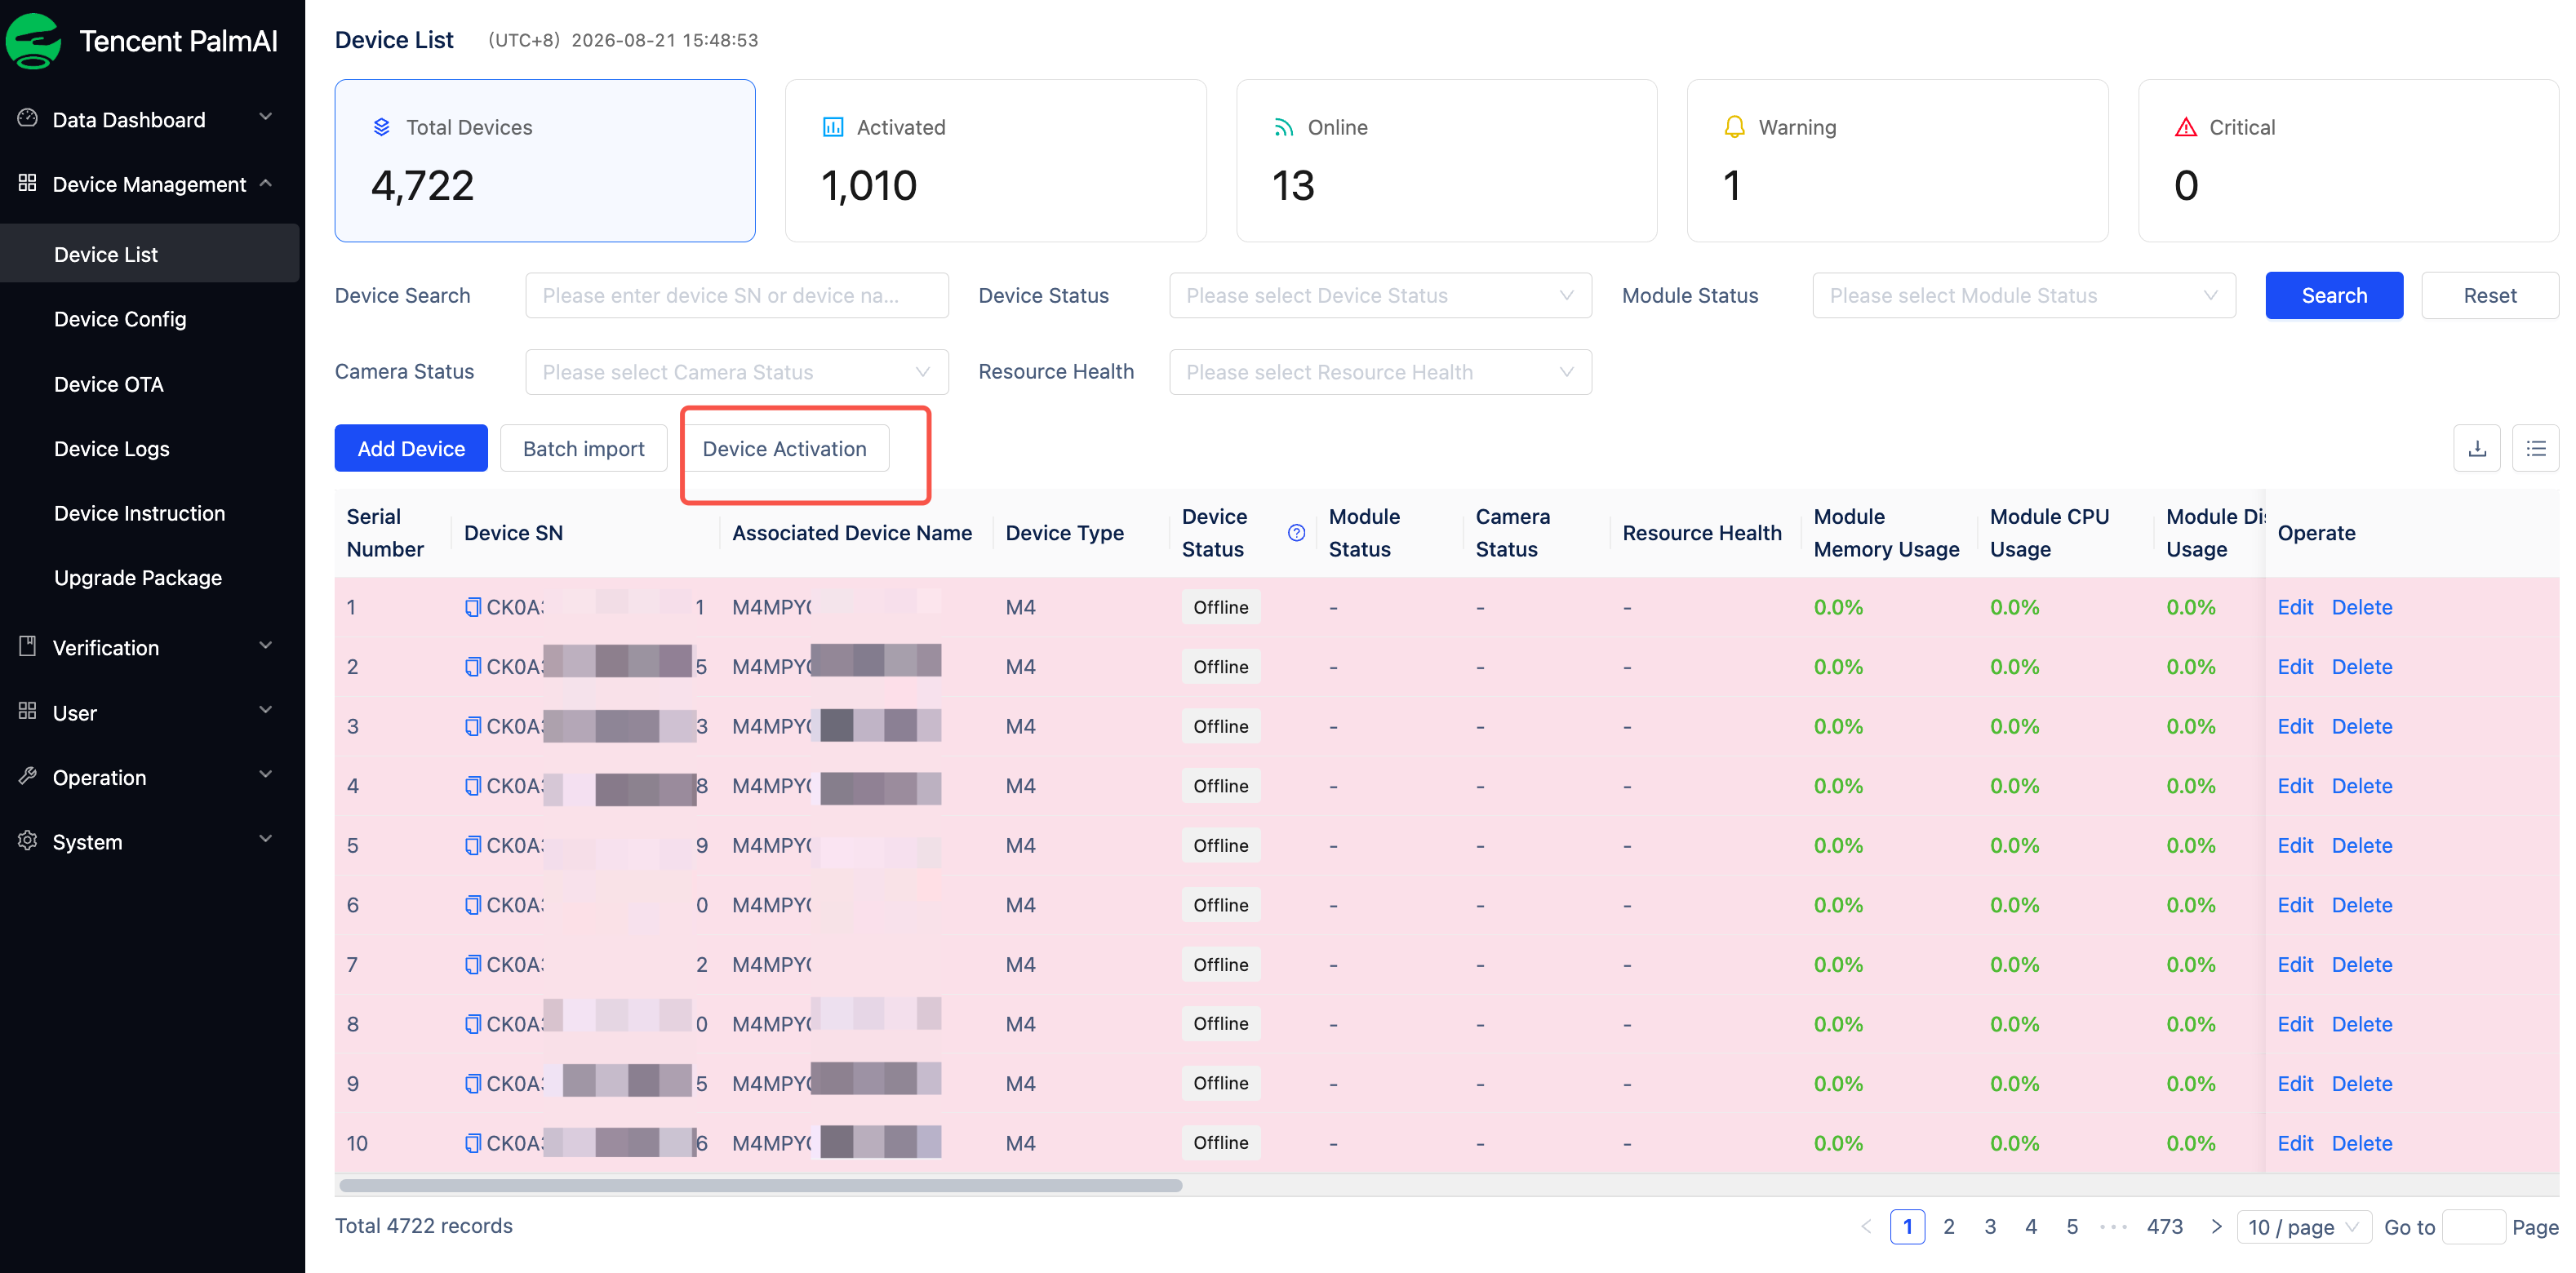
3.1.1.2 Device Activation and Environment Binding
After the device information is registered in PalmAI Admin Web, scan a QR code on the device to activate it and connect it to the current backend environment. A device that has not been activated on the device side may be unable to upload verification records properly.
- Go to the Device List page.
- Click Device Activation to generate a device activation QR code.
- Scan the QR code with the device to complete device activation and environment binding.
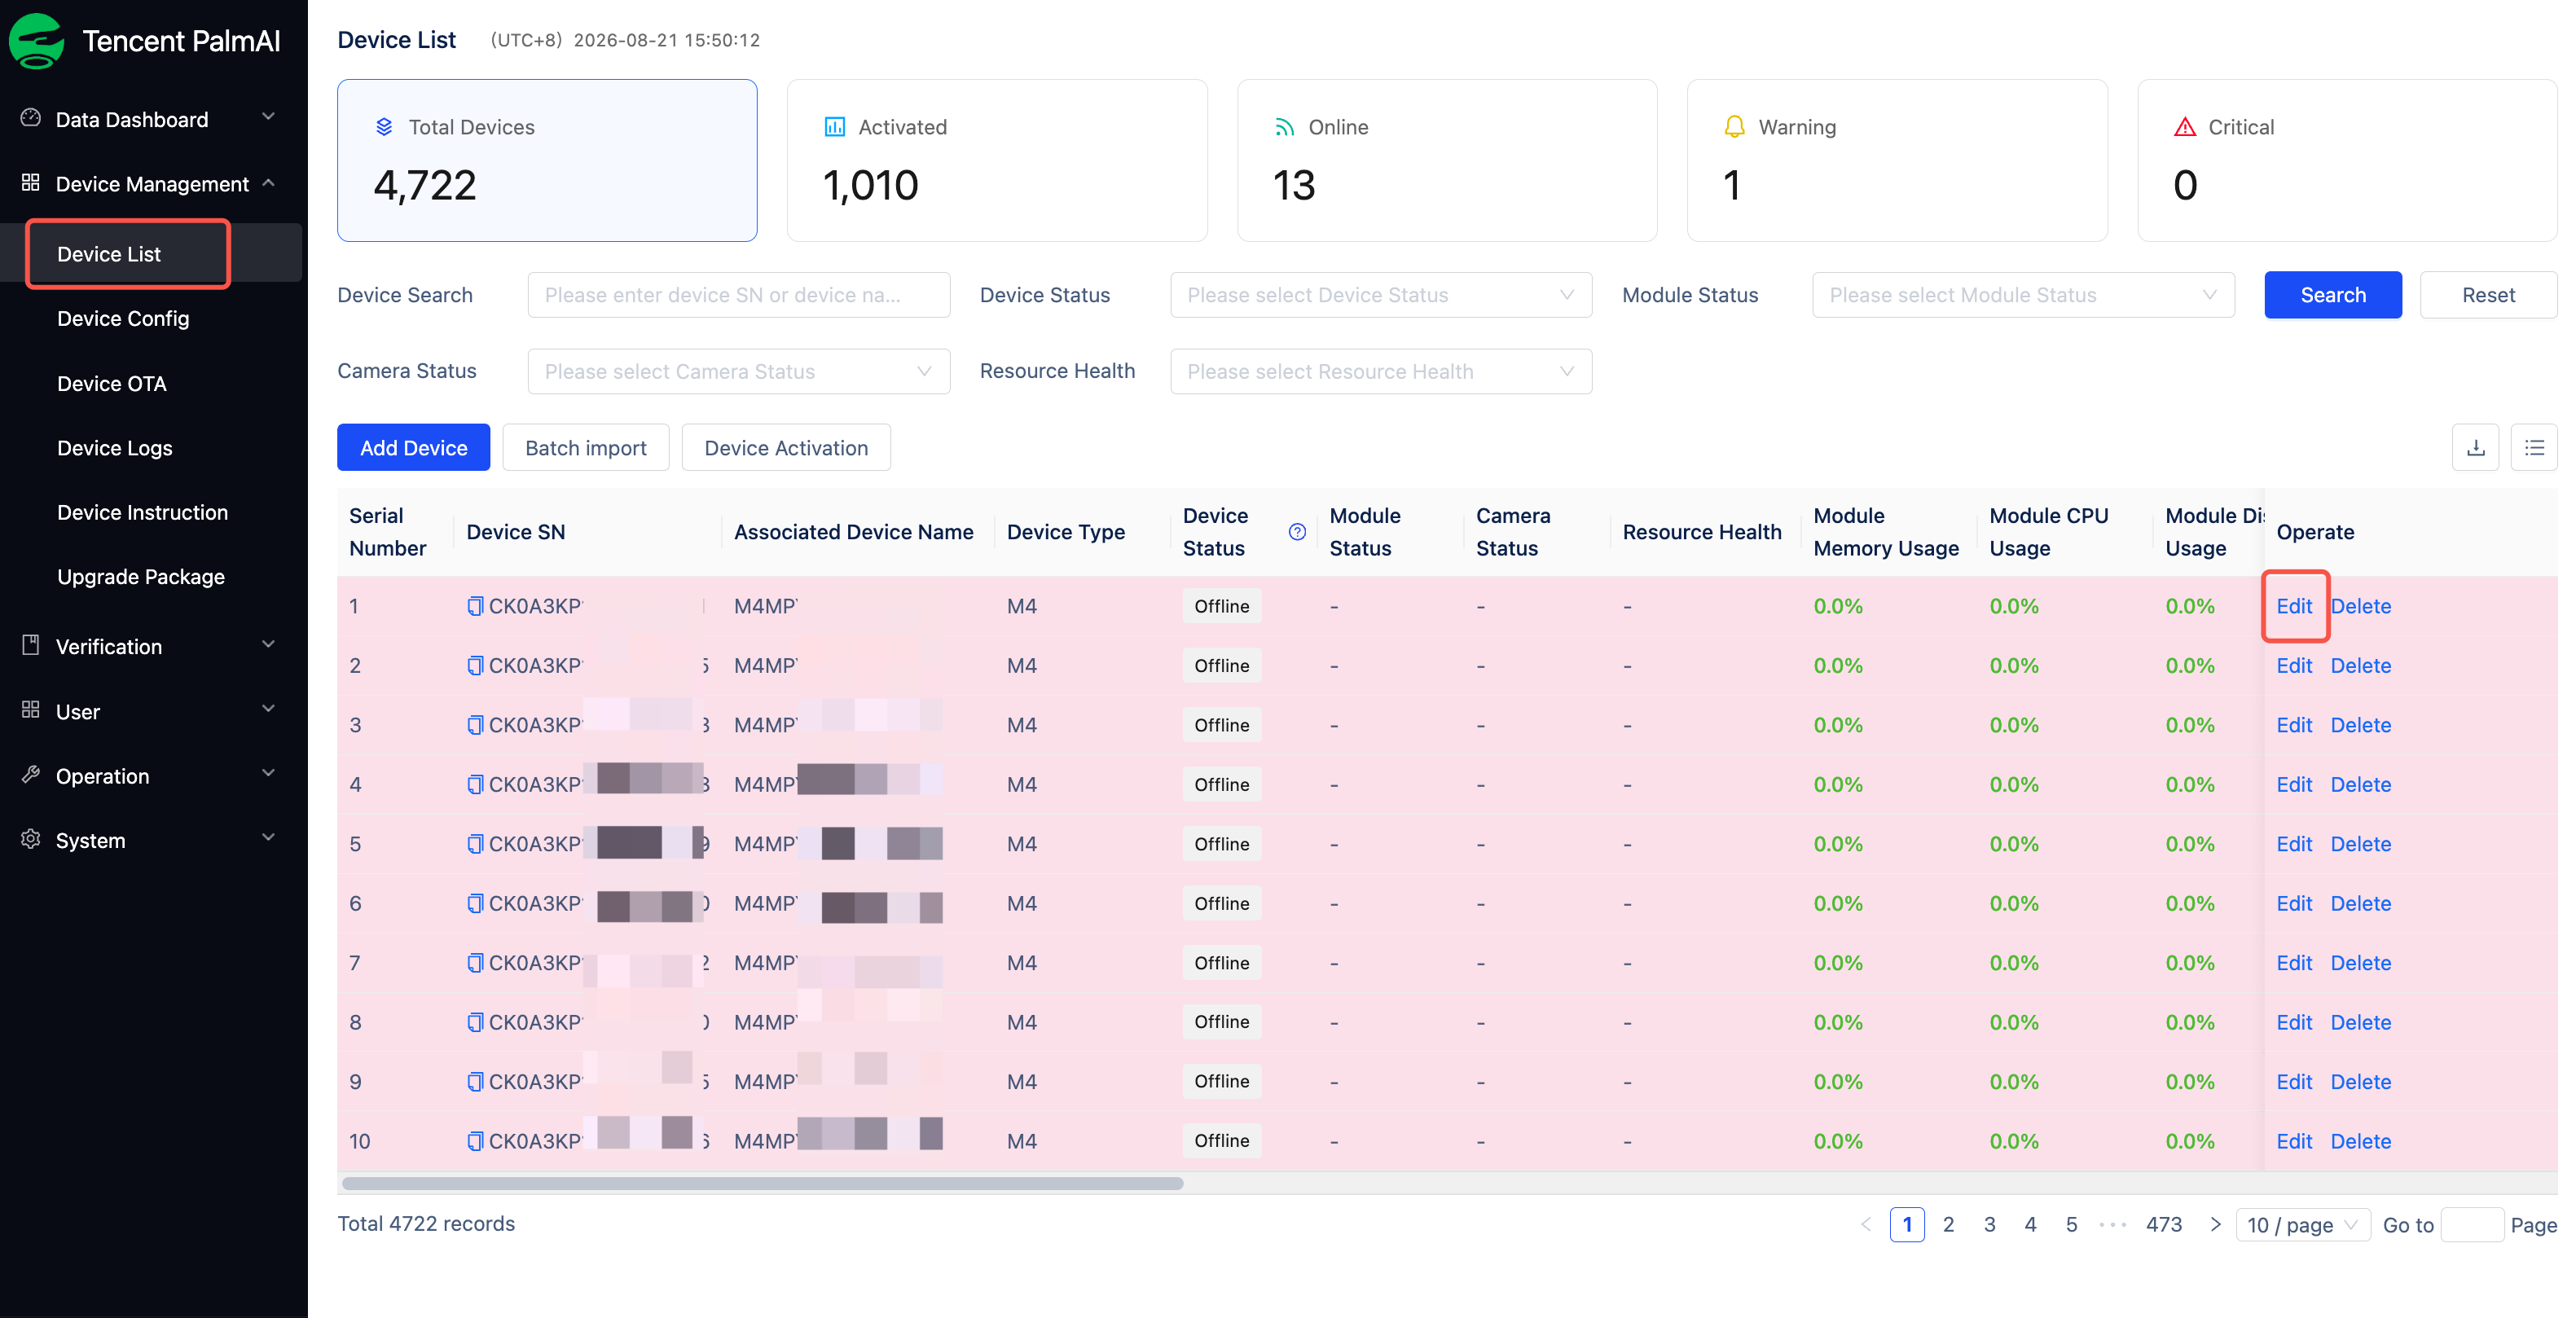
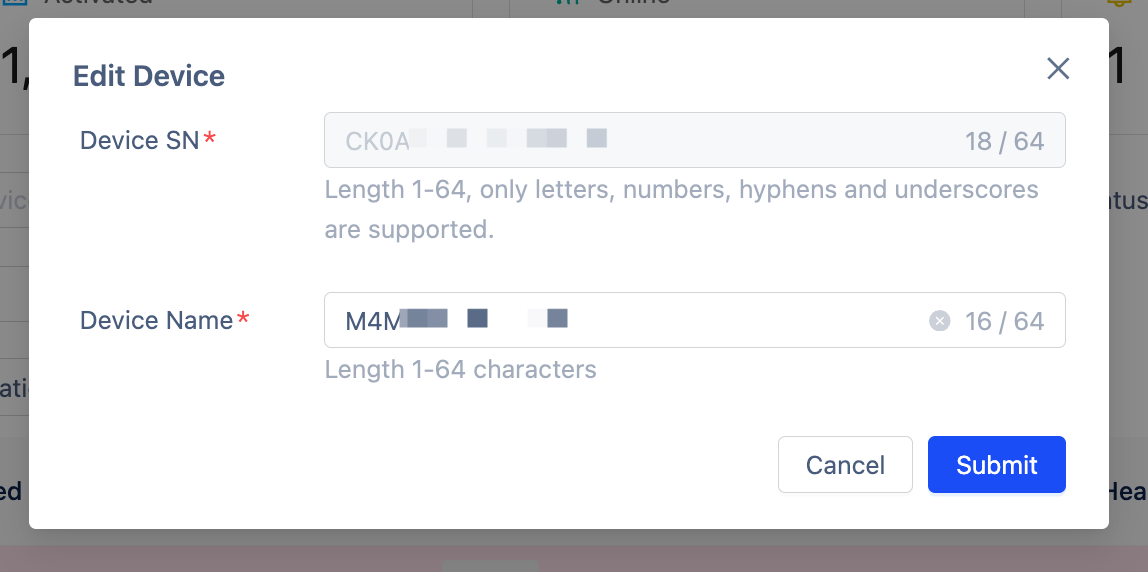
3.1.1.3 Editing a Device
- Find the target device.
- Click Edit.
- Change the device name and save.
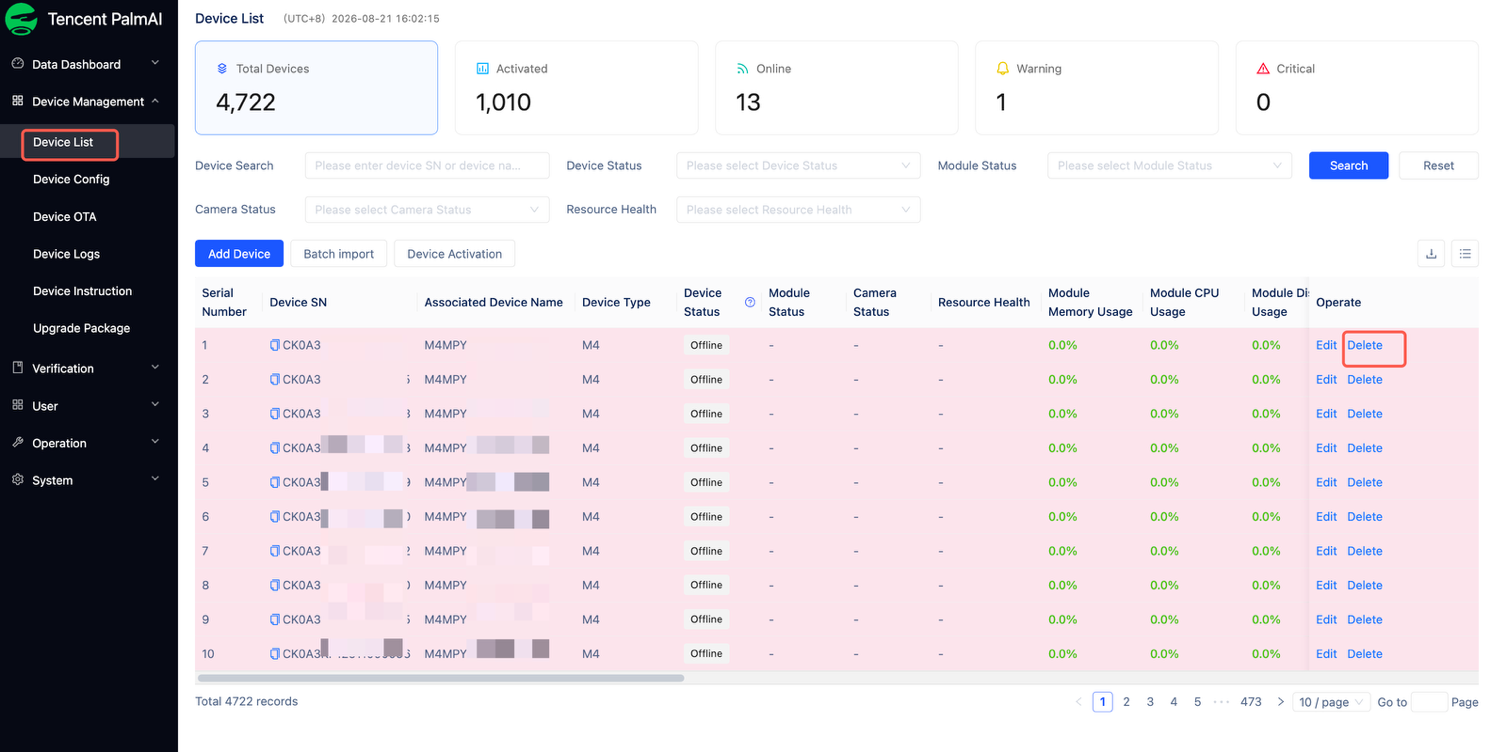
3.1.1.4 Deleting a Device
Prerequisites
- The device has been disassociated from its scene. A device cannot be deleted while it remains associated with a scene.
If the device is still associated with a scene, the system displays: Failed to delete the device. Remove the associated scene before deleting the device.
Procedure
- Find the target device.
- Click Delete.
- Confirm the deletion in the confirmation dialog.
Warning
After a device is deleted, its Palm Feature Database and rules are also deleted, and the device can no longer perform Palm Scans. Existing verification records are not affected.
3.1.2 Device Configuration
3.1.2.1 Adding a Device Template
Template configuration lets administrators customize the UI of M3 and M4 devices. Administrators can add device templates, configure the Device Homepage, Success Page, and Failure Page separately, and delete templates that are no longer used. After configuration, the system dispatches the UI assets and display text to the devices.
- Click Add Device Template.
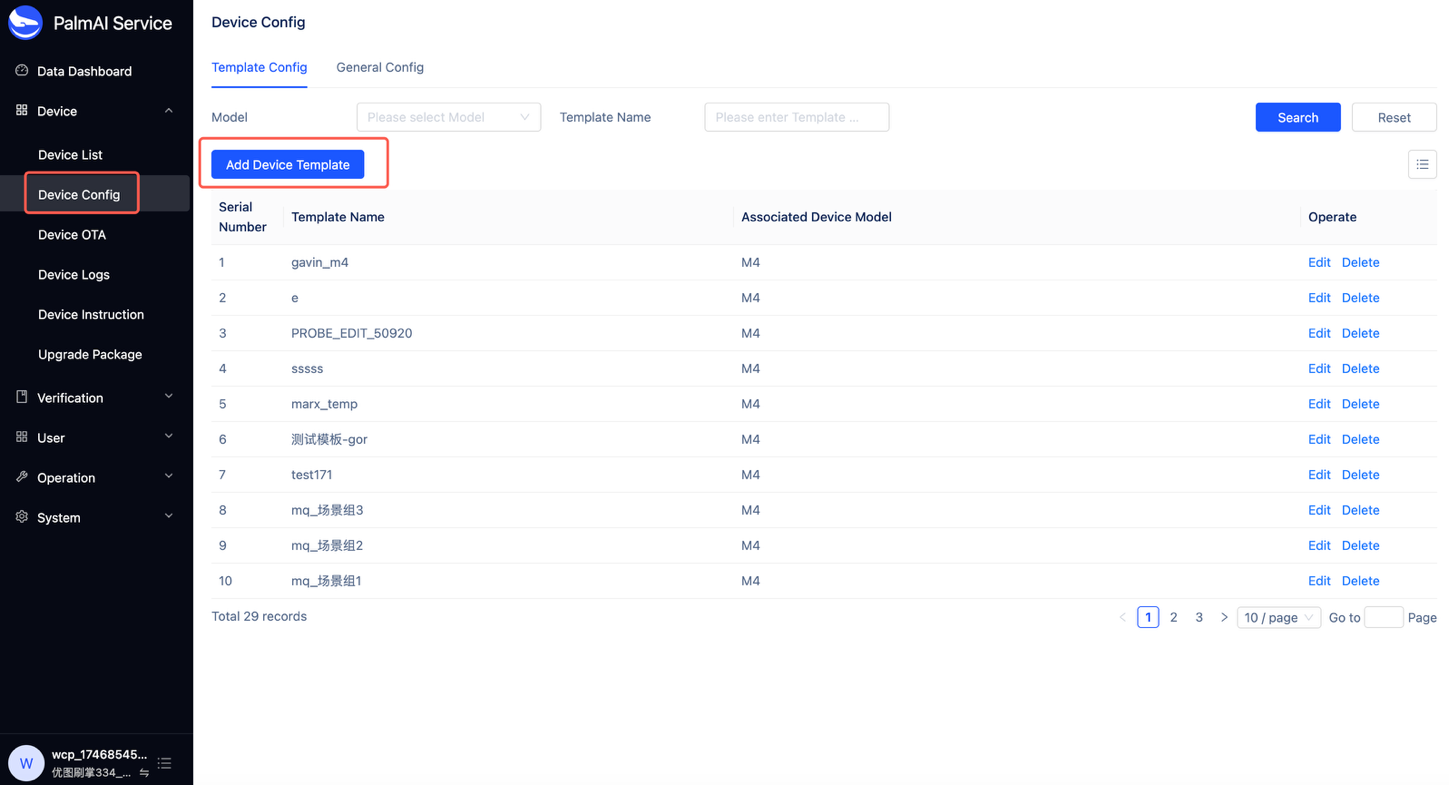
- Enter a template name and select an associated device model.
- Set the effective scope by scene or device number:
- By scene: Click the add button and select one or more scenes in the dialog. Devices subsequently added under the selected scenes or scene groups automatically use this template and do not need to be added to it again.
- By device number: Select one or more devices by device name or device number. Devices added later must be added to the template manually before it can take effect.
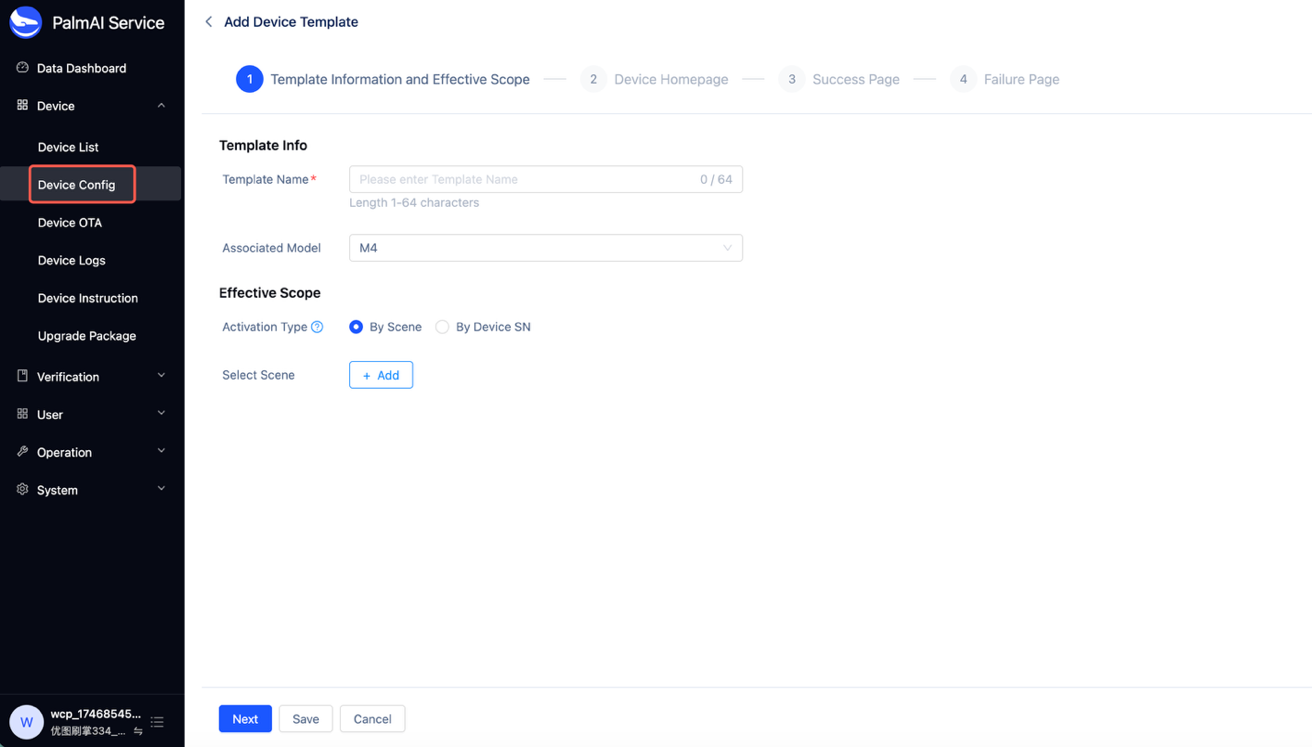
Configuring the Device Homepage
Click Device Homepage to configure the title text, image, and Logo on the device homepage (the default page after the device starts). If it is not configured, the device uses the system default template.
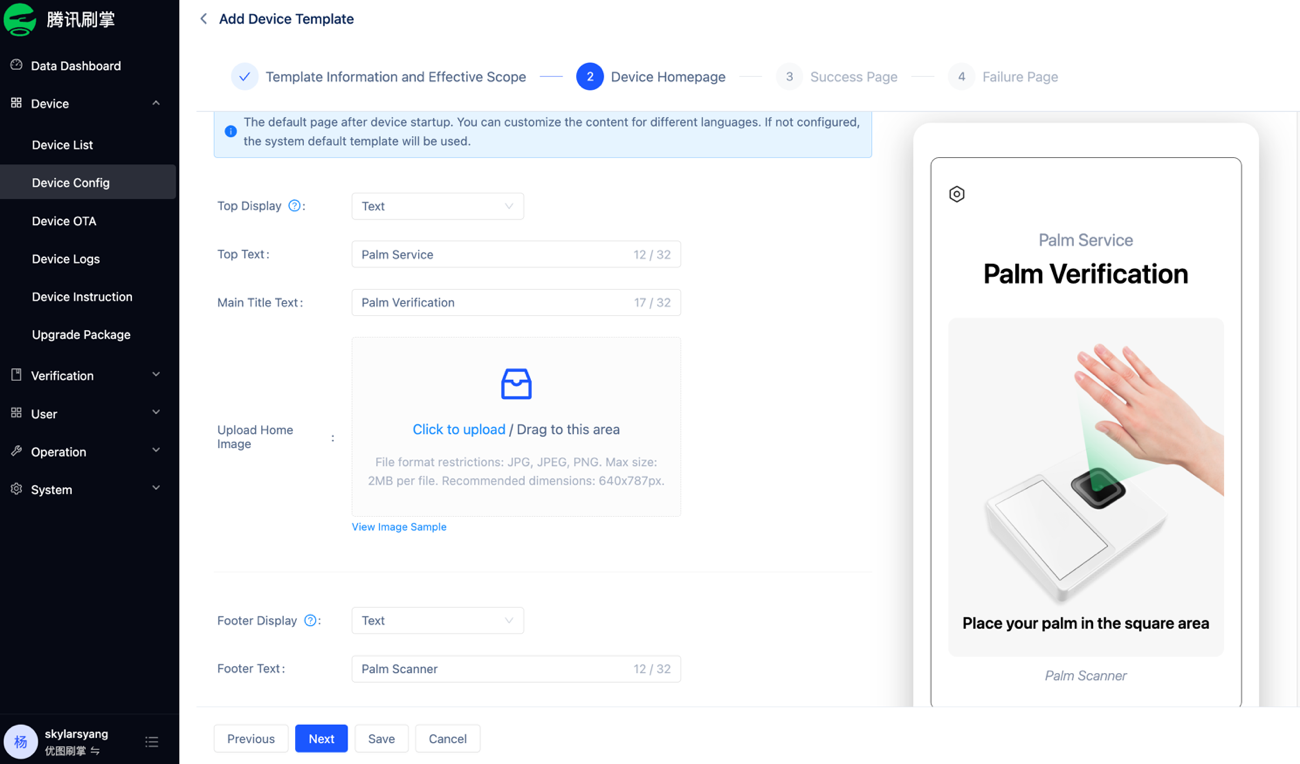
Configuring the Verification Success Page
Click Success Page to configure the content and audio shown on the verification success page. When verification succeeds and the user has permission to access the device, the device displays this page and plays the corresponding audio. If it is not configured, the device uses the system default template.
Configuring the Verification Failure Page
Click Failure Page to configure the content and audio shown on the verification failure page. When verification fails, the device displays this page and plays the corresponding audio. If it is not configured, the device uses the system default template.
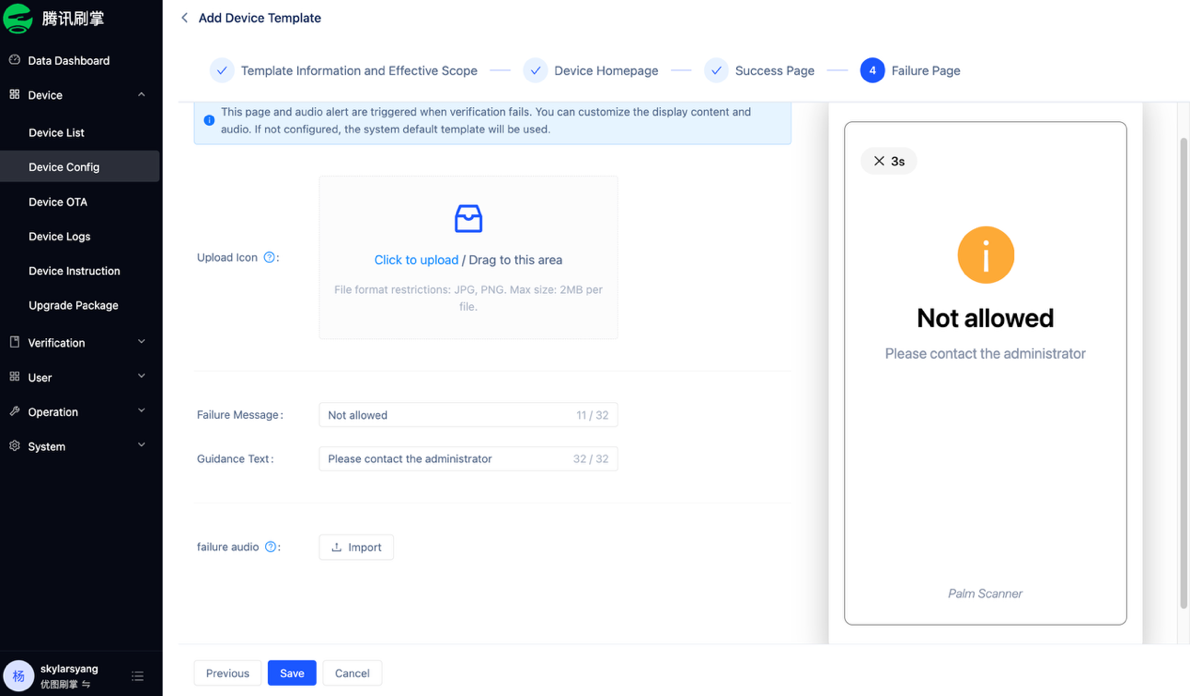
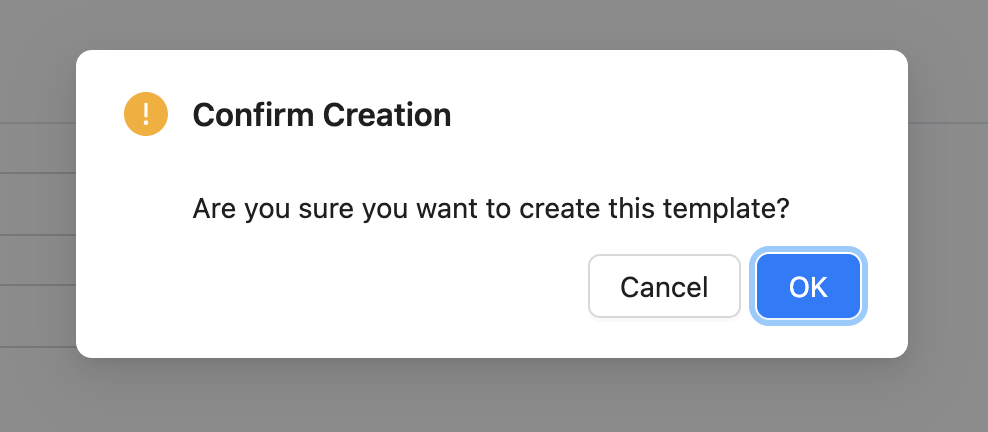
- After completing all configurations, click the submit button.
- Confirm submission in the confirmation dialog.
The system creates the template and dispatches the configuration to the devices.
3.1.2.2 Deleting a Device Template
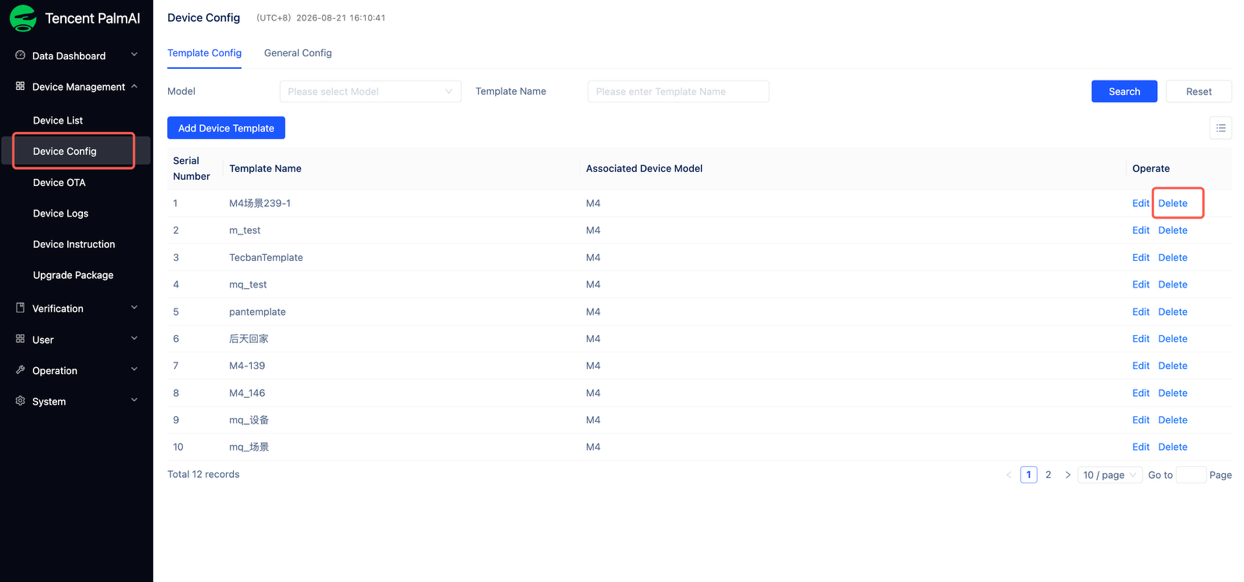
- Find the target template and click Delete.
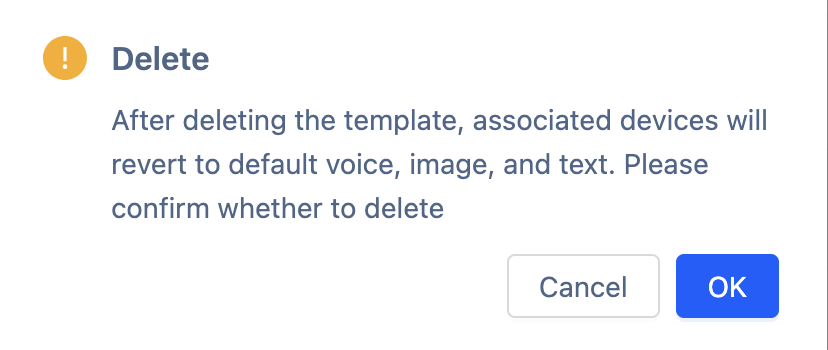
- Confirm the deletion in the confirmation dialog.
After the template is deleted, the devices resume using the system default template.
3.1.2.3 Adding a General Configuration
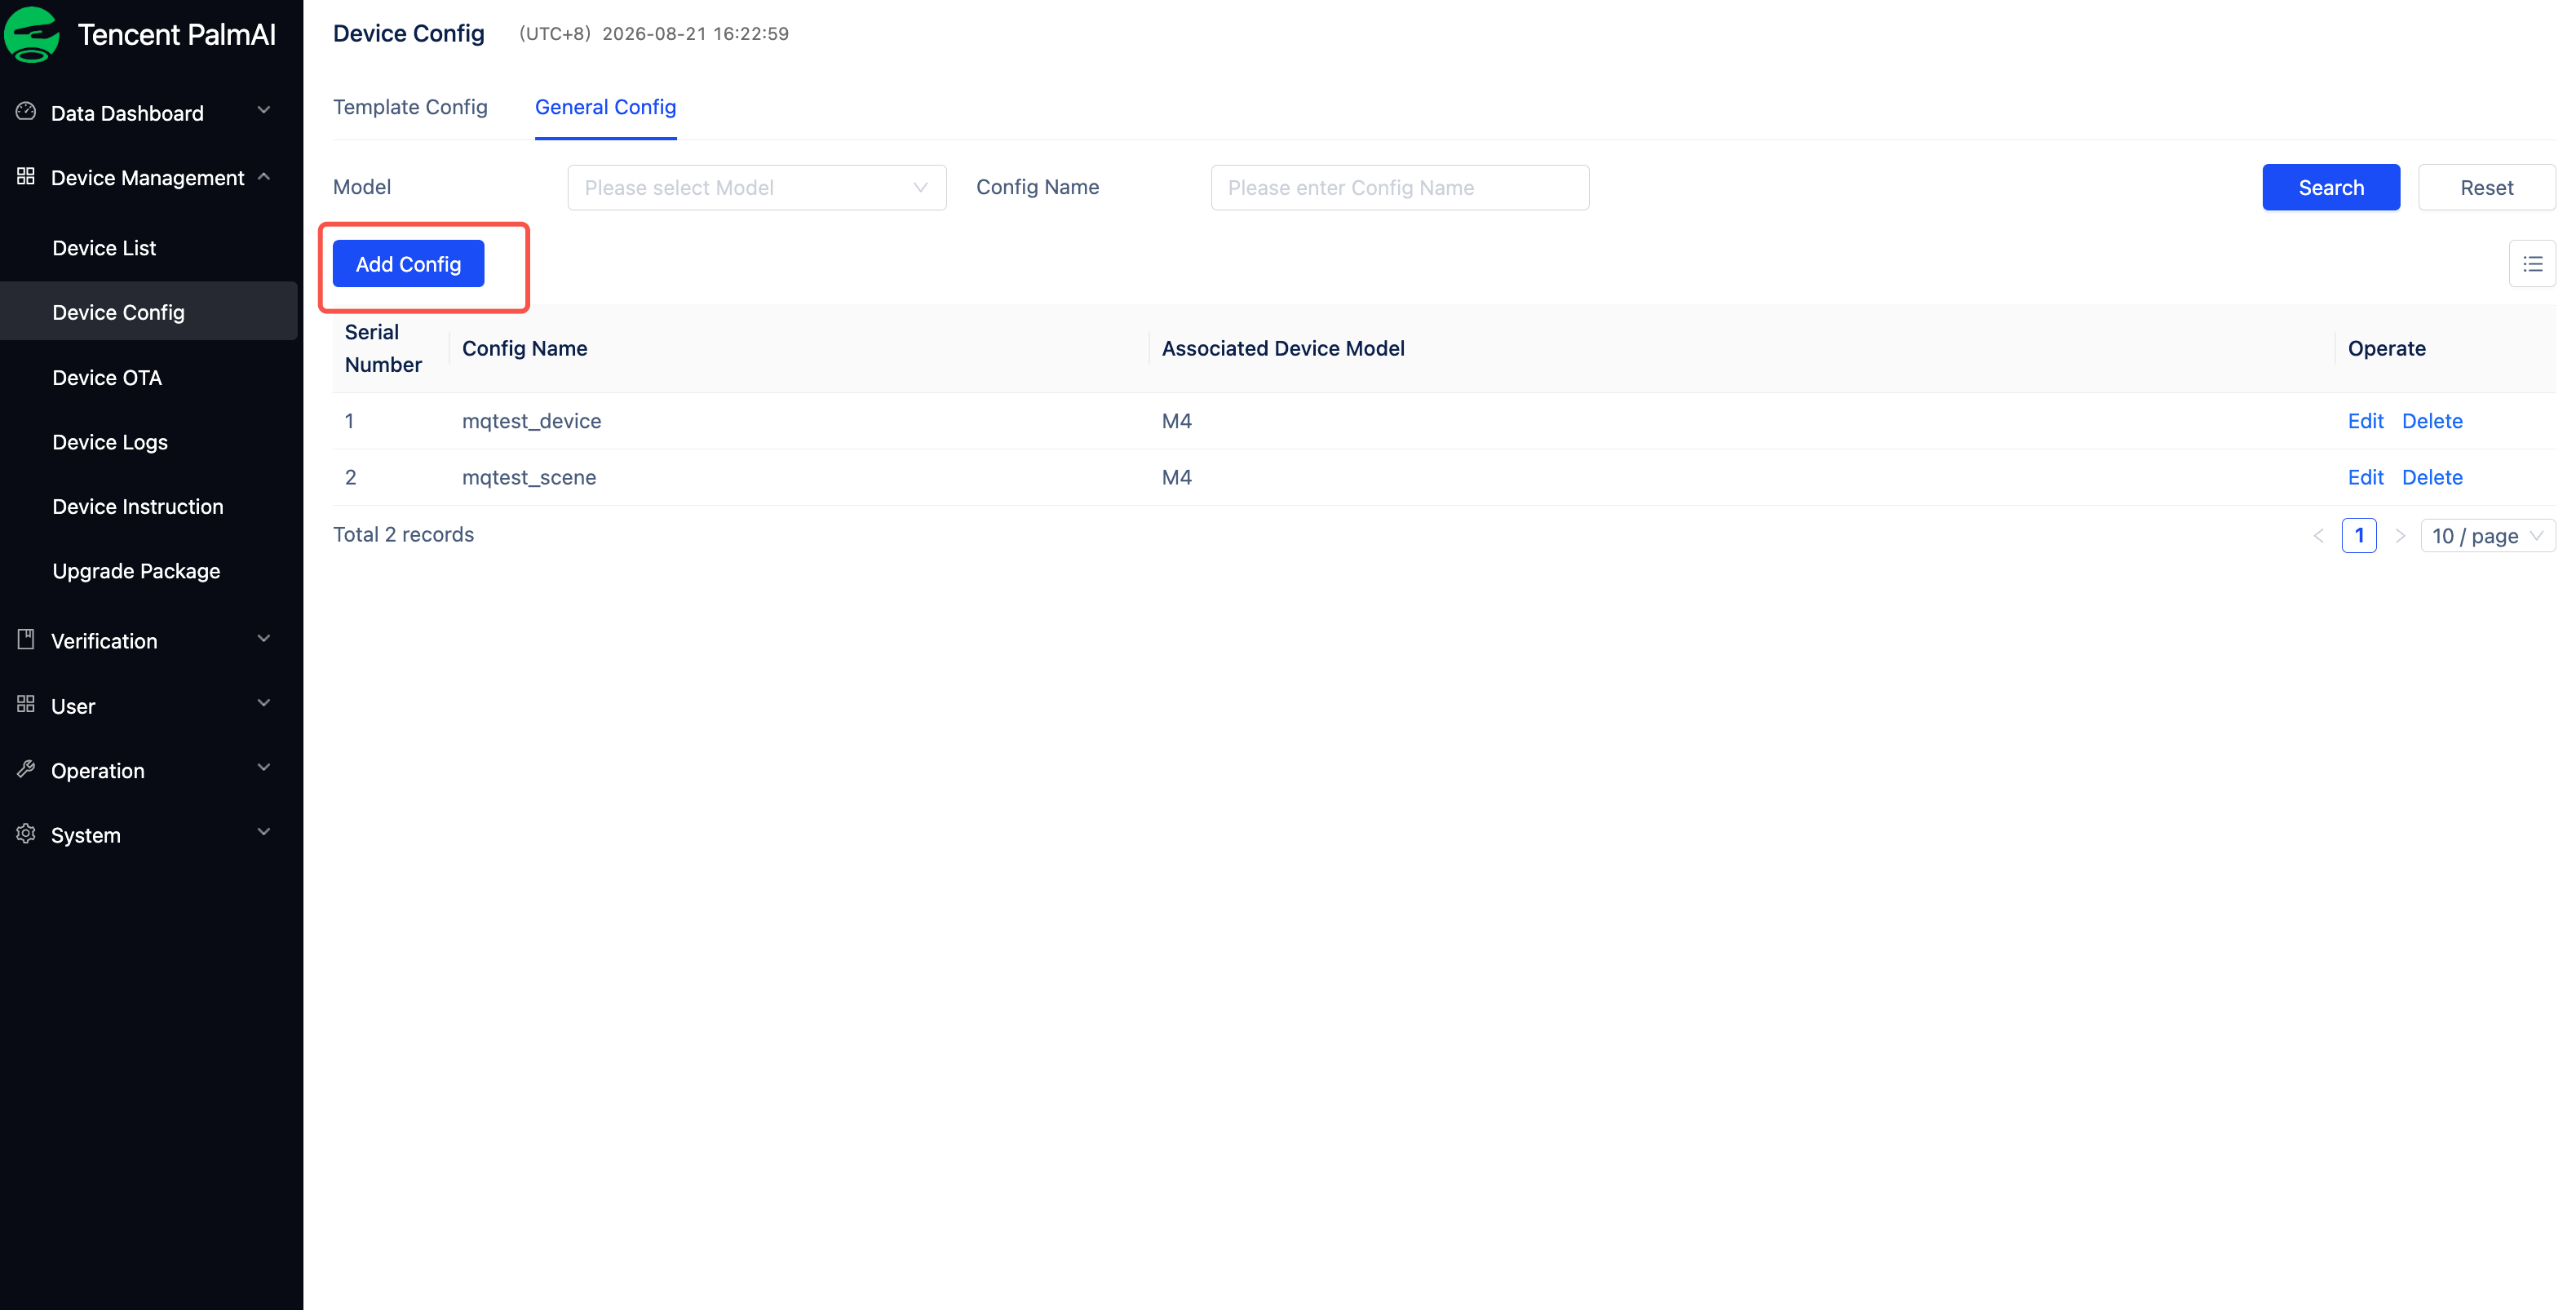
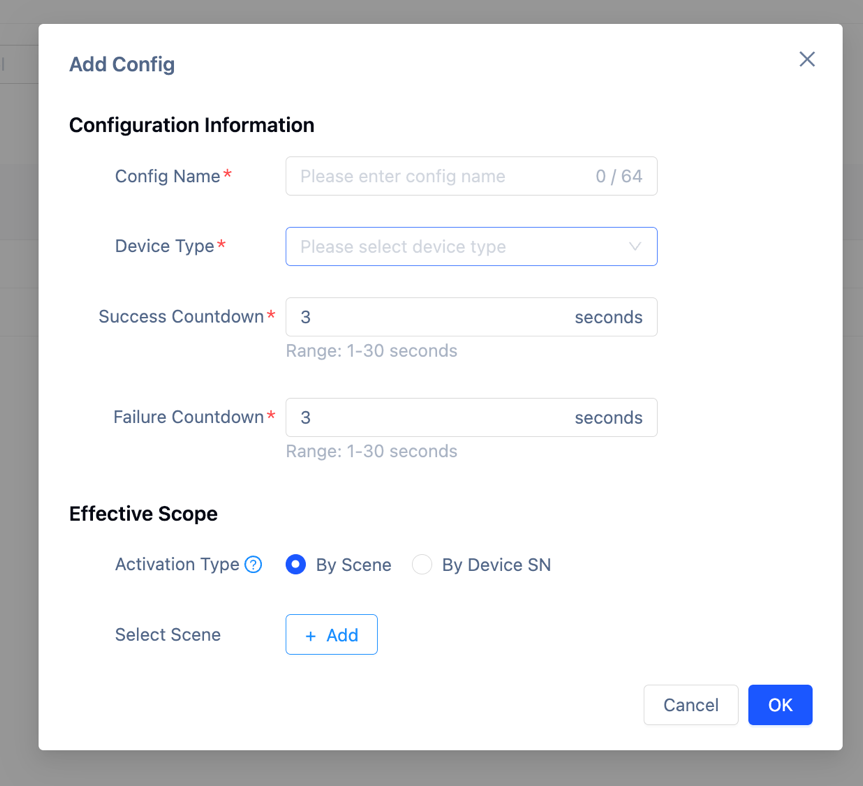
General configurations can be added and deleted. When adding a configuration, you can set the countdown duration after successful and failed device verification and define its effective scope by scene or Device SN. After the configuration is created, the system dispatches it to the corresponding devices.
- Click Add Config.
- Enter a configuration name and select the device type.
- Set the recognition success and recognition failure countdowns.
- Select the effective type and set the effective scope using By Scene or By Device SN.
- Click OK to save the configuration.
3.1.2.4 Deleting a General Configuration
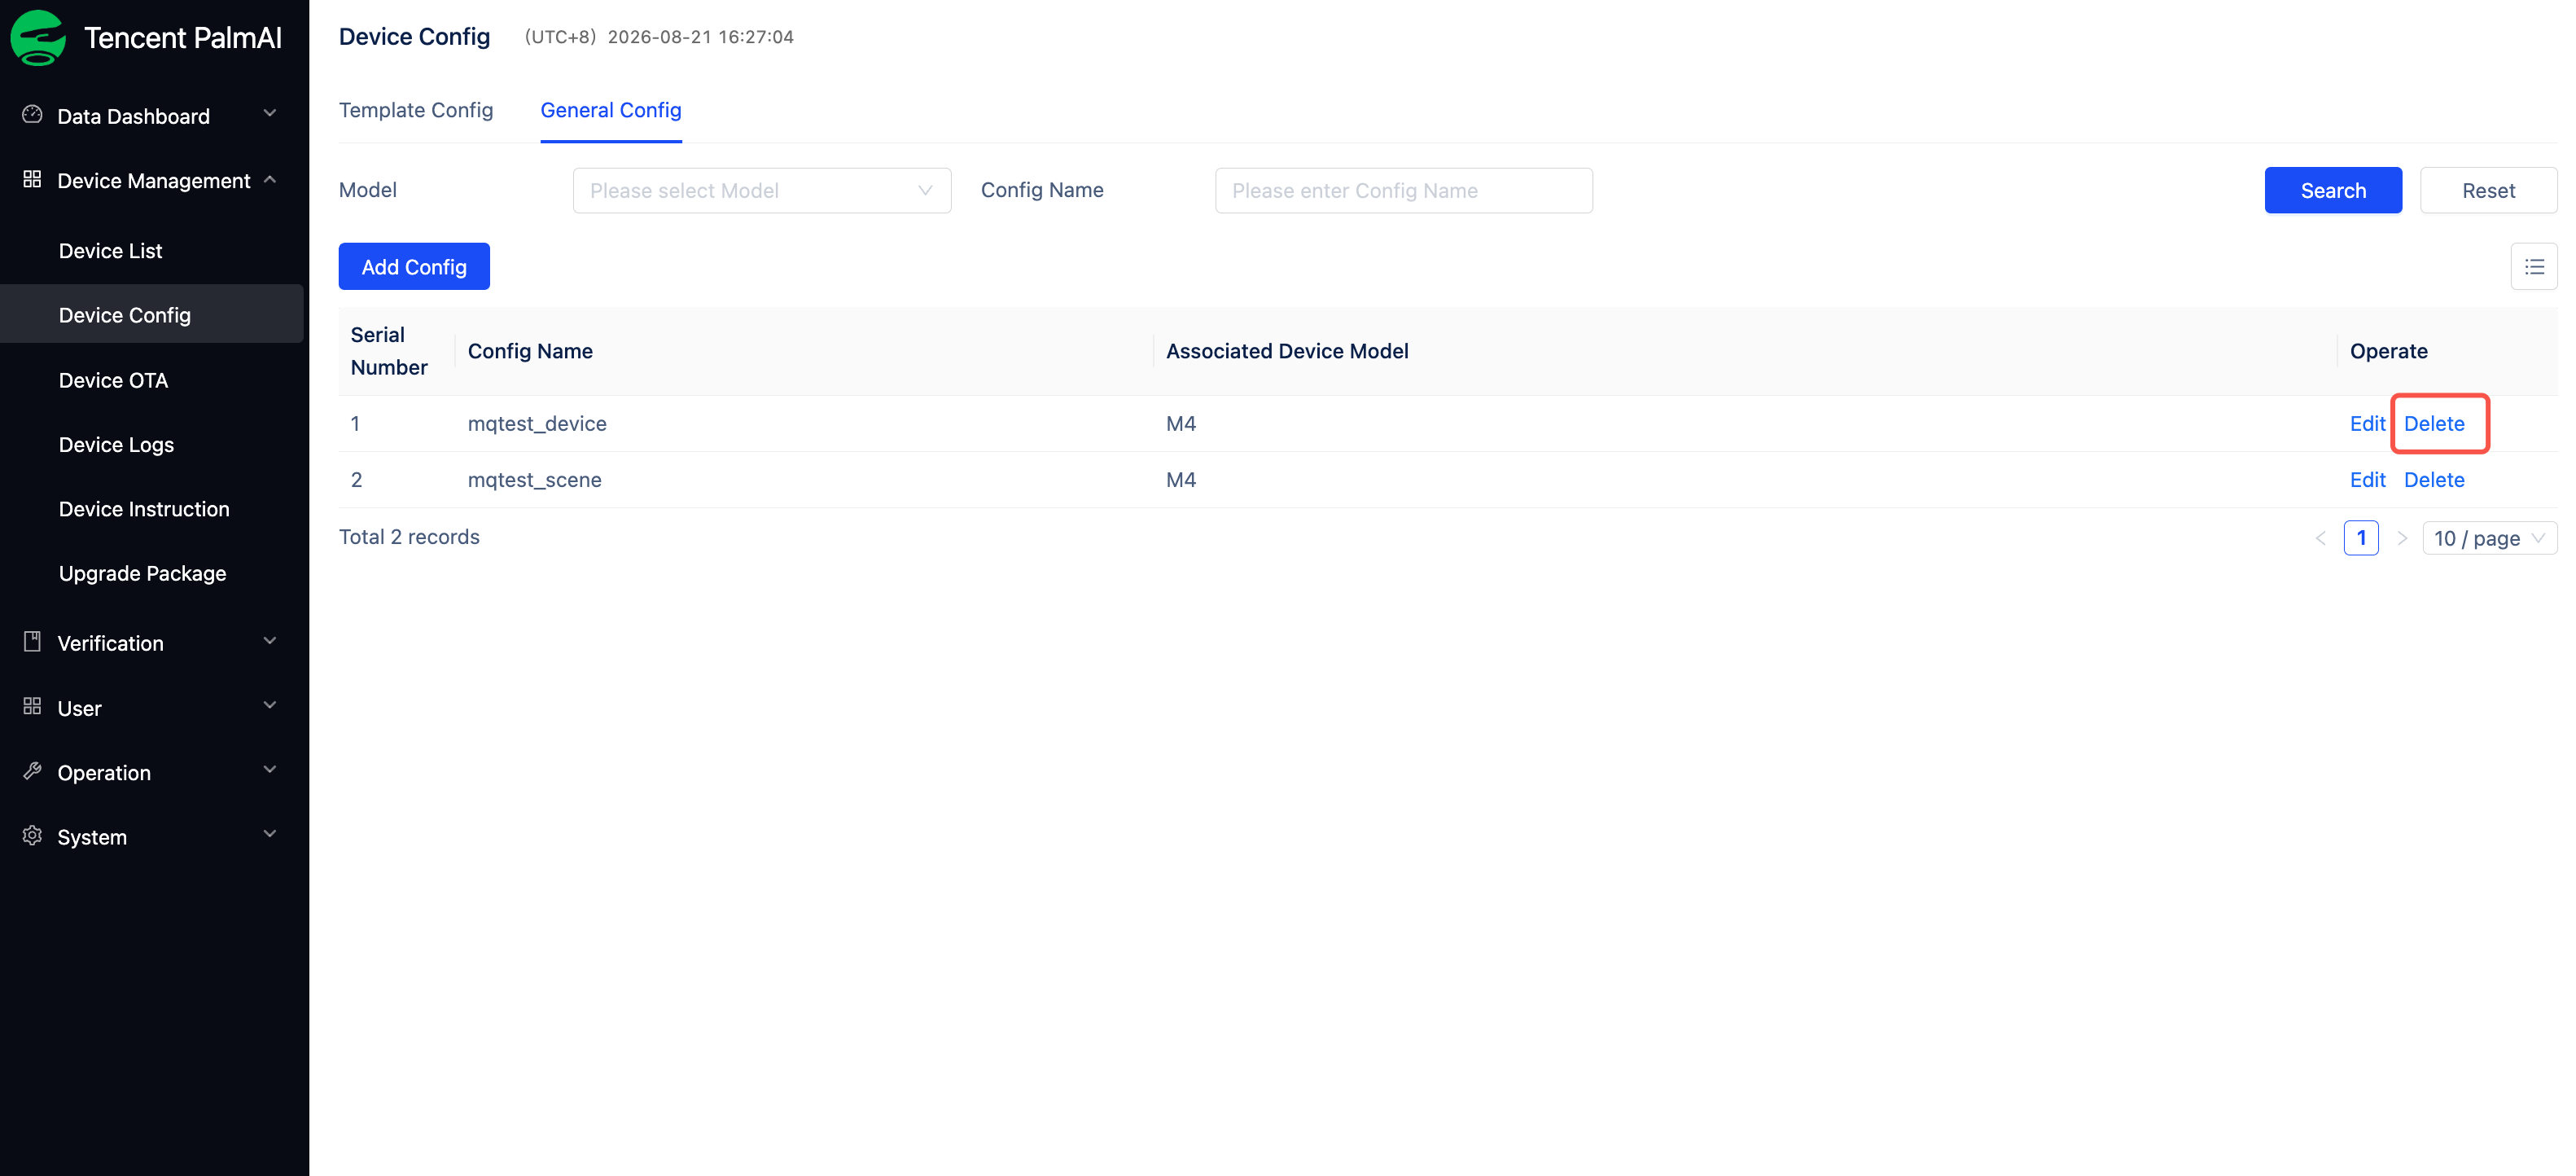
- Find the target configuration.
- Click Delete.
- Click OK in the confirmation dialog.
After the configuration is deleted, associated devices resume using the default configuration.
3.1.3 Device OTA
Device OTA supports searching for upgrade campaigns by upgrade task name, type, status, and associated upgrade package, and supports upgrading devices in batches.
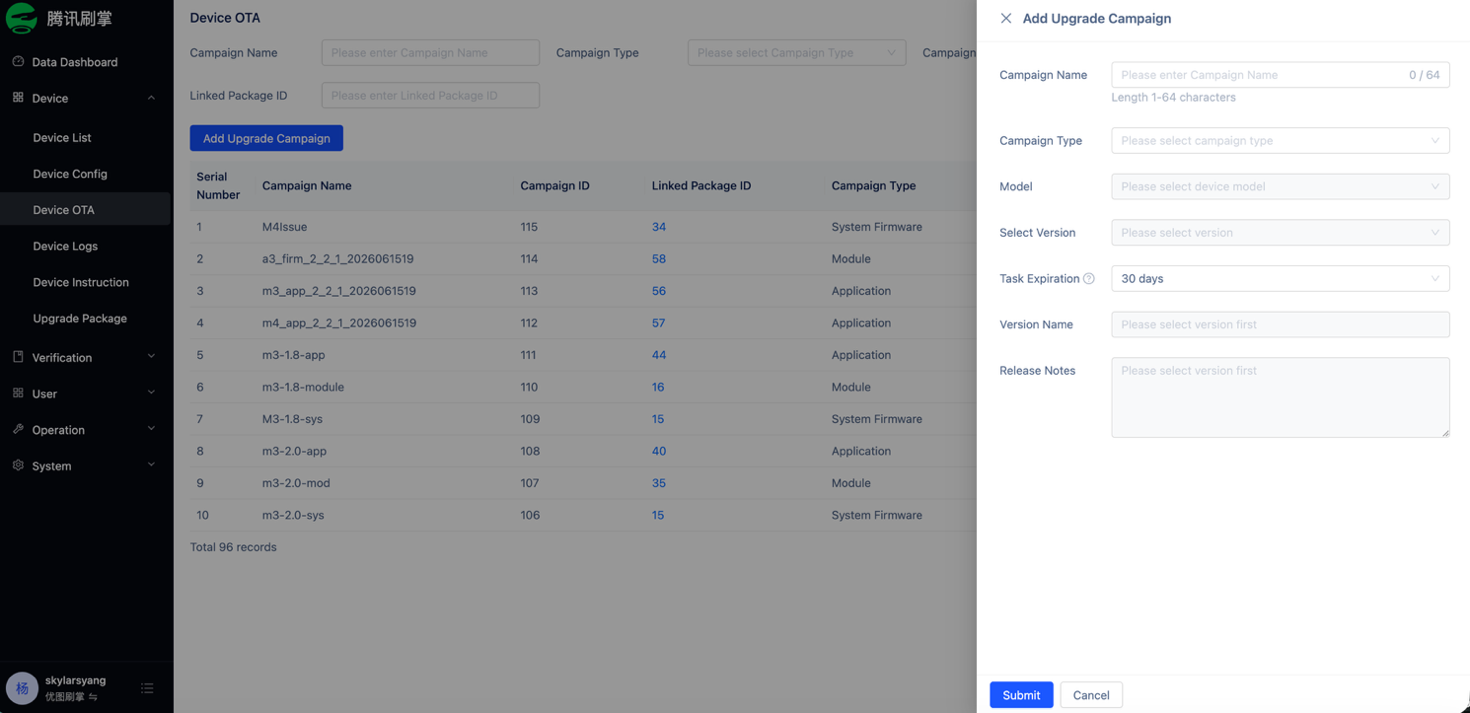
3.1.3.1 Creating an Upgrade Campaign
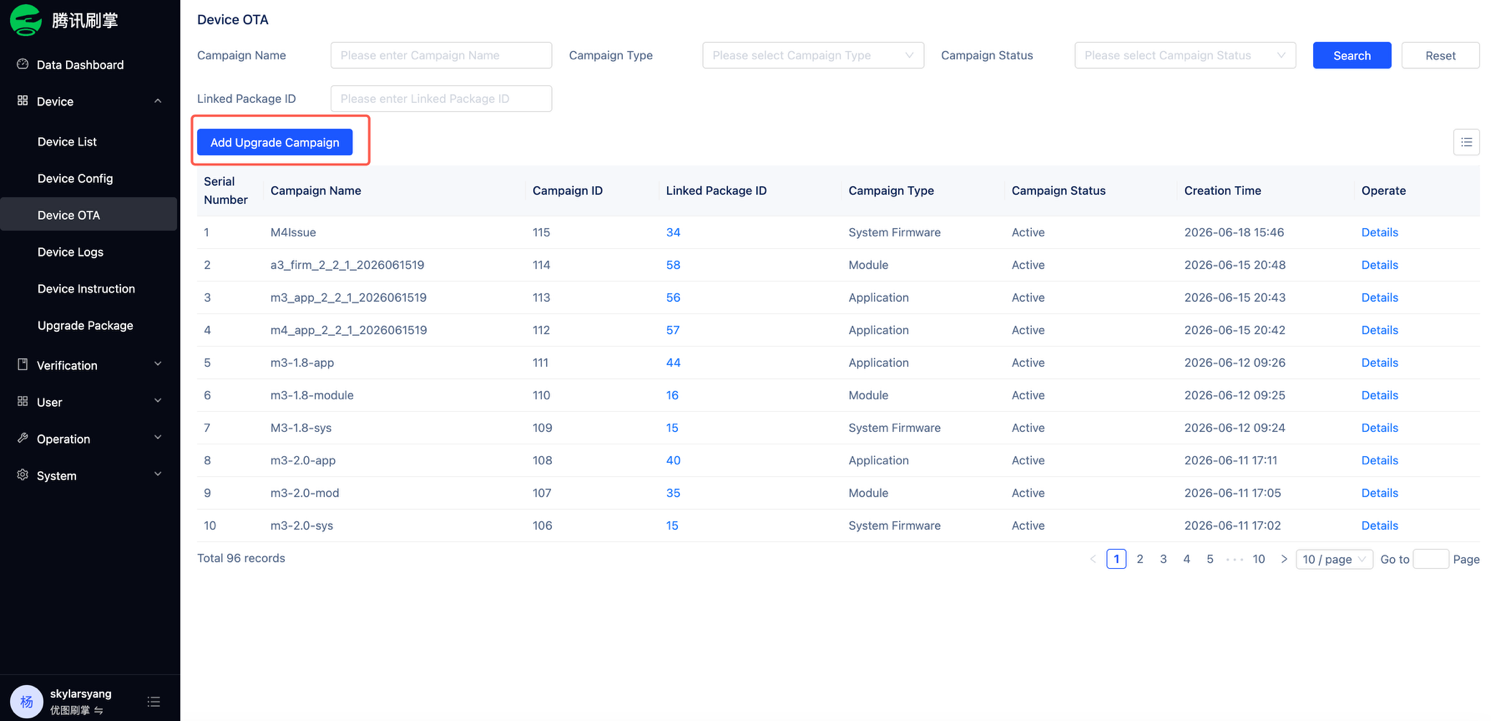
- Click Add Upgrade Campaign.
- Enter the task name, type, model, version, and task expiration time.
- Submit the upgrade campaign.
The new upgrade campaign appears on the page.
Configuring an Upgrade Campaign by Package
When creating an upgrade campaign, you can separately select the packages to upgrade, such as an application package, algorithm package, or system firmware package. Binding to a complete version is no longer mandatory.
- Algorithm and application versions can be upgraded independently. A module firmware upgrade can include the latest algorithm package.
- An algorithm version field has been added to upgrade task details. It shows the algorithm version currently installed on the device and supports batch export.
3.1.3.2 Adding a Device Upgrade Task
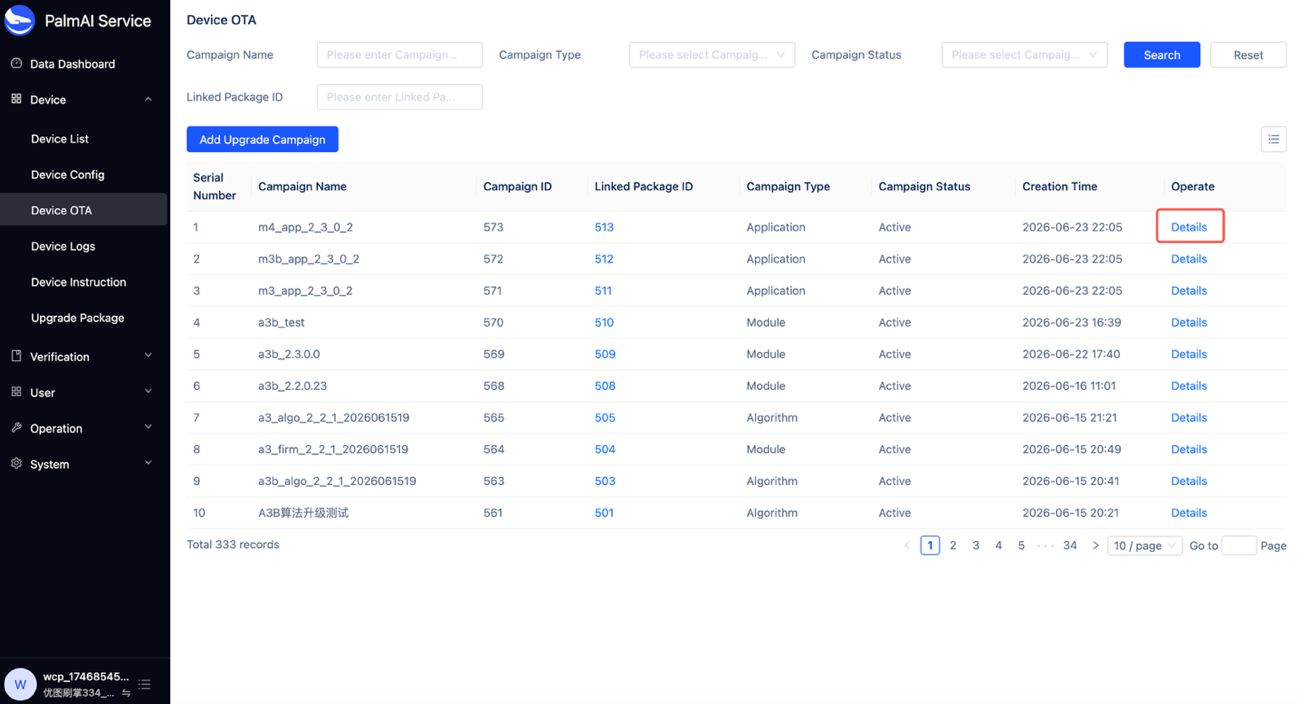
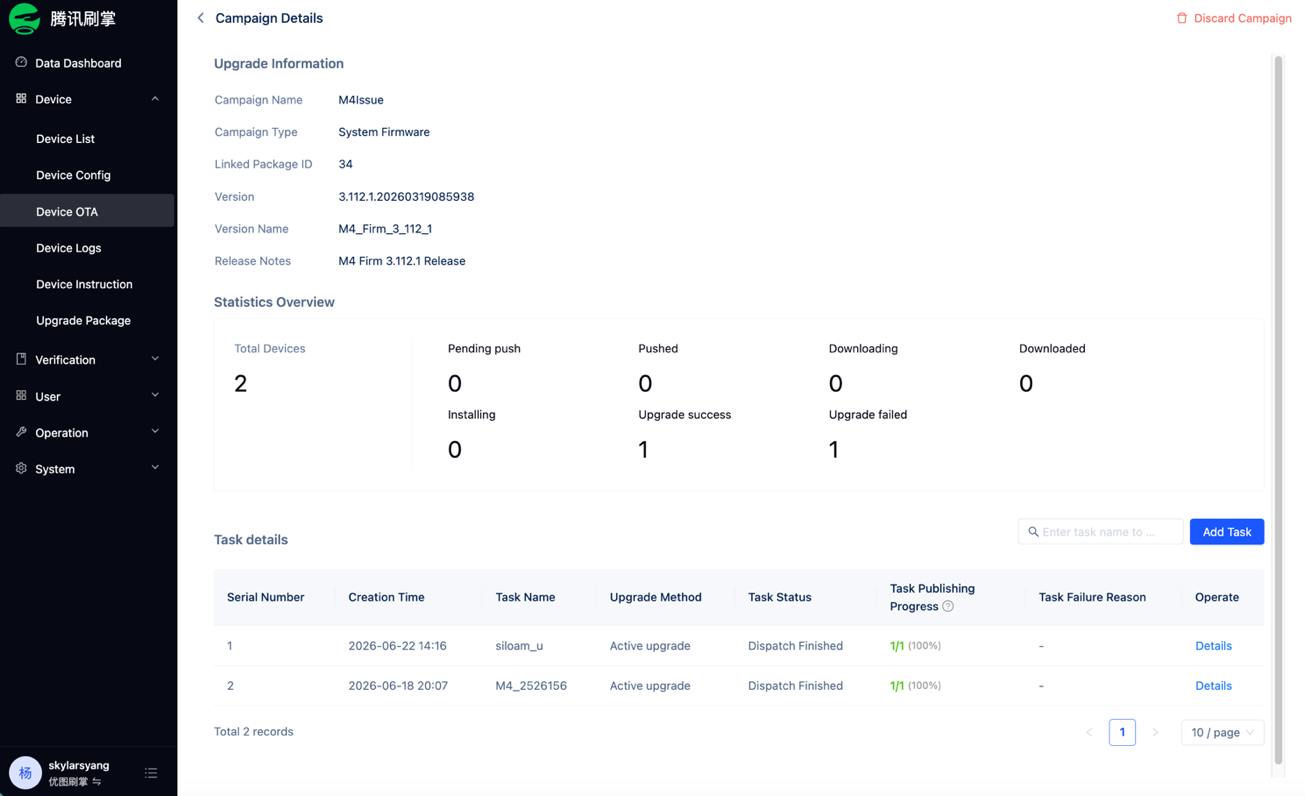
After an upgrade campaign enters the Active state, you can add a device upgrade task. When adding a task, select the associated device scope and validate the devices. After submission, you can view the dispatch status and, for a non-silent upgrade, perform the operation on the device.
- Find the target upgrade campaign and click Details.
- On the upgrade campaign details page, click Add Task.
- Enter the task name and select an upgrade method.
- Choose whether to enable Silent Upgrade.
- Select associated devices.
When Silent Upgrade is enabled, devices upgrade automatically. When Silent Upgrade is disabled, the upgrade must be performed manually on each device. For manual upgrade instructions, see "5.5.7 OTA Upgrade and Version Maintenance" in the user manual for the M3 model or "6.5.7 OTA Upgrade and Version Maintenance" in the user manual for the M4 model.
Selecting the Associated Device Scope
The associated device scope provides the following options:
- All devices: Devices registered later do not receive push messages and can only initiate an upgrade themselves.
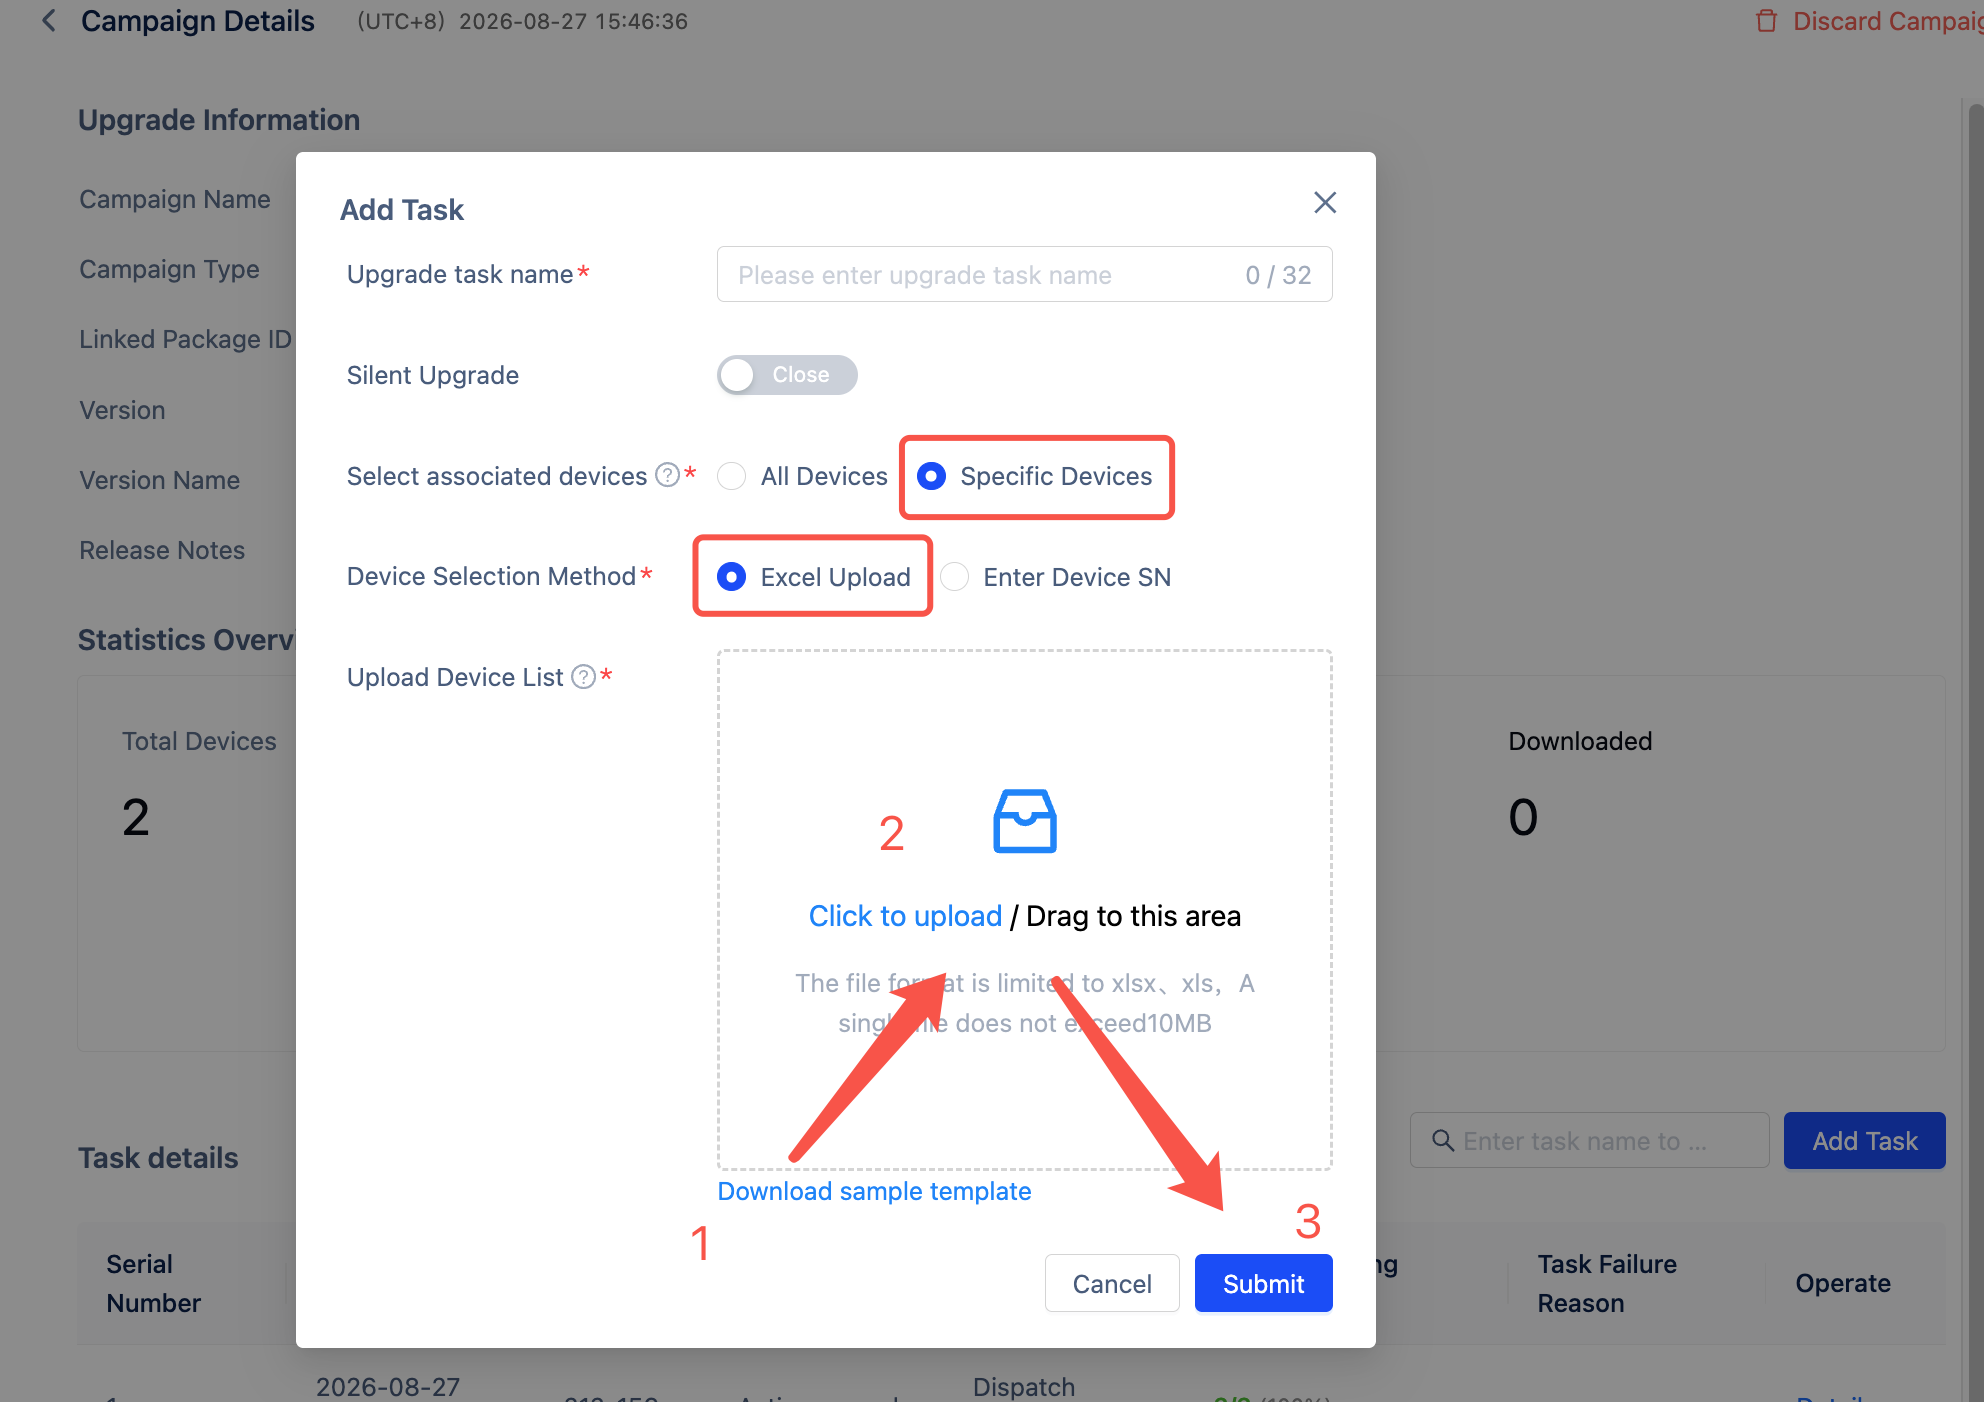
- Specified devices: The upgrade task applies only to the devices specified for this task. After selecting this option, you can download the import template and import Device SNs in batches.
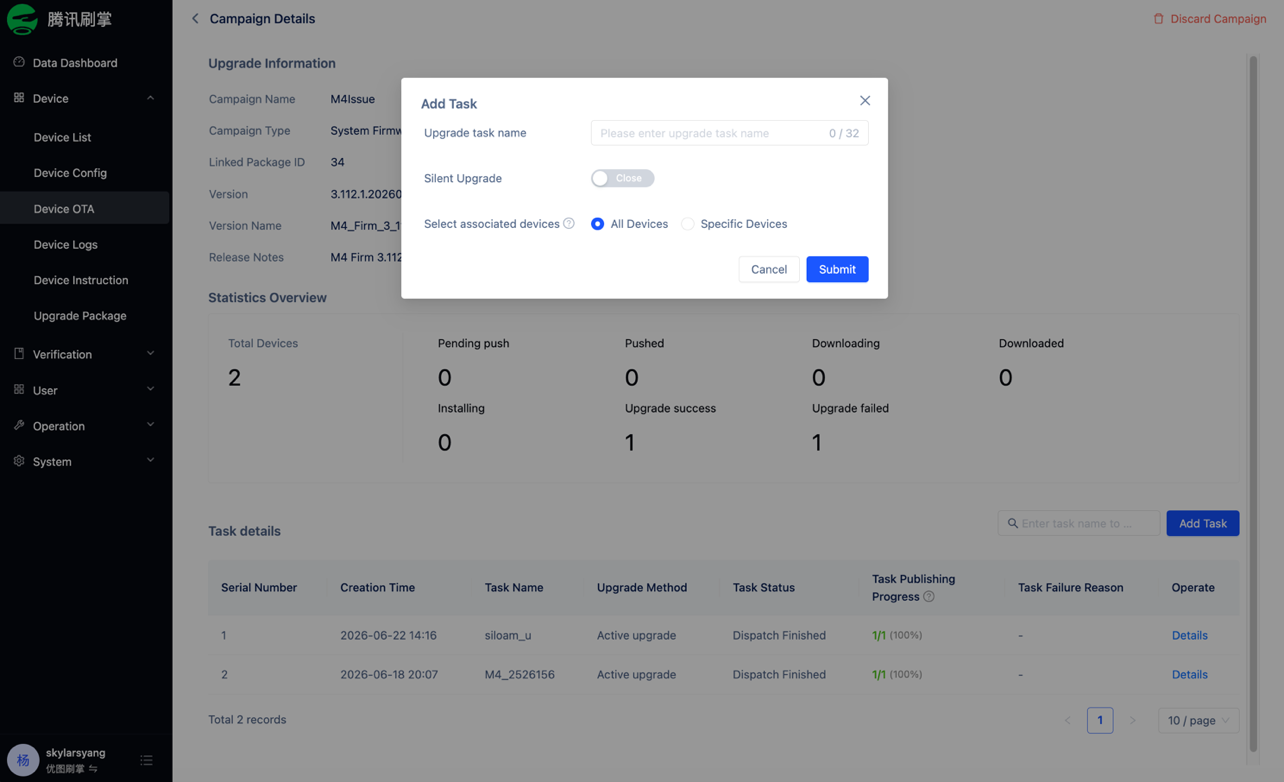
When specifying devices, enter Device SNs in either of the following ways:
-
Excel Upload: Download the specified template, enter the device information, upload the template, and click Submit.
-
Enter Device SN:
- Enter a Device SN directly.
- Click Check Device to verify that the device number is correct.
- After validation succeeds, click Submit.
If the input is incorrect, the system displays a message.
Validating and Submitting Devices
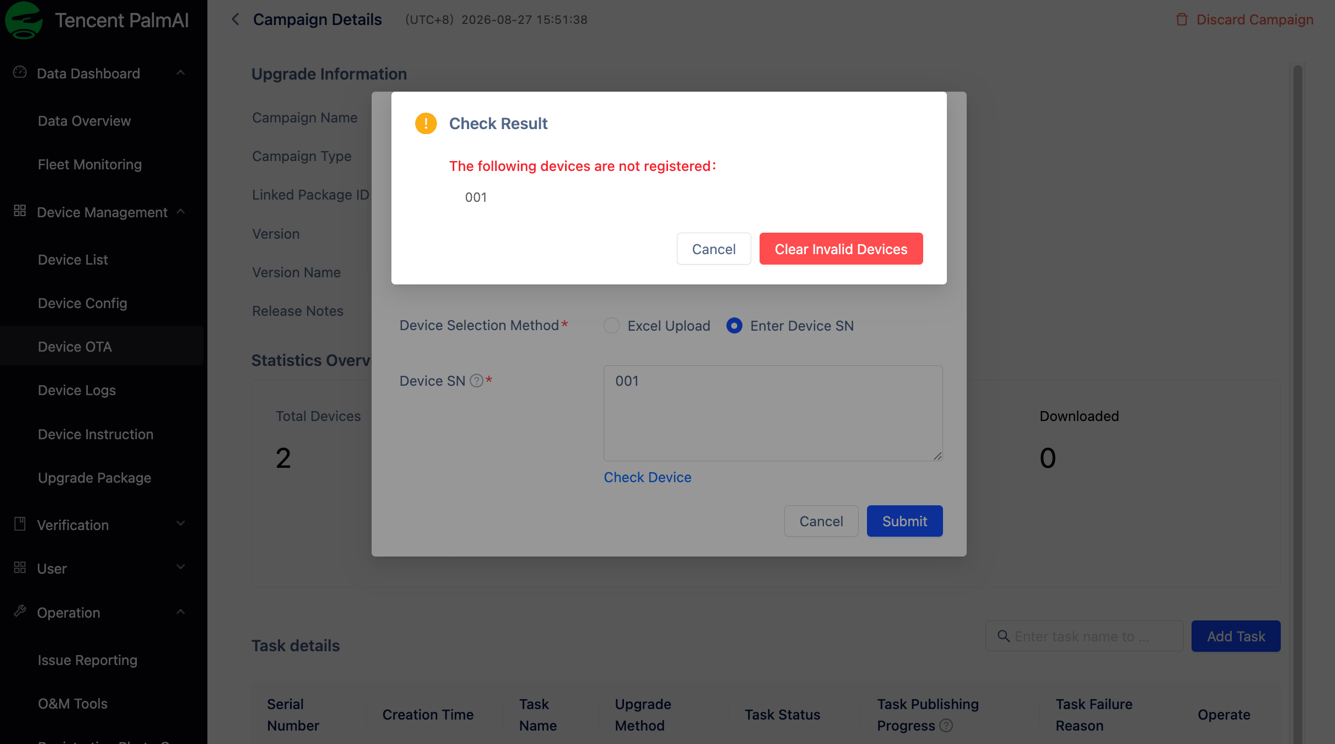
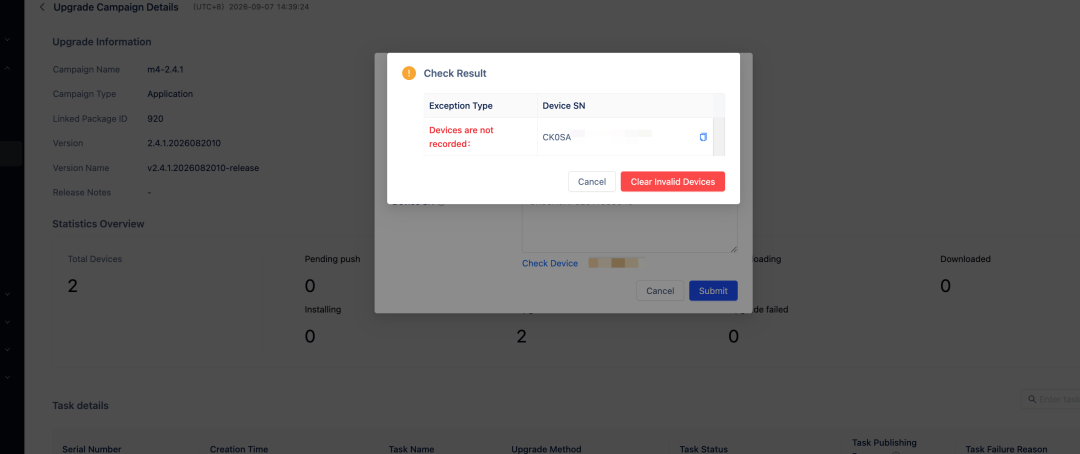
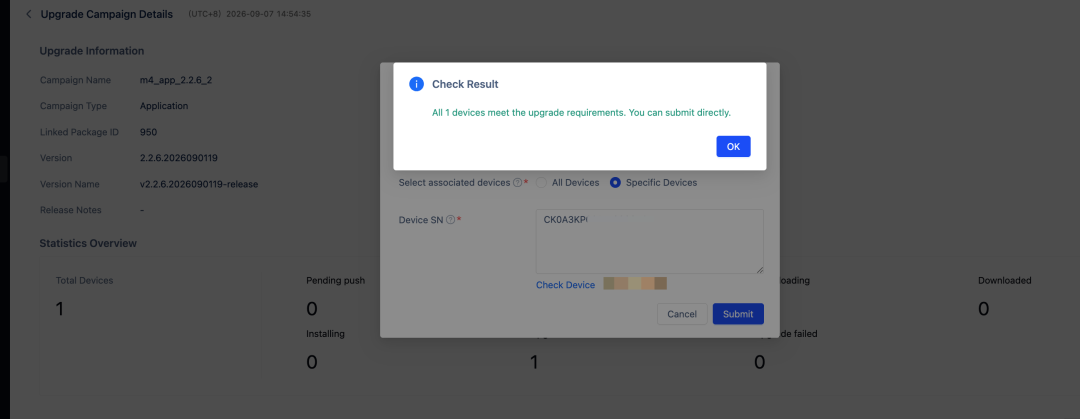
- After entering the devices, click Check Device.
- Process the devices based on the validation result:
- If a device has not been registered in PalmAI Admin Web, the system displays
Devices are not recordedin the Check Result dialog. Click Clear Invalid Devices to remove invalid devices. - If all devices meet the upgrade requirements, the system displays
All devices meet the upgrade requirements. You can submit directly..
- If a device has not been registered in PalmAI Admin Web, the system displays
- After validation succeeds, click OK.
- Click Submit to submit the upgrade task.
Viewing Task Dispatch Status
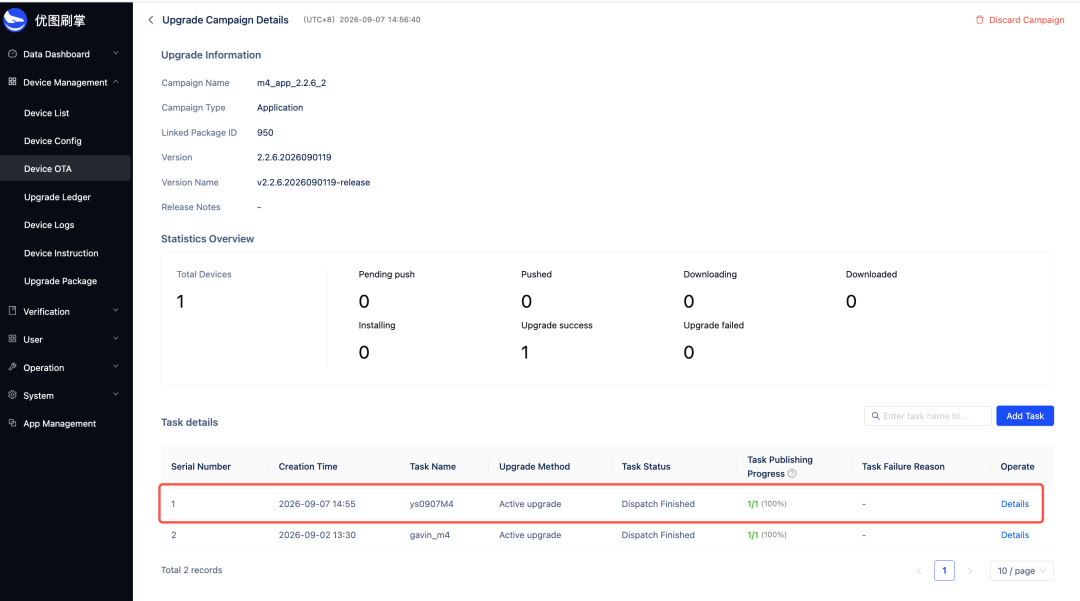
After a task is submitted, the system begins dispatching the upgrade task to devices. During dispatch, the task is in the pending push or pushing state. When dispatch is complete, the task status is Dispatch Finished, and Task Publishing Progress shows the push progress. After devices complete the upgrade, the Upgrade success count under Statistics Overview is updated.
Device-Side Operations for Non-Silent Upgrades
When Silent Upgrade is disabled, the device does not upgrade automatically after PalmAI Admin Web dispatches the task. A red dot appears beside any component with an available upgrade on the device's Setting page.
To view device component versions, return to the Setting page and scroll down:
| Entry | Displayed Content |
|---|---|
| System update | System version. |
| App update | Application version. |
| Module update | Module version. |
| Algo update | Algorithm version. |
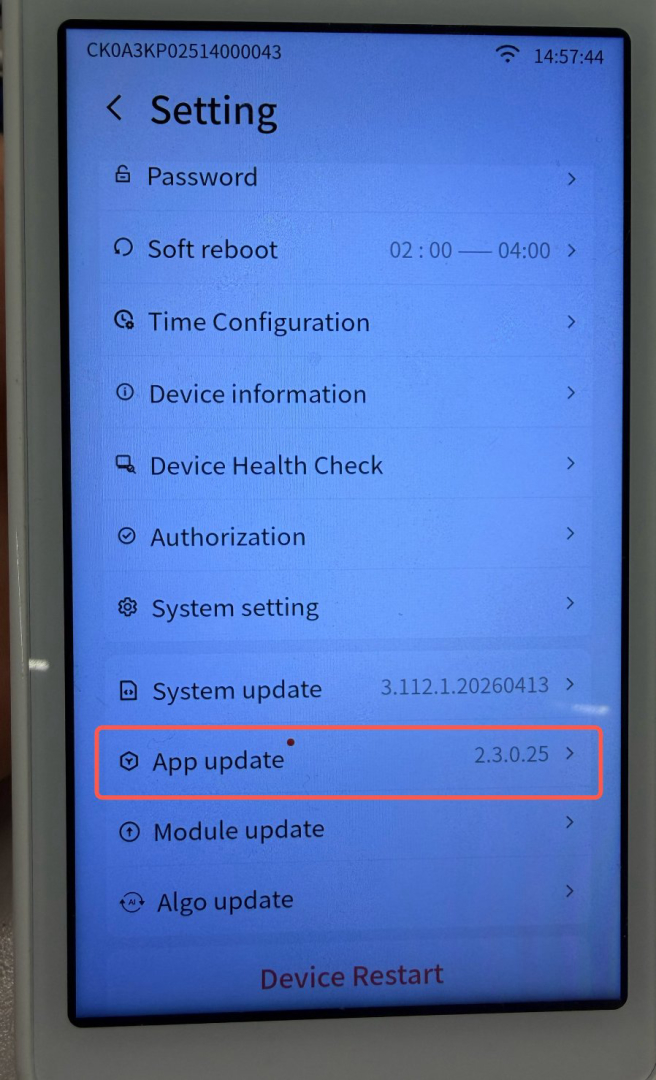
- Tap the upgrade entry marked with a red dot.
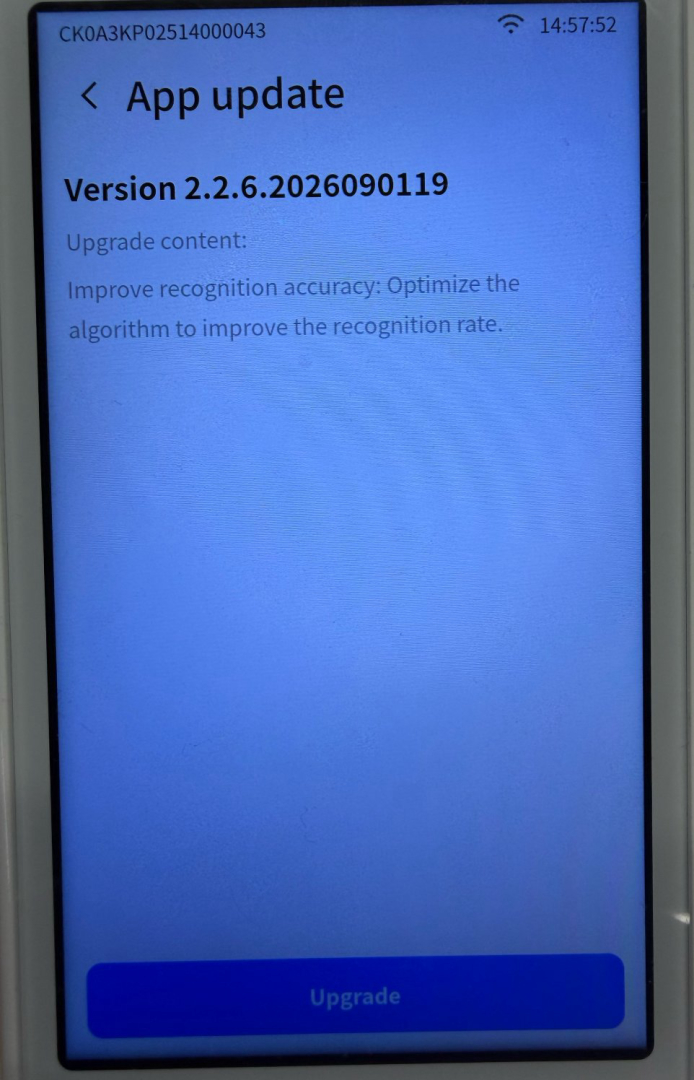
- Review the target version and upgrade details.
- Tap Upgrade to start the upgrade.
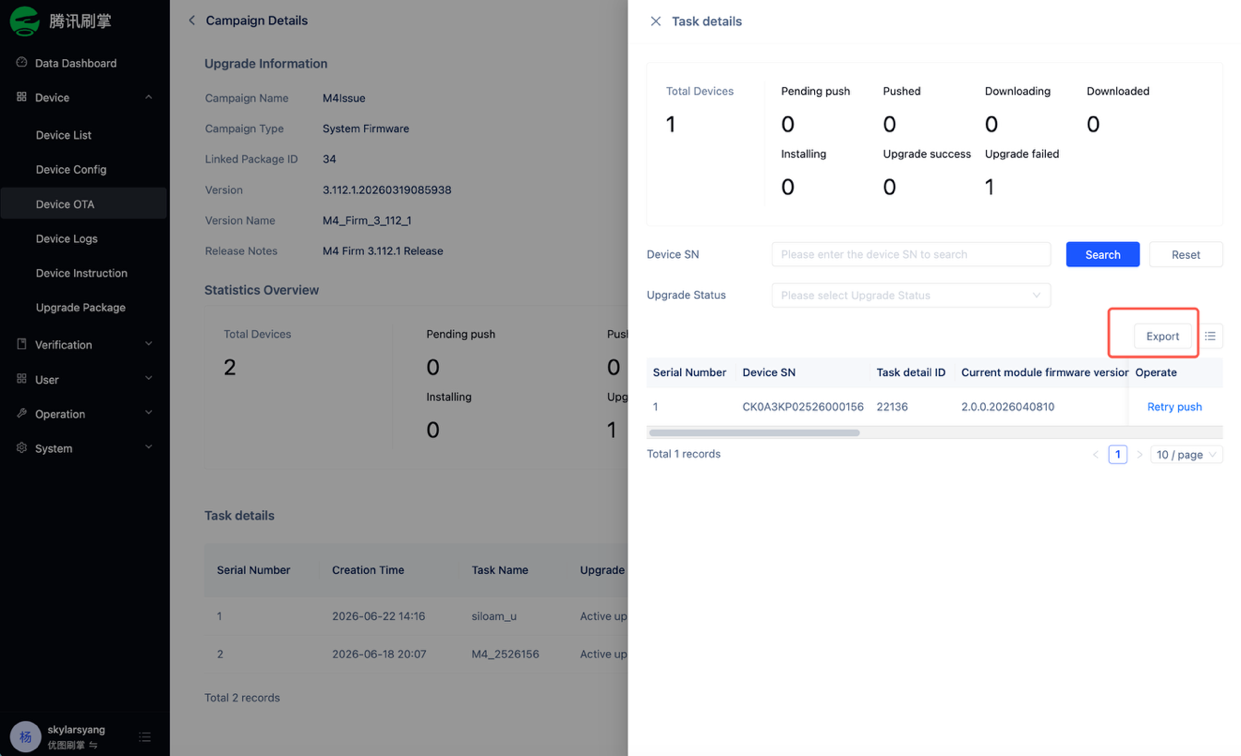
3.1.3.3 Viewing and Exporting Task Details
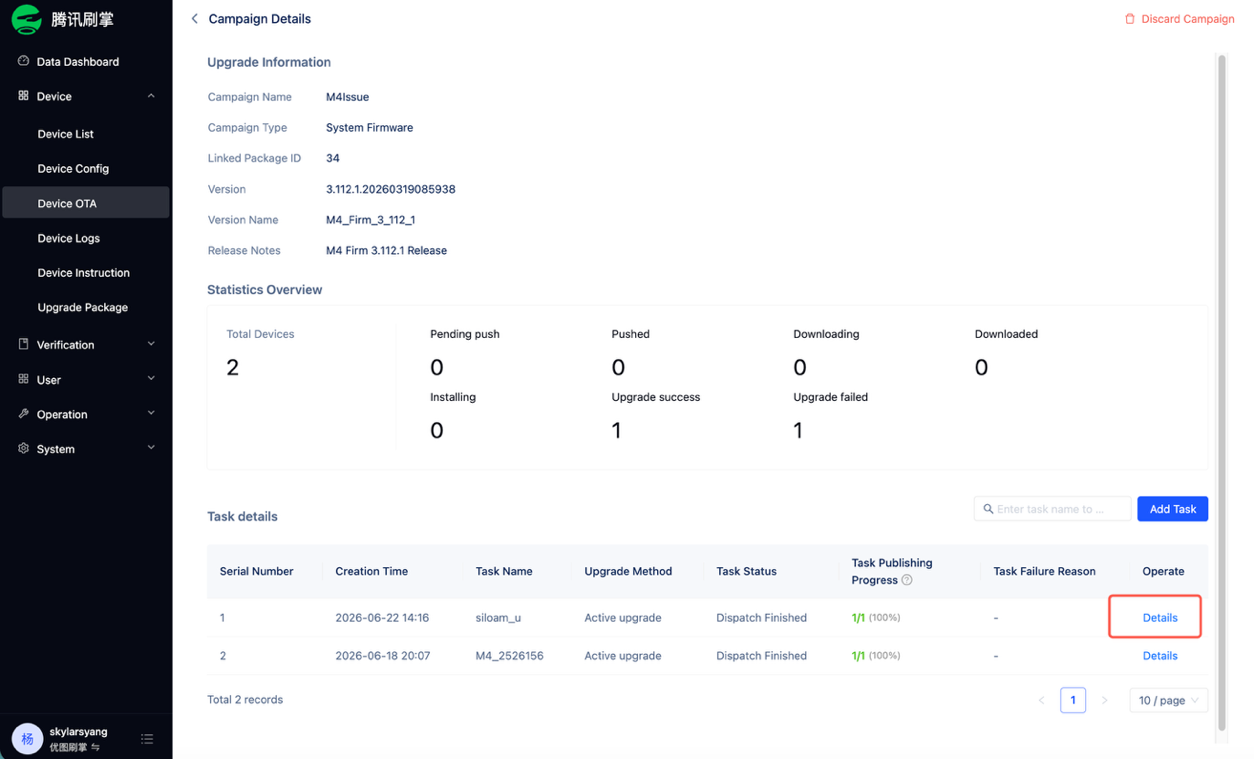
- Find the target task and click Details.
- View the data overview at the top of the page and the task data summarized by status.
- View task details, including Device SN, current version, task status, push failure count, and last failure reason.
- To export task details, click Export.
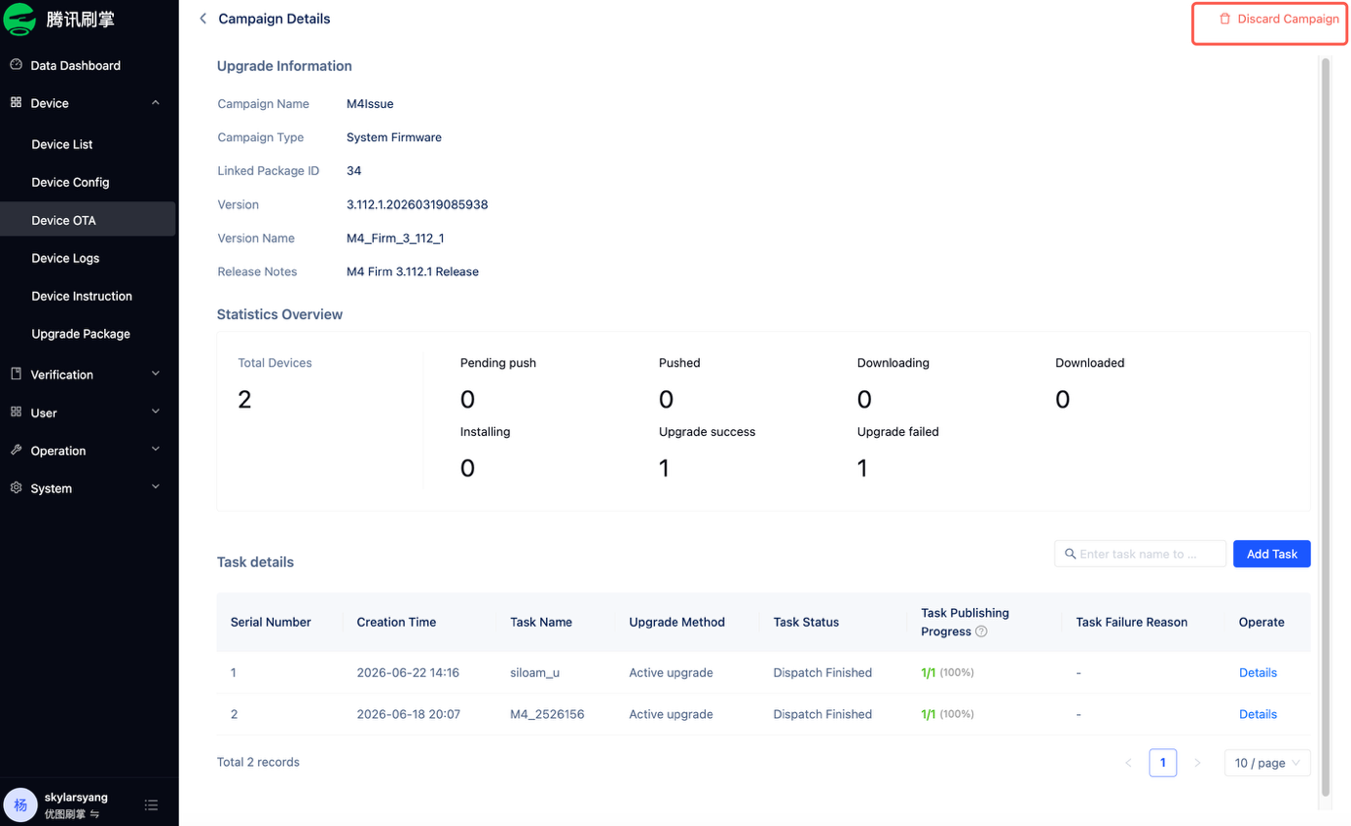
3.1.3.4 Discarding an Upgrade Campaign
- Find the target upgrade campaign and click Details.
- On the upgrade campaign details page, click Discard Campaign.
3.1.4 Device Logs
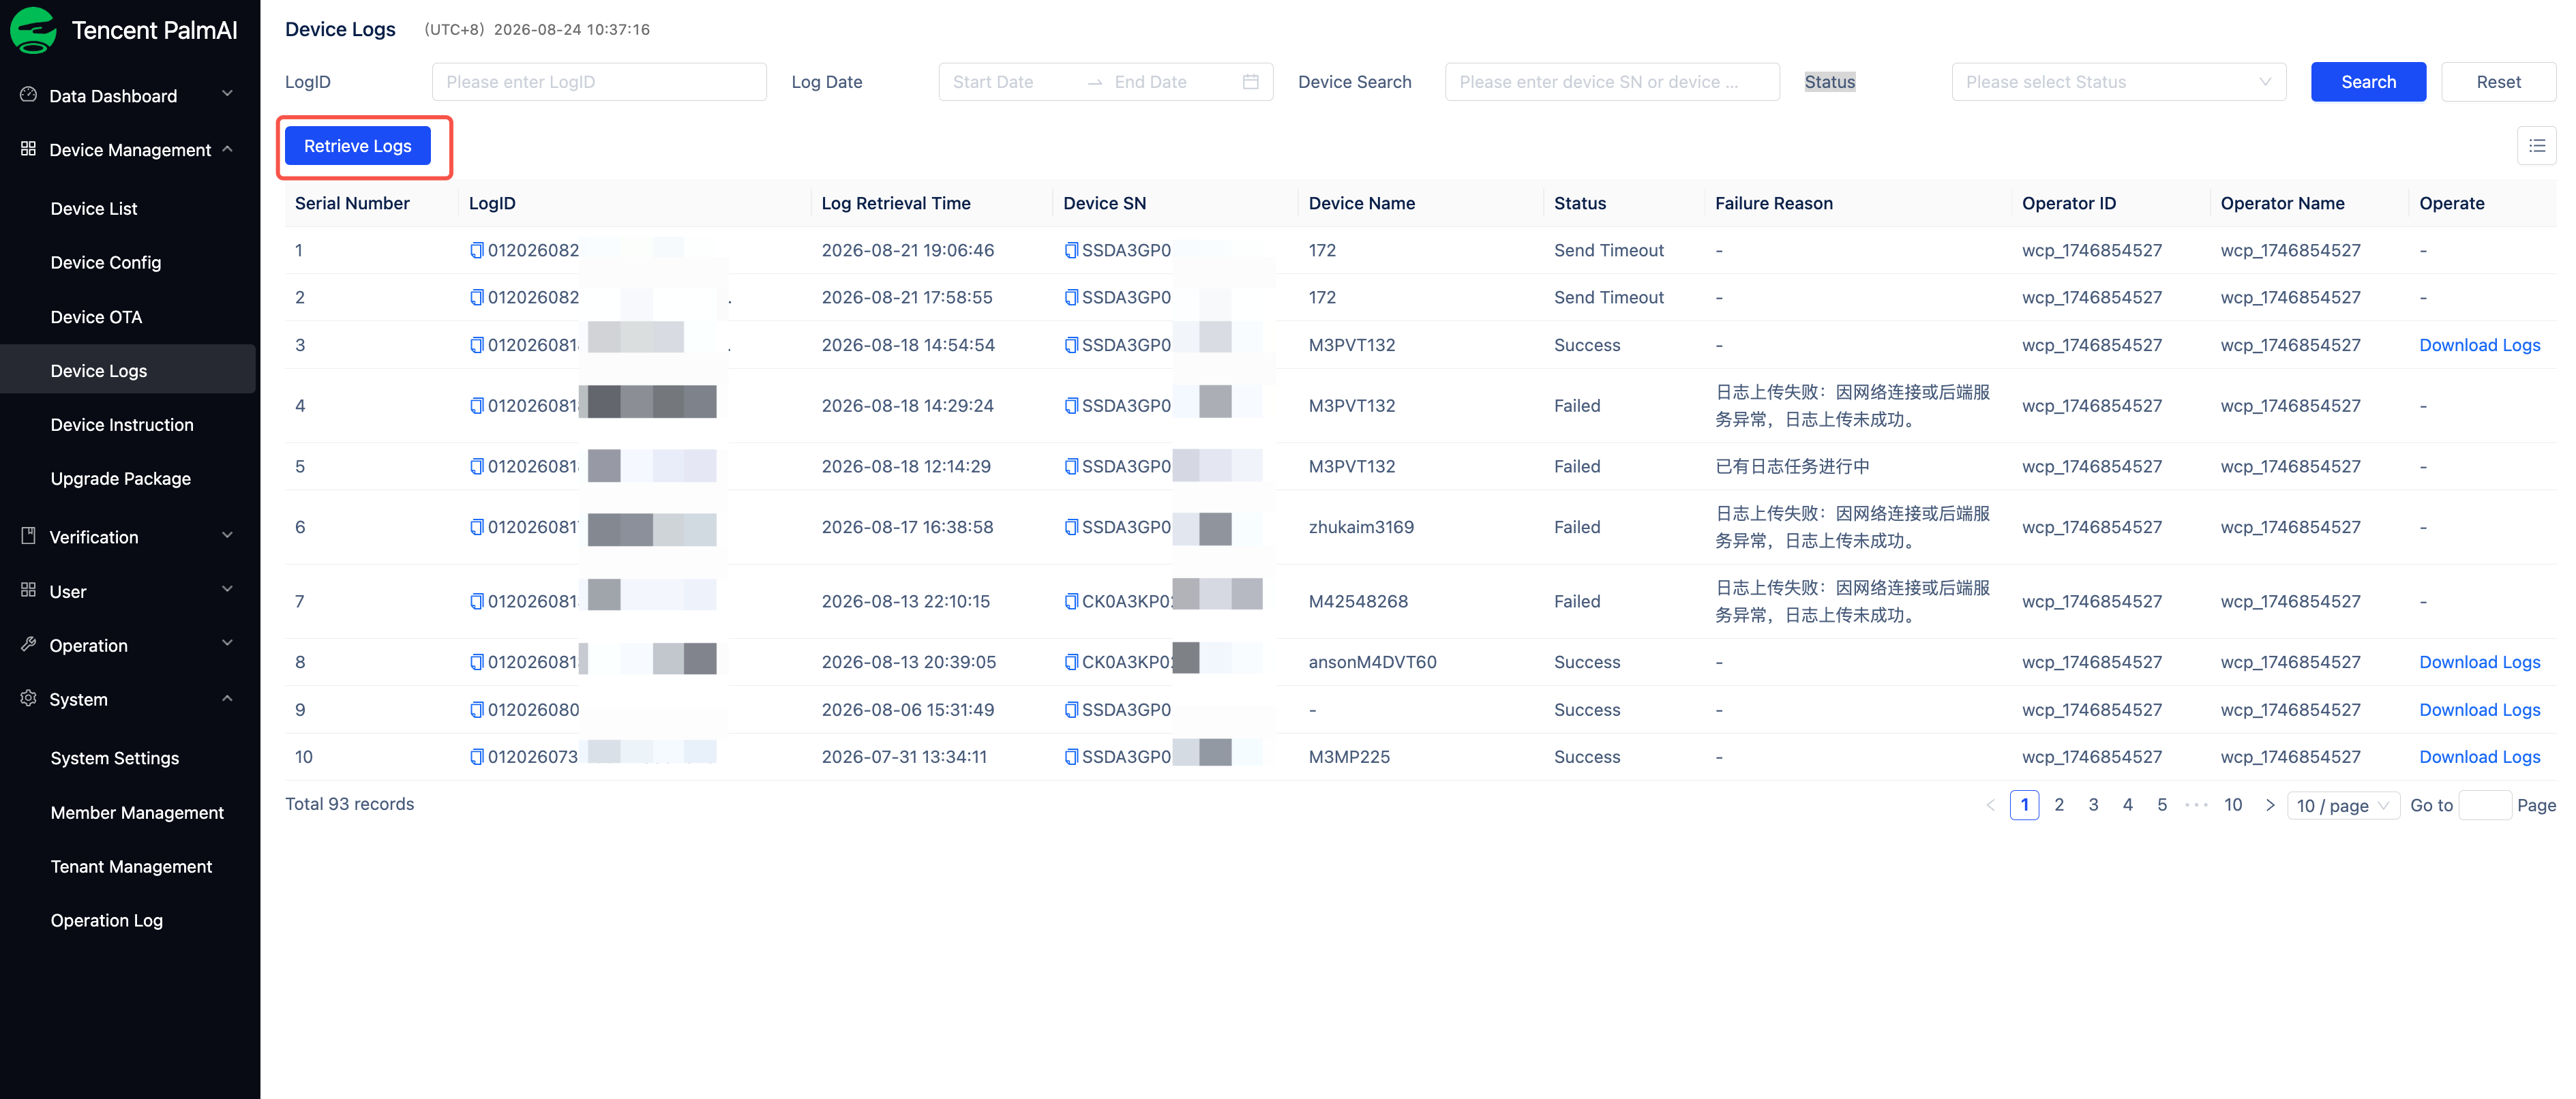
The Device Logs page supports viewing and filtering uploaded logs, downloading log files, and actively triggering a device to upload logs for a specified date.
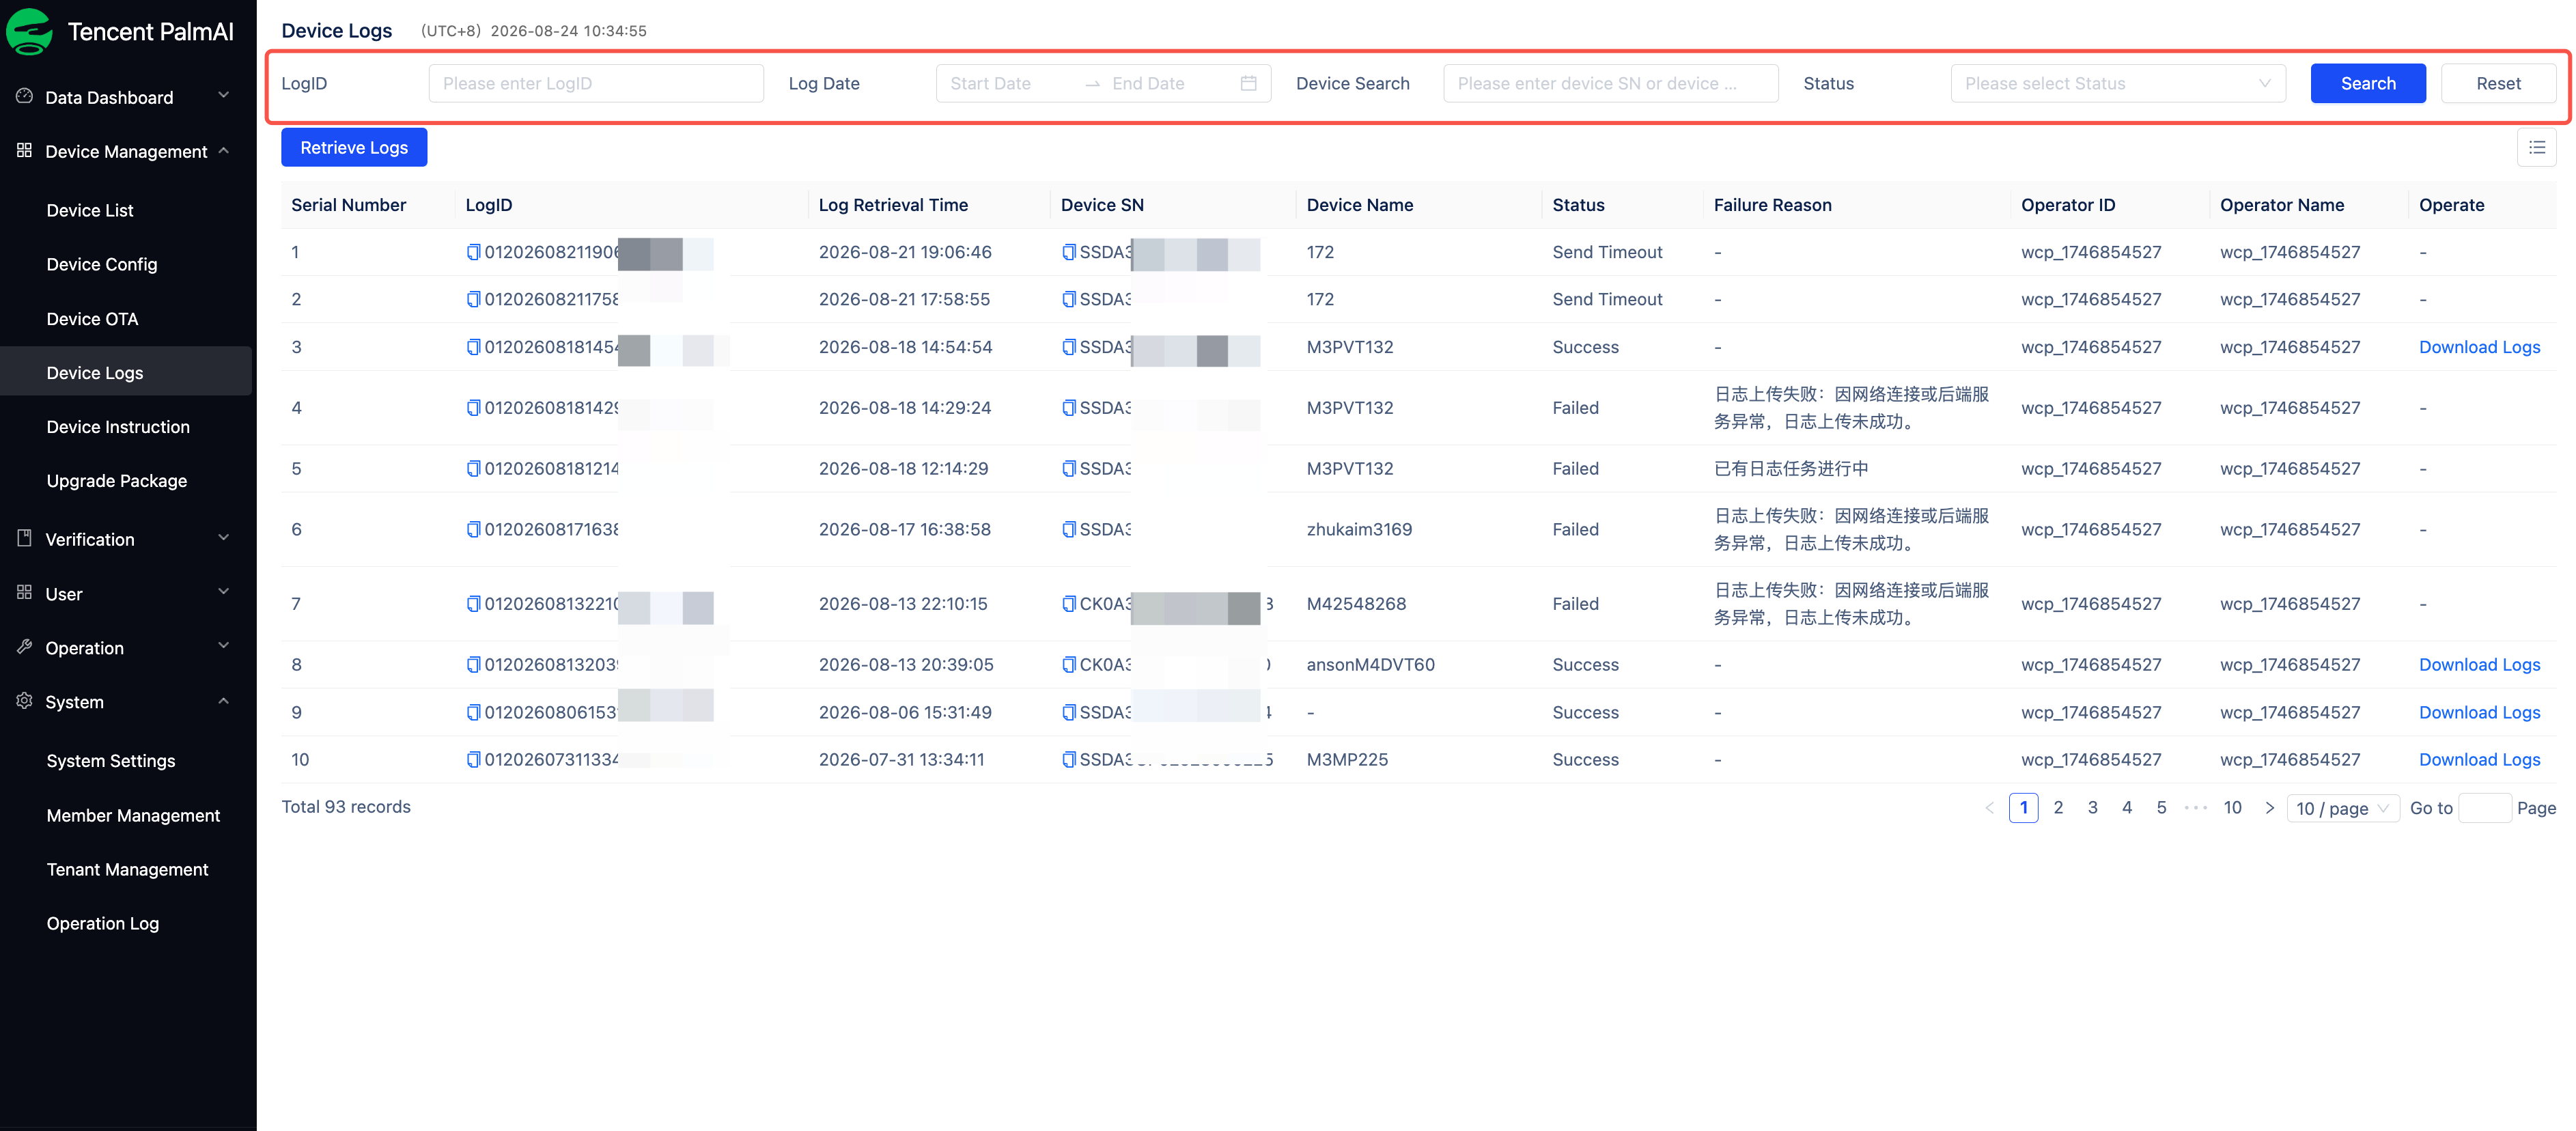
3.1.4.1 Viewing and Filtering Device Logs
- Click Device Logs.
- Filter logs by Log ID, Log Date, Device, and Status.
Note
The Device Logs feature requires the cloud platform's log service. You can click the link to use the log platform.
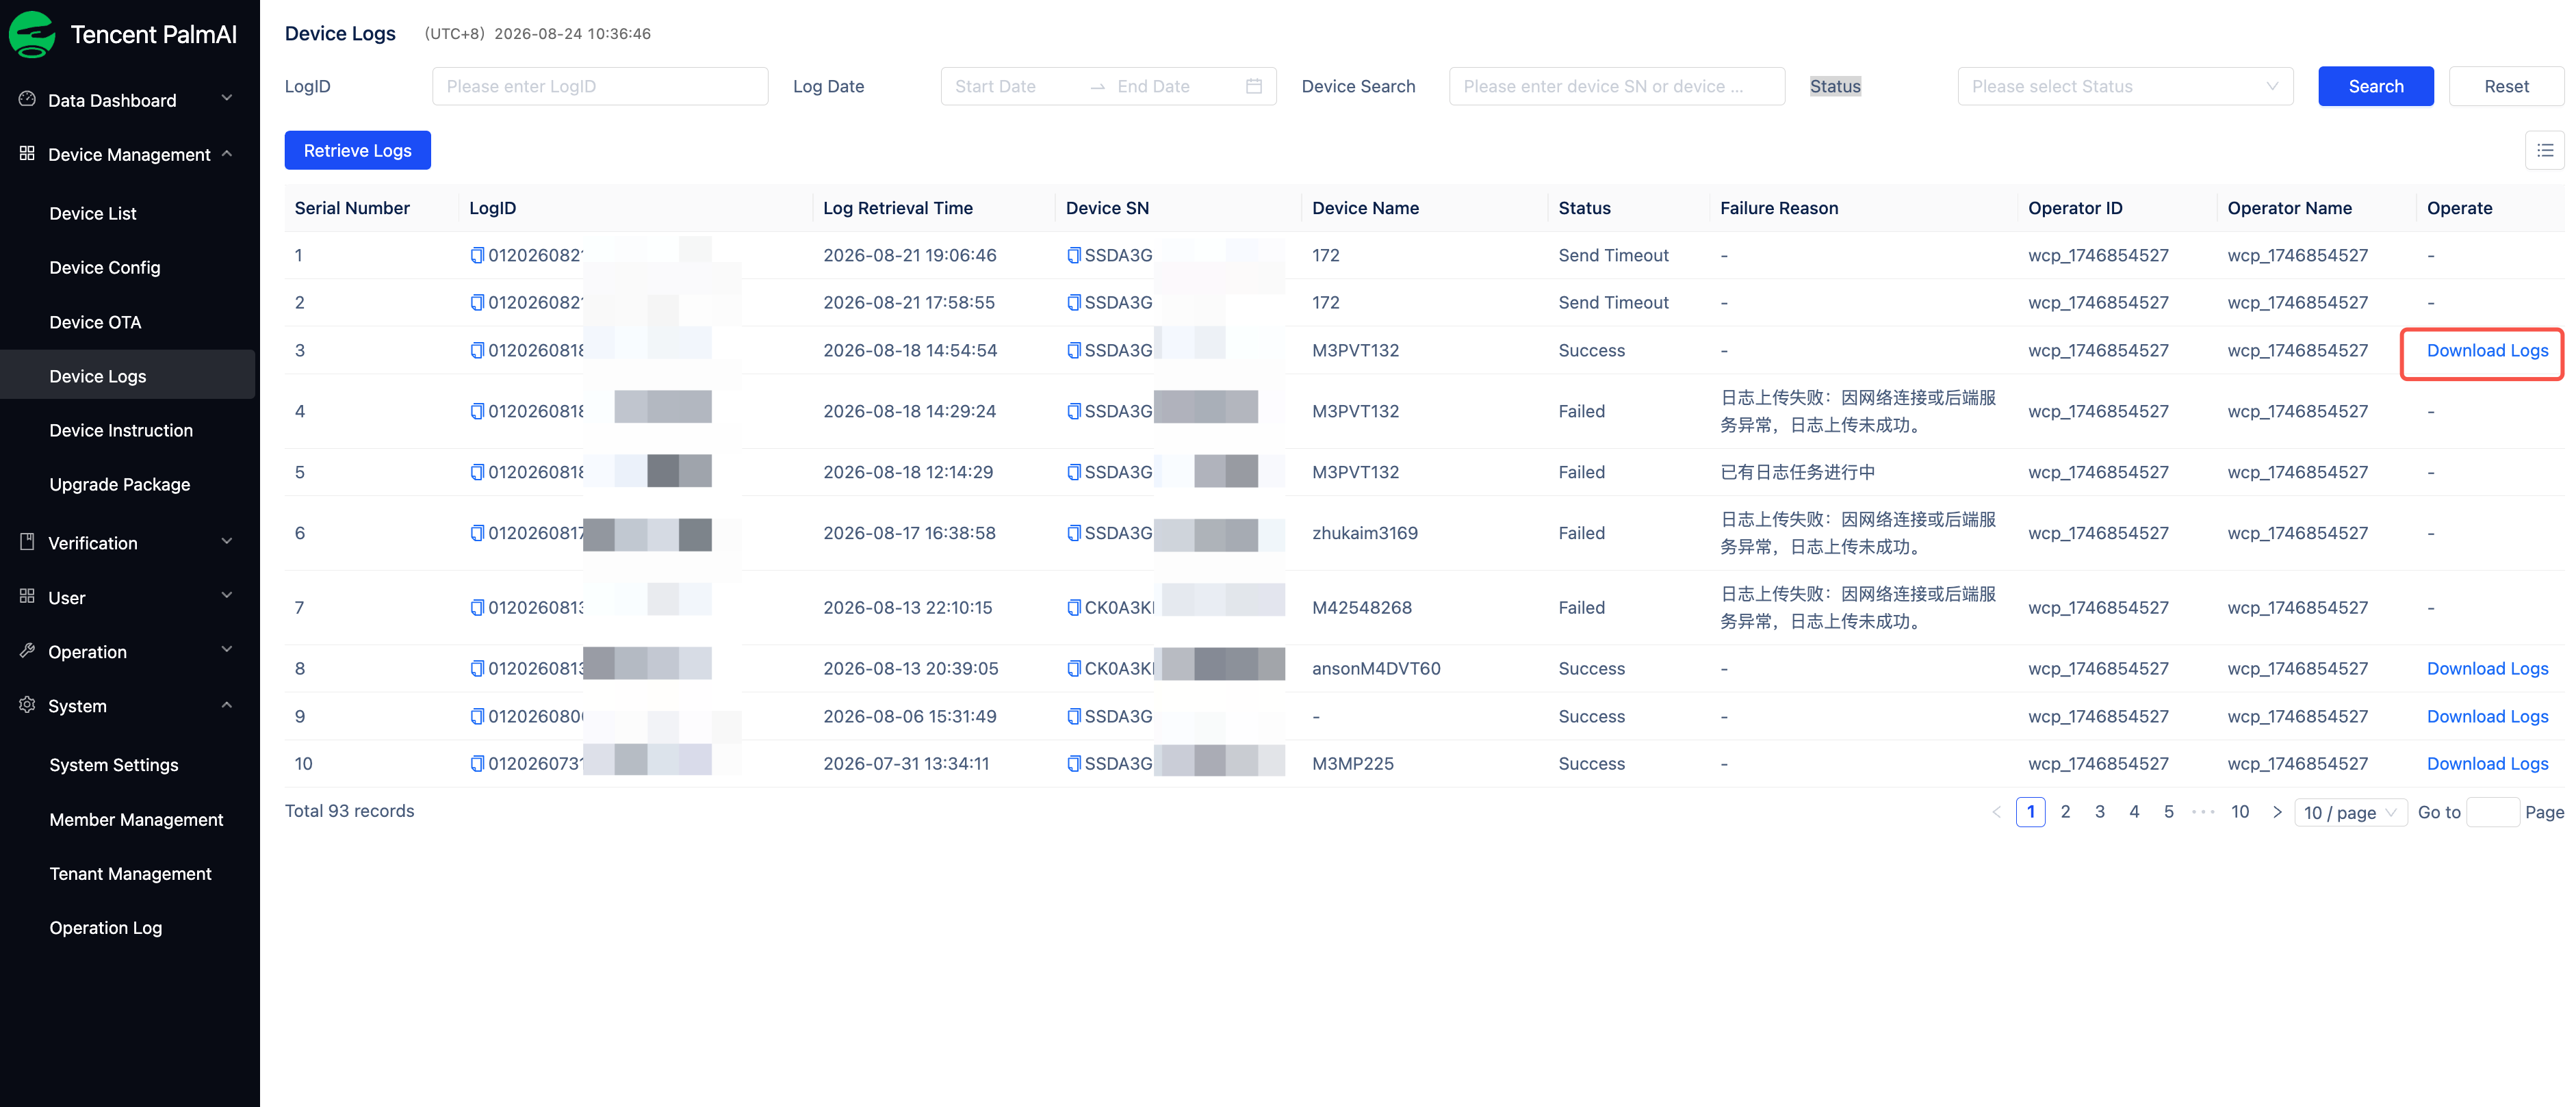
3.1.4.2 Downloading Device Logs
- Find the target log.
- Click Download Logs to download it.
3.1.4.3 Triggering a Device Log Upload
- Click Retrieve Logs.
- Enter the Device SN and date.
- Submit the log retrieval request.
The system triggers the device to upload logs for the specified date.
3.1.5 Remote Commands
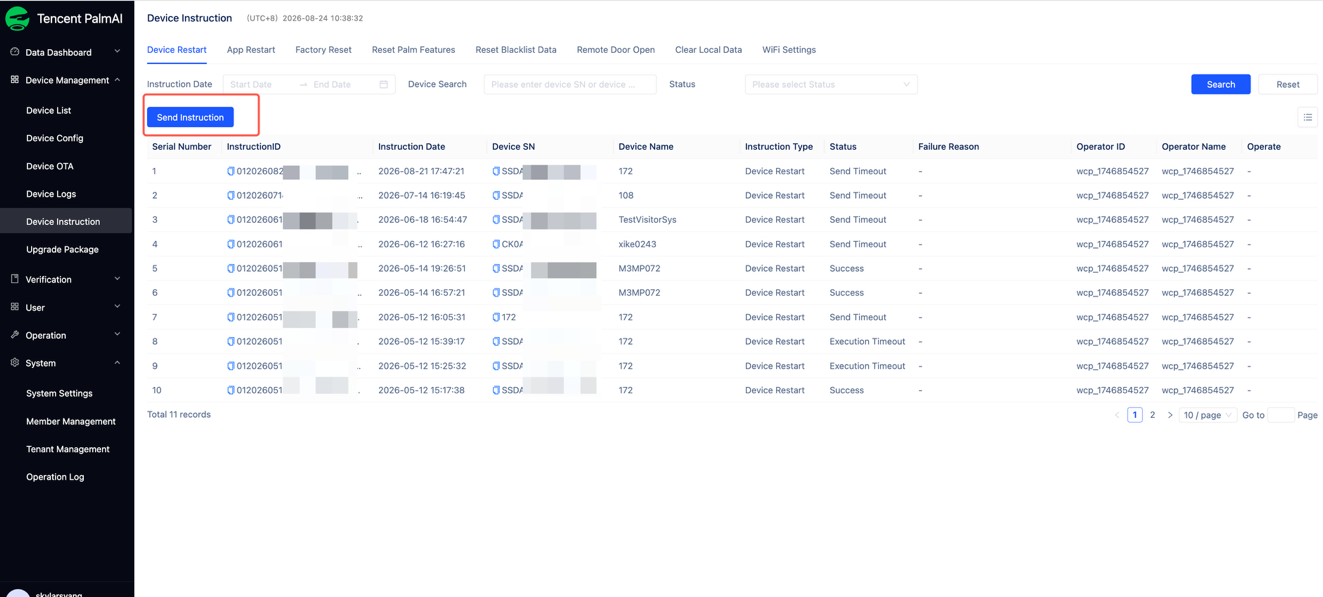
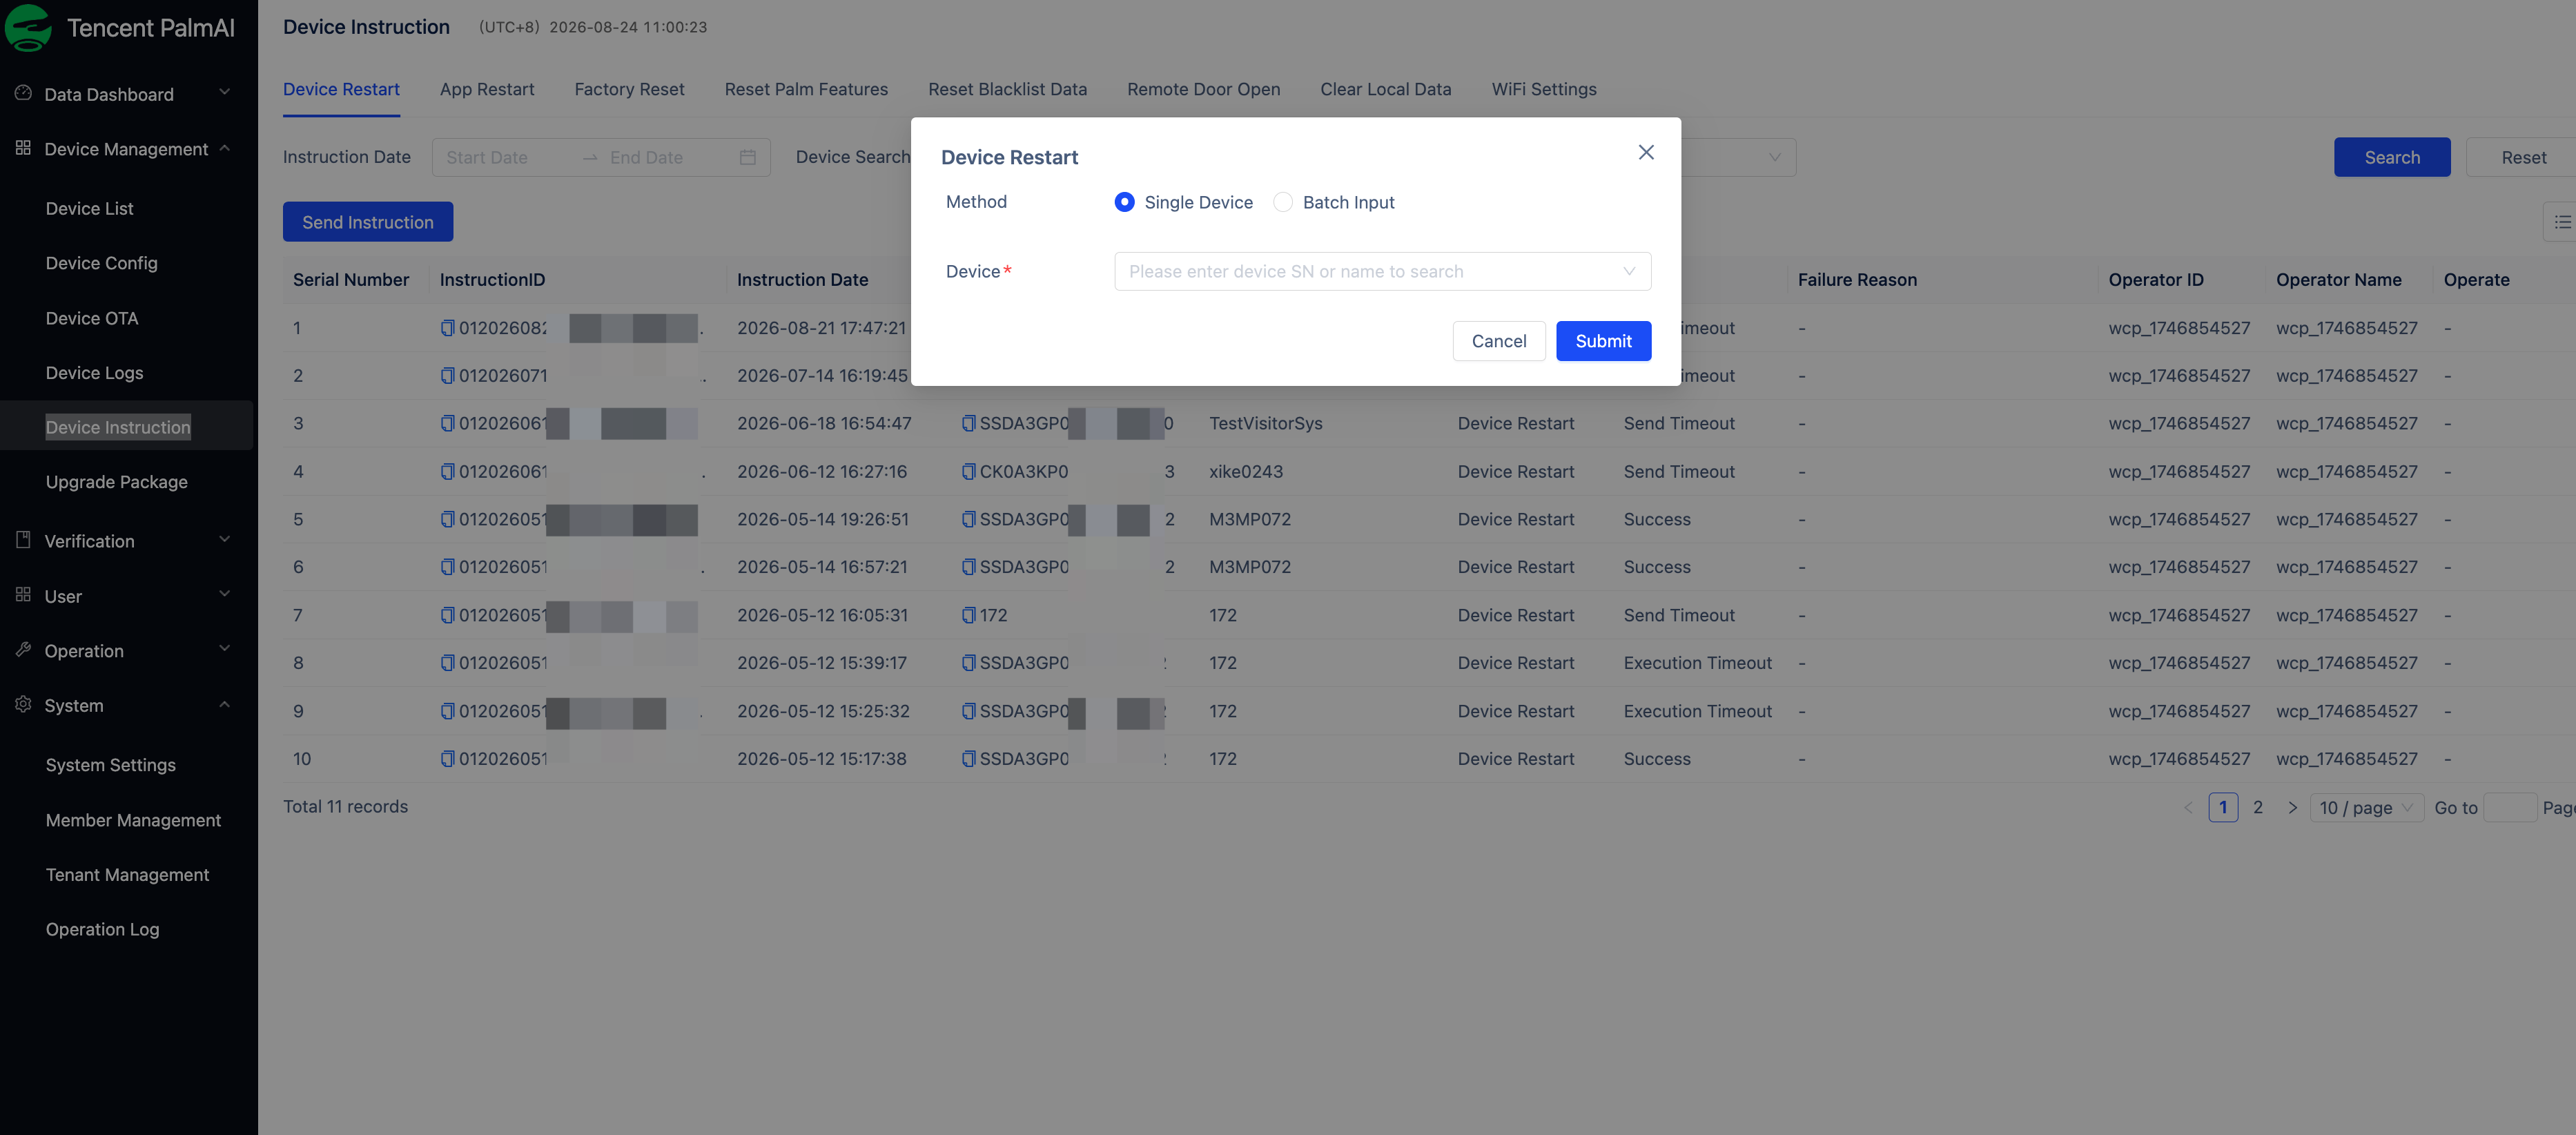
PalmAI Admin Web supports dispatching remote operation commands to devices without operating them on site.
Supported remote command types:
| Command Type | Description |
|---|---|
| Device Restart | Remotely restarts the device. |
| Application Restart | Restarts the application. |
| Restore Factory Settings | Remotely restores the device to factory settings. |
| Reset Palm Print Features | Remotely resets the device's palm print features. |
| Reset Blocklist Data | Remotely resets the device's Blocklist data. |
| Remote Door Unlock | Remotely unlocks a door using an M3 device. |
| Clear Palm Feature Database | Remotely clears the local Palm Feature Database on the device. |
| Wi-Fi Settings | Remotely dispatches Wi-Fi settings, including the Wi-Fi name and password. |
Procedure
-
Go to Device Instruction and click Send Instruction.
-
Find the target device. In the dialog, select the command type, enter the required parameters, and click Submit to send it.
-
View the command dispatch status, including
Sending,Succeeded, andFailed.
Warning
Remote command operations cannot be undone. Use them with caution.
3.1.6 Upgrade Package Management
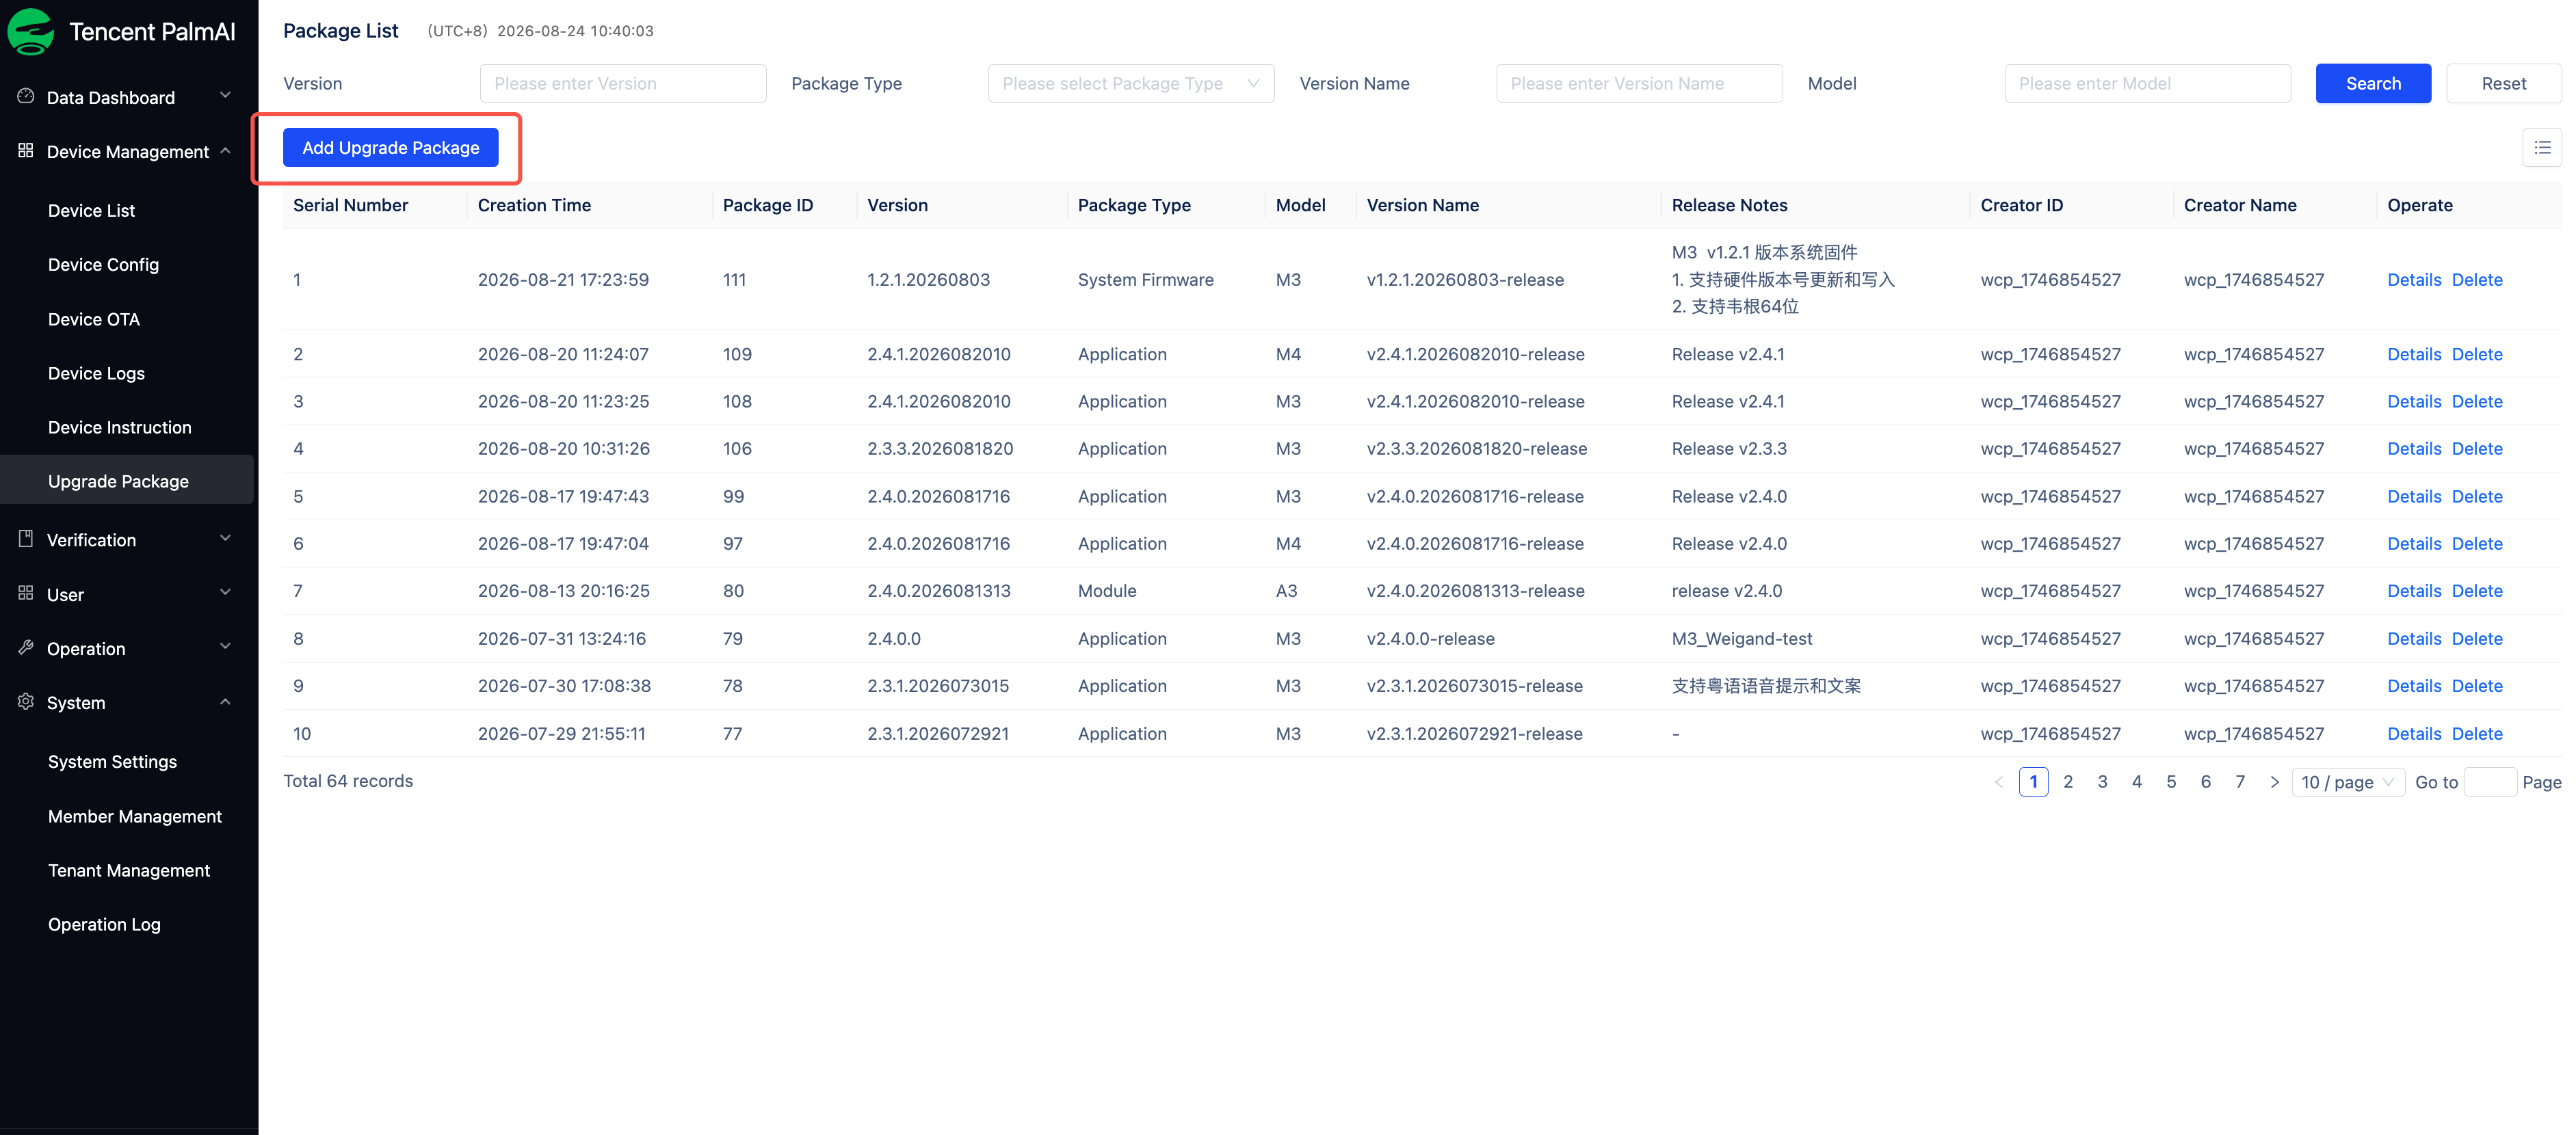
The manufacturer's technical support team provides configuration files for device-side upgrade packages to control version dependencies and upgrade order. Upgrade Package Management supports adding upgrade packages, viewing their details, and deleting them.
3.1.6.1 Adding an Upgrade Package
- Click Add Package.
- Select and upload the upgrade package.
- Enter the release notes and submit.
Note
After an upgrade package is created successfully, you can view its details but cannot modify it.
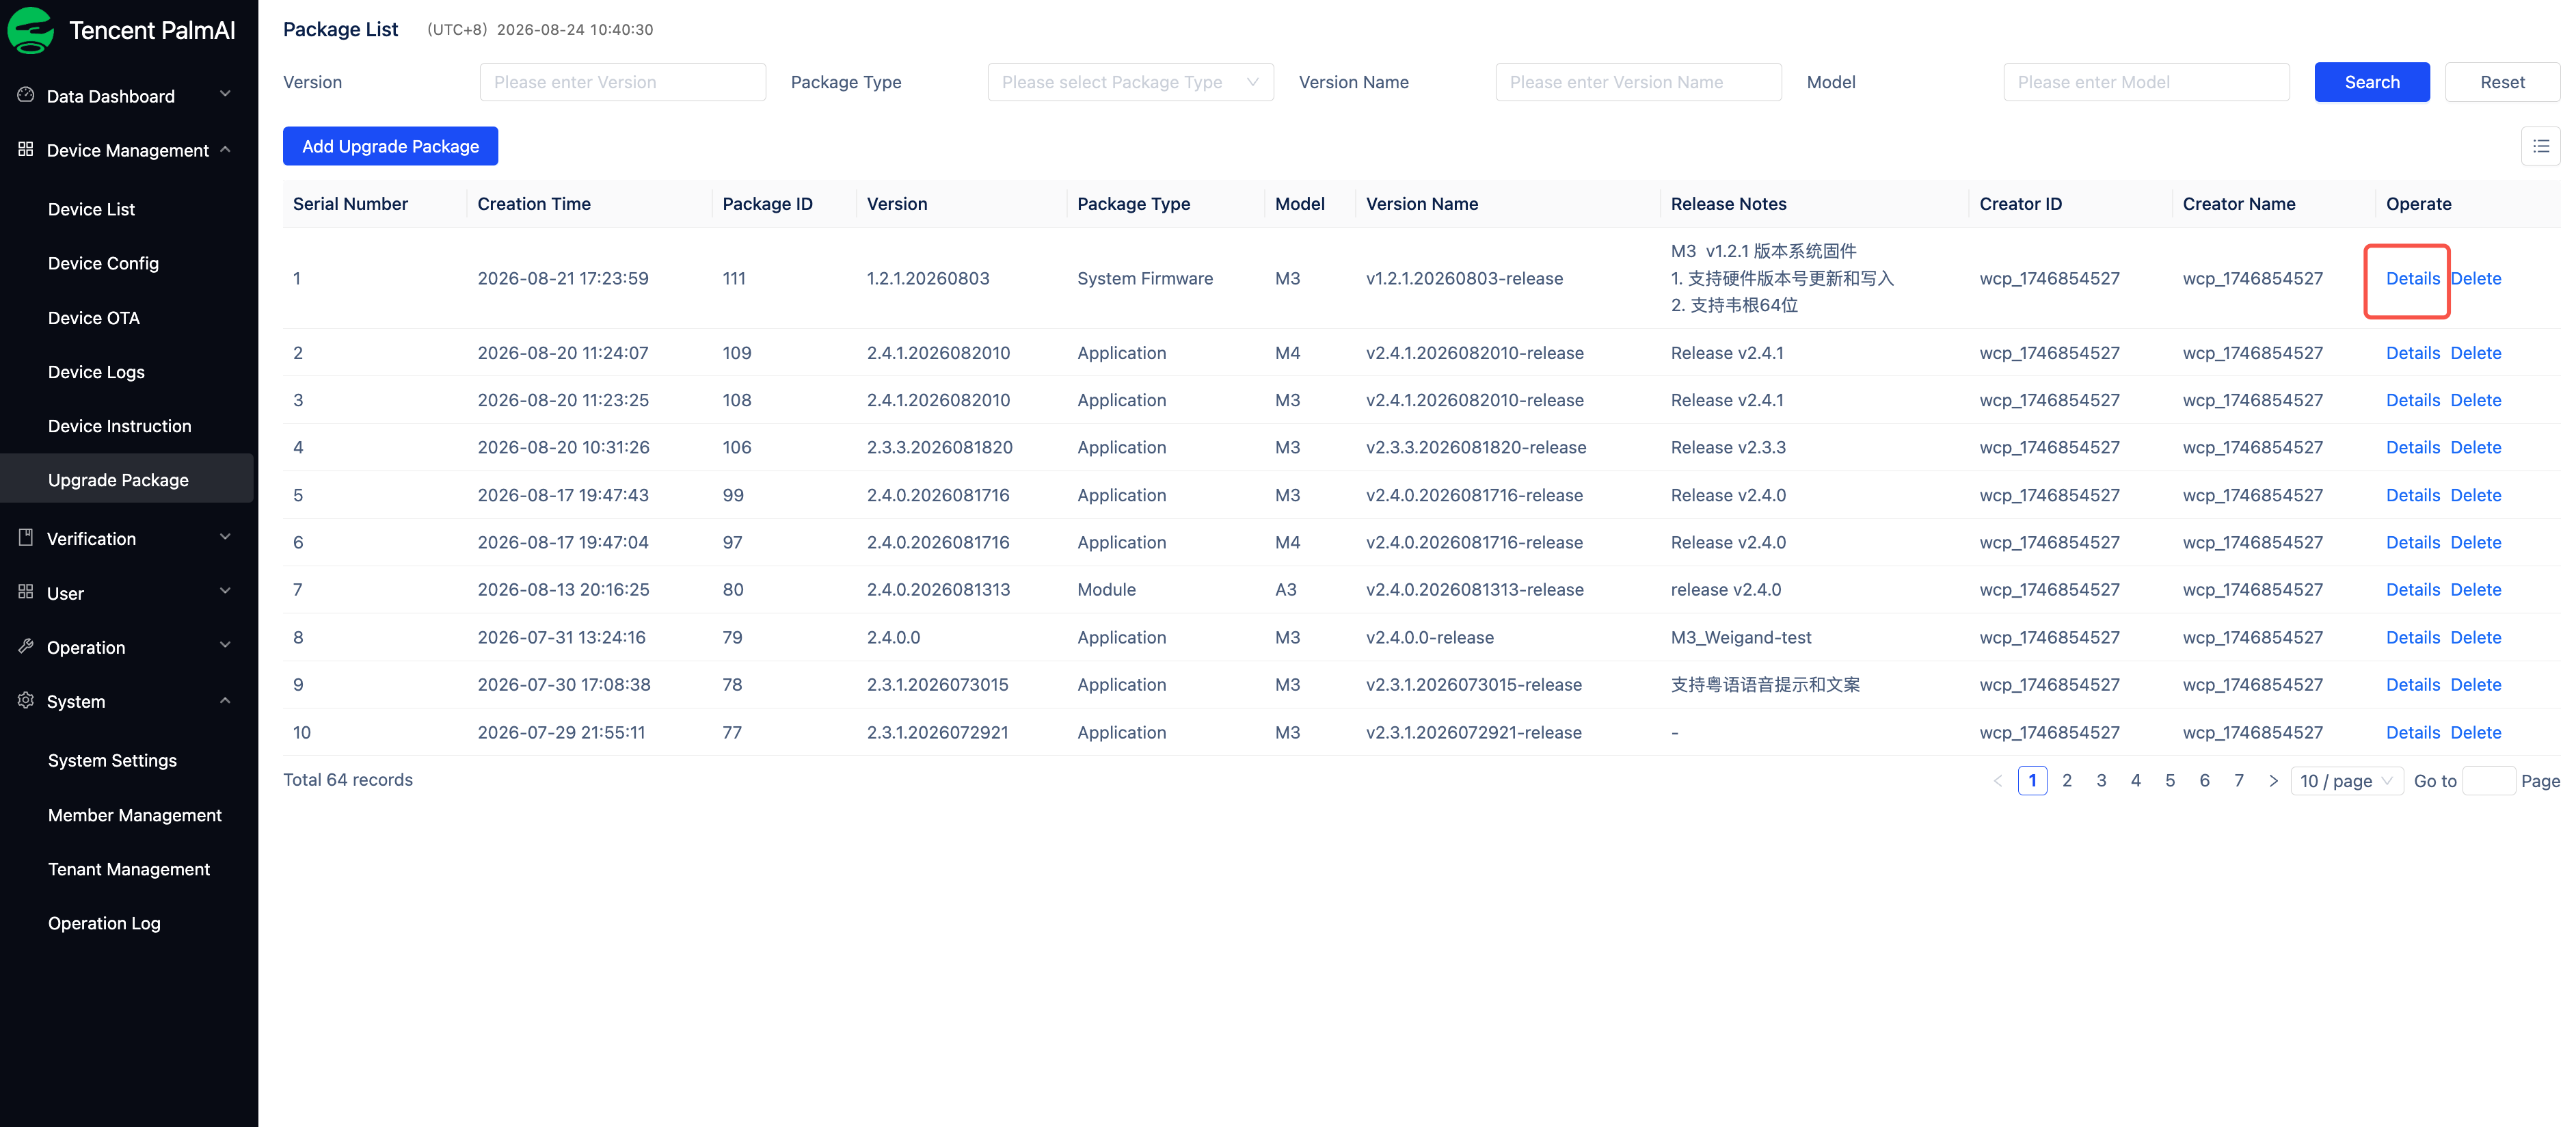
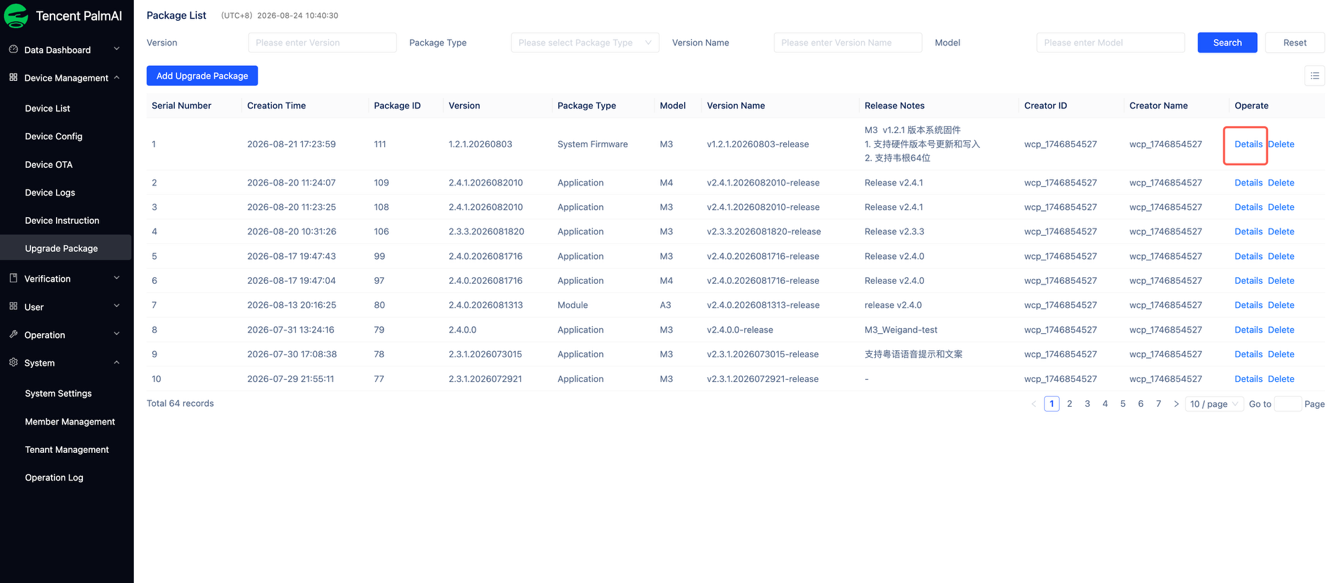
3.1.6.2 Viewing Upgrade Package Details
- Find the target upgrade package.
- Click Details.
3.1.6.3 Deleting an Upgrade Package
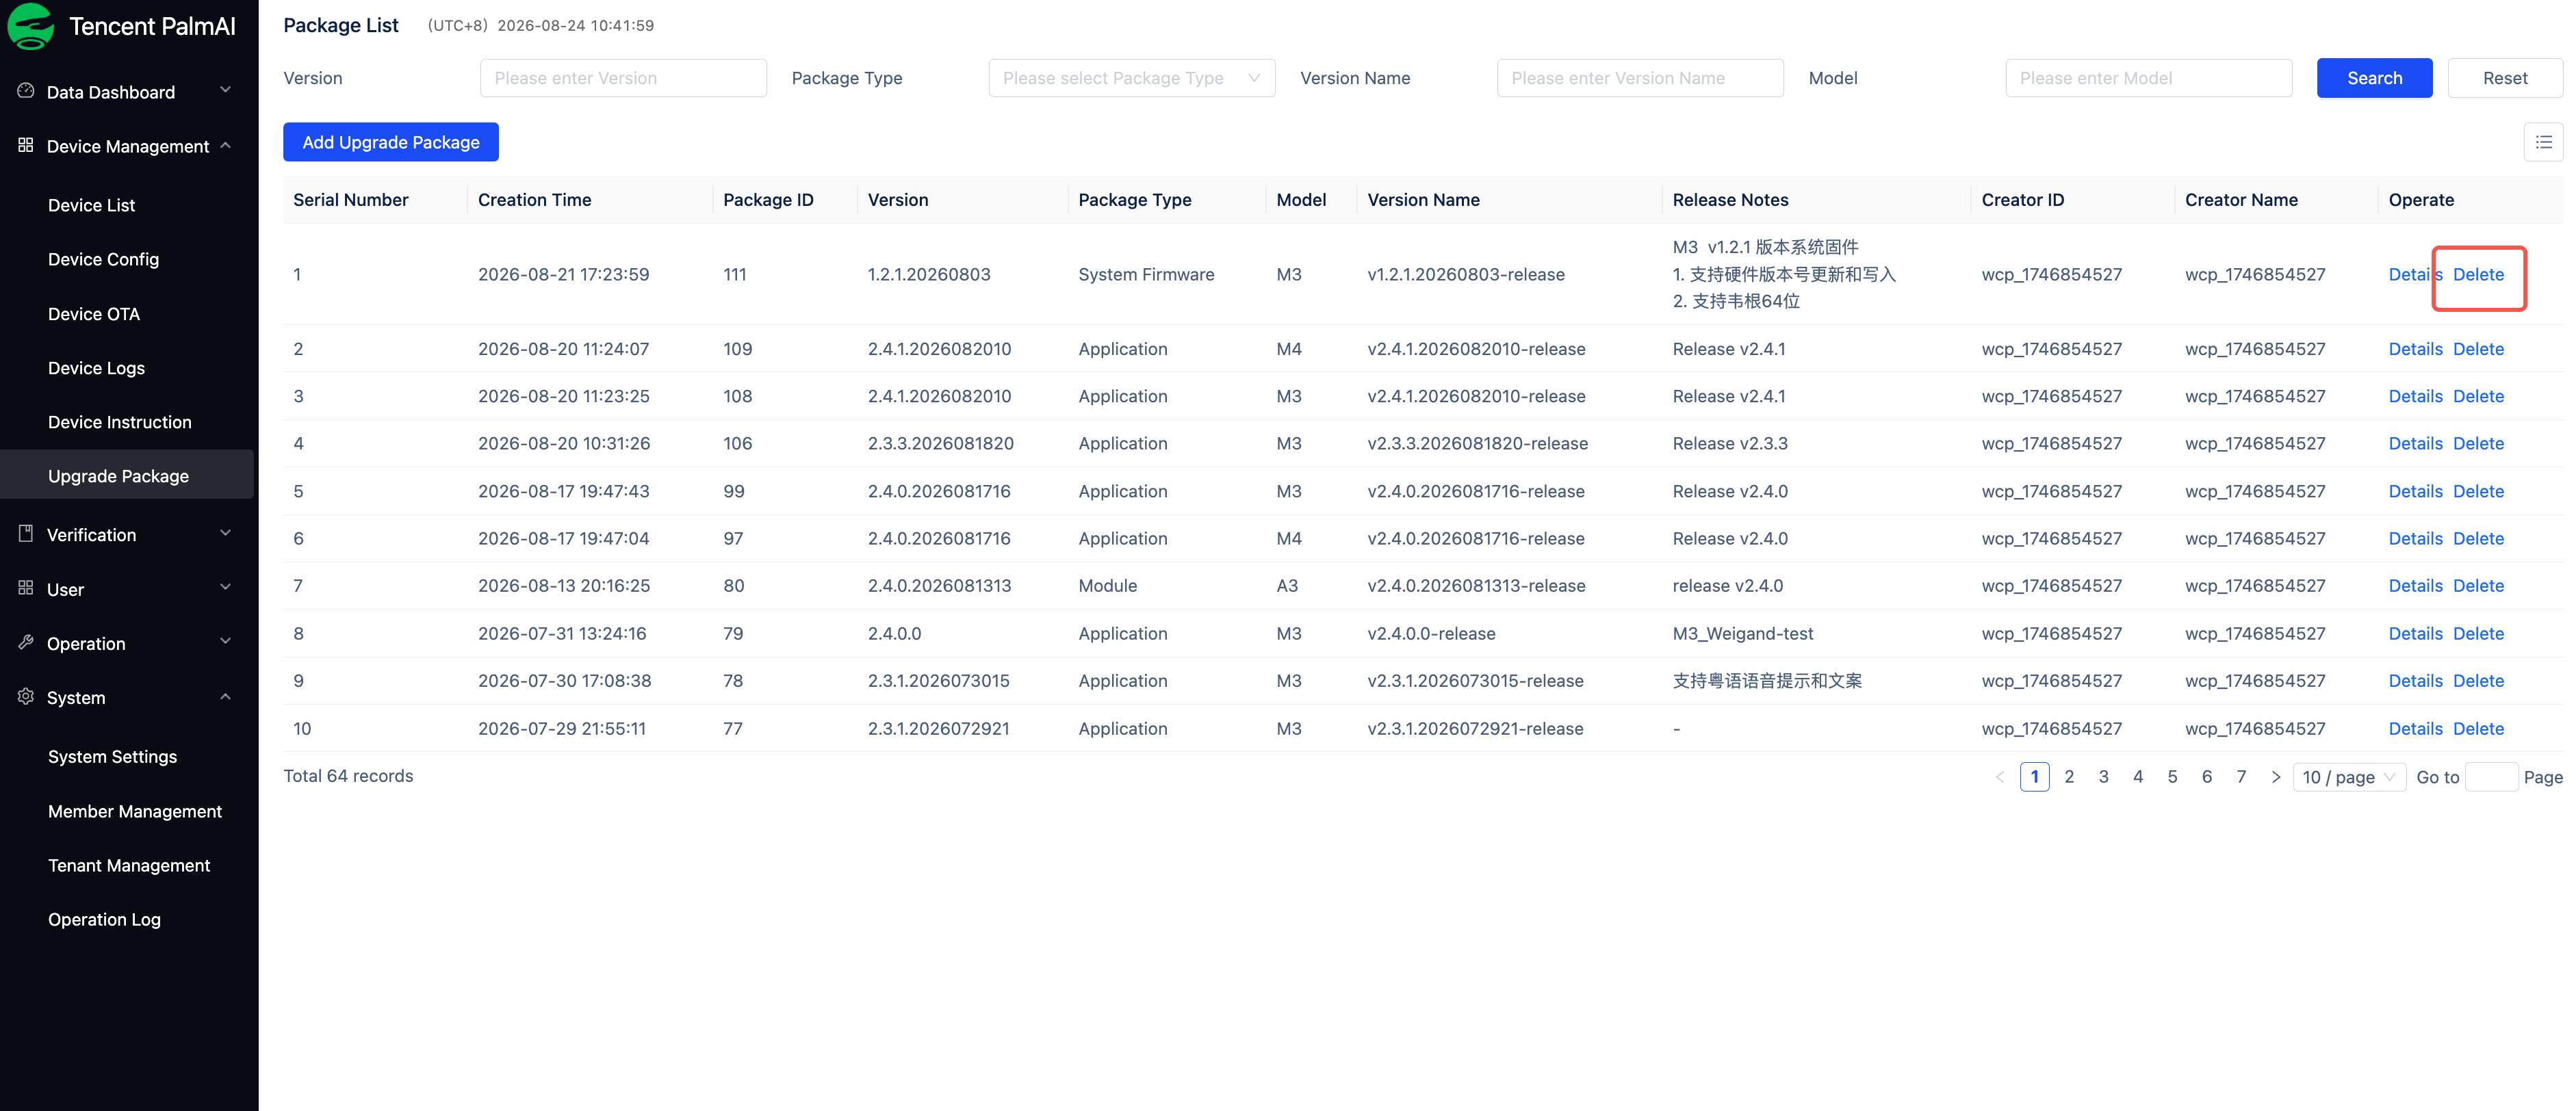
- Find the target upgrade package and click Delete.
The system checks for any upgrade campaigns that use this package and have a status of Draft or Active:
- If an associated active upgrade campaign exists, the system indicates that the package cannot be deleted and returns the upgrade campaign ID. Discard the corresponding upgrade campaign first.
- If no associated active upgrade campaign exists, the system displays a confirmation dialog. Confirm to complete the deletion.
3.2 Scene Management
A device must be bound to a scene before Palm Scans can upload verification records. Verification records can be viewed by scene.
- Scene group: Represents an area. For example, "Tencent Building—31st Floor of Tencent Building" or "Peking University—Peking University Library" can be created as scene groups. Scene groups support multiple nesting levels. For example, "Tencent Building—31st Floor" can be created under "Tencent Building."
- Scene: Represents an actual business location, such as "31st Floor Entrance Turnstile." A scene must belong to a scene group.
Multiple child scene groups or scenes can be created under one scene group, enabling hierarchical area-based management.
3.2.1 Scene Group Management
After members log in to PalmAI Admin Web, they can view only the scene group data within the scope of their roles and can create, edit, and delete managed scene groups and view the scenes under them.
3.2.1.1 Creating a Scene Group
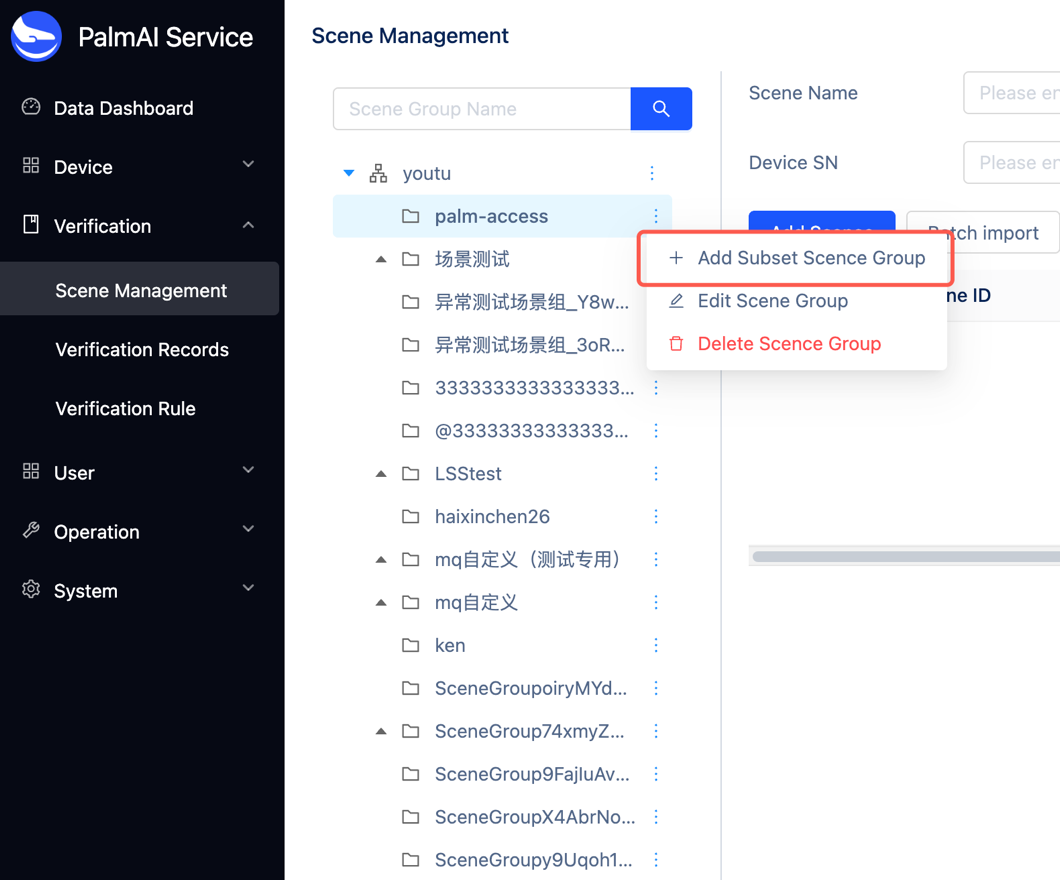
- Go to the Scene Management page.
- Find the target scene group and click its settings button.
- Select the option to create a scene group.
- Enter the scene group name and submit.
The new scene group becomes a child of the current scene group. You can create multiple levels of scene groups according to actual management requirements.
Note
Scene groups with duplicate names cannot be added under the same scene group. If a scene with the same name already exists under the current scene group, the system displays
A scene with the same name already exists in the current scene group. Change the name and try again.
3.2.1.2 Editing a Scene Group
- Find the target scene group and click its settings button.
- Select the option to edit the scene group.
- Change the scene group name and save.
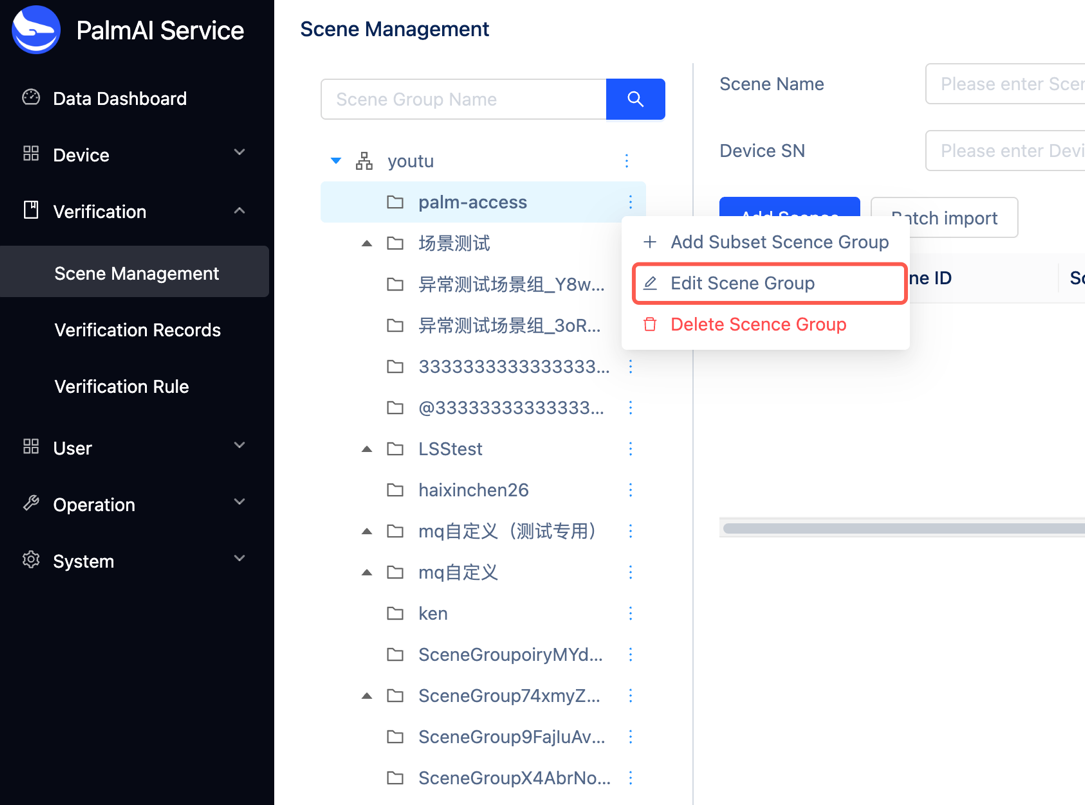
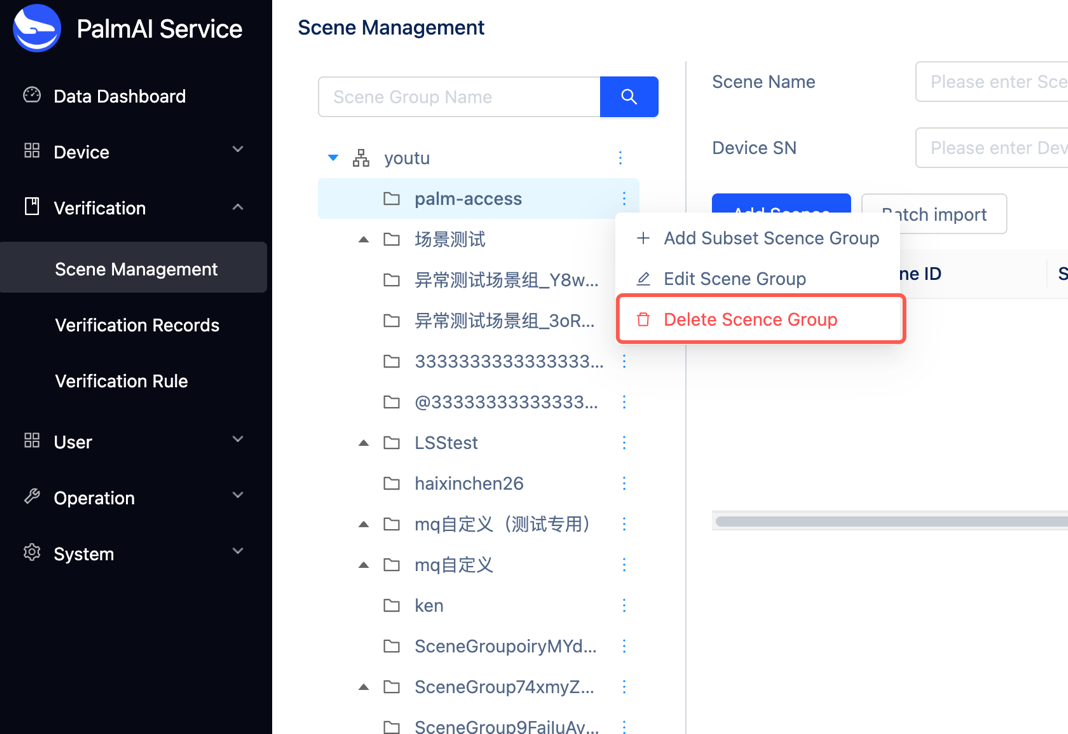
3.2.1.3 Deleting a Scene Group
- Find the target scene group.
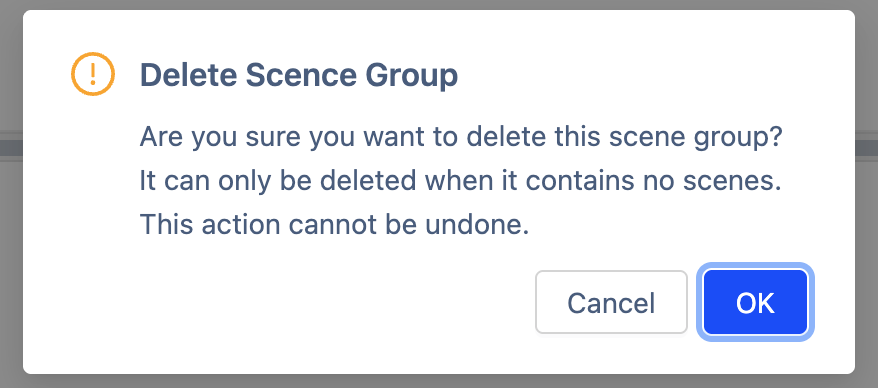
- Click Delete scene group.
- Confirm the deletion in the confirmation dialog.
Note
The delete button appears only when the scene group contains no scenes.
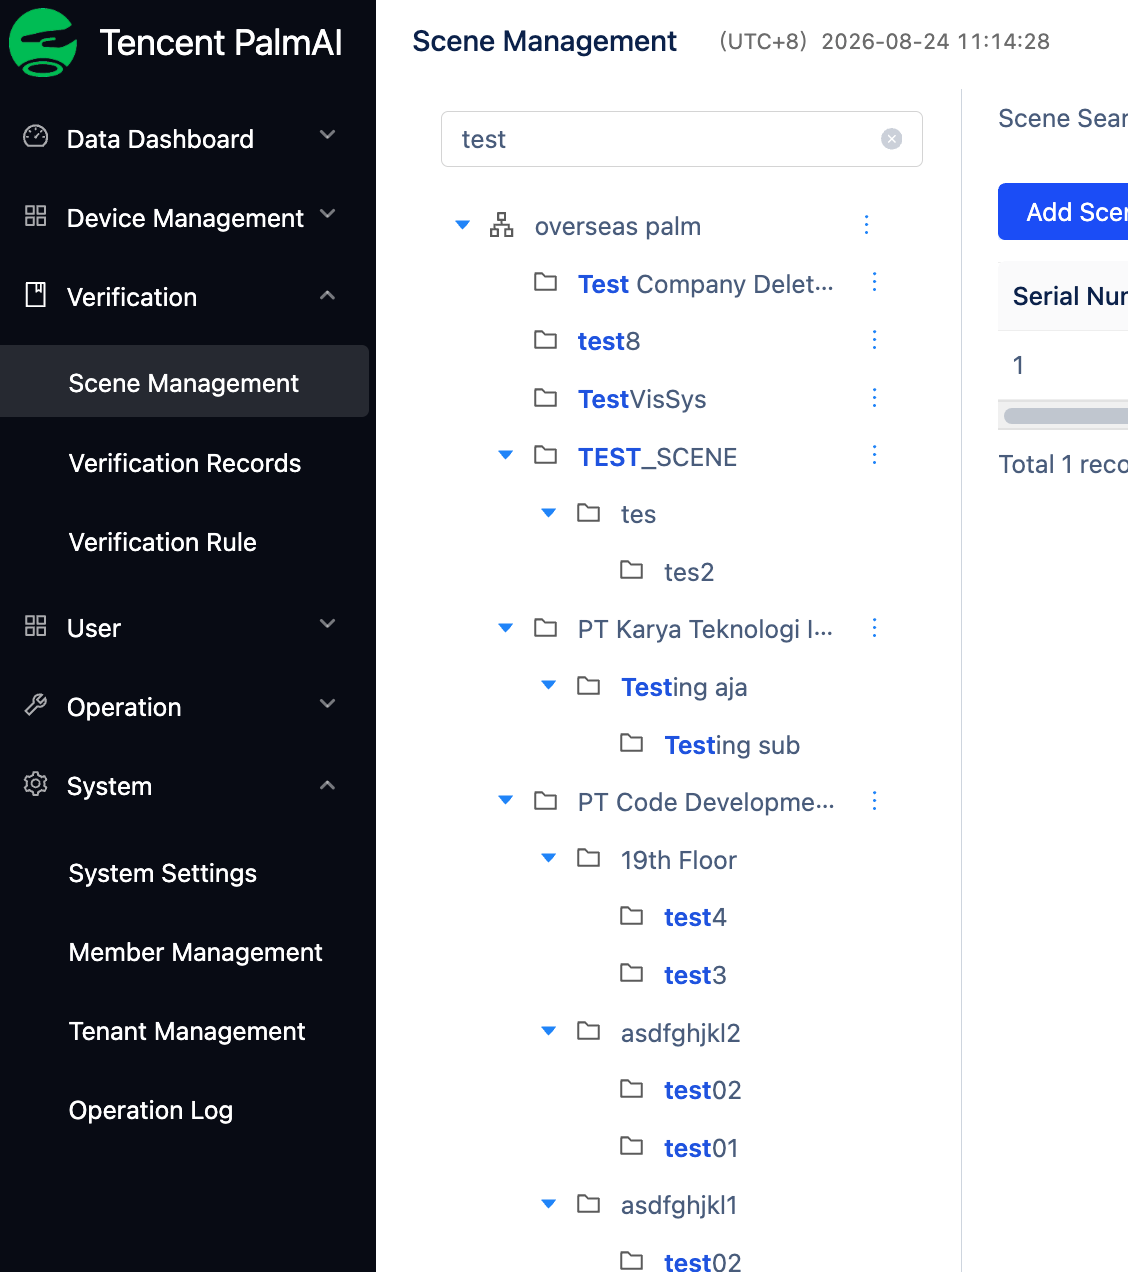
3.2.1.4 Querying Scene Groups
You can search for scene groups by Scene Group Name and Scene Group ID. Members can search only the scene groups within the scope managed by their roles.
3.2.2 Scene Management
3.2.2.1 Creating a Scene
Scenes can be created individually or imported in batches. Select the appropriate method based on the number of scenes you need to create.
Creating a Single Scene
- Select the target scene group.
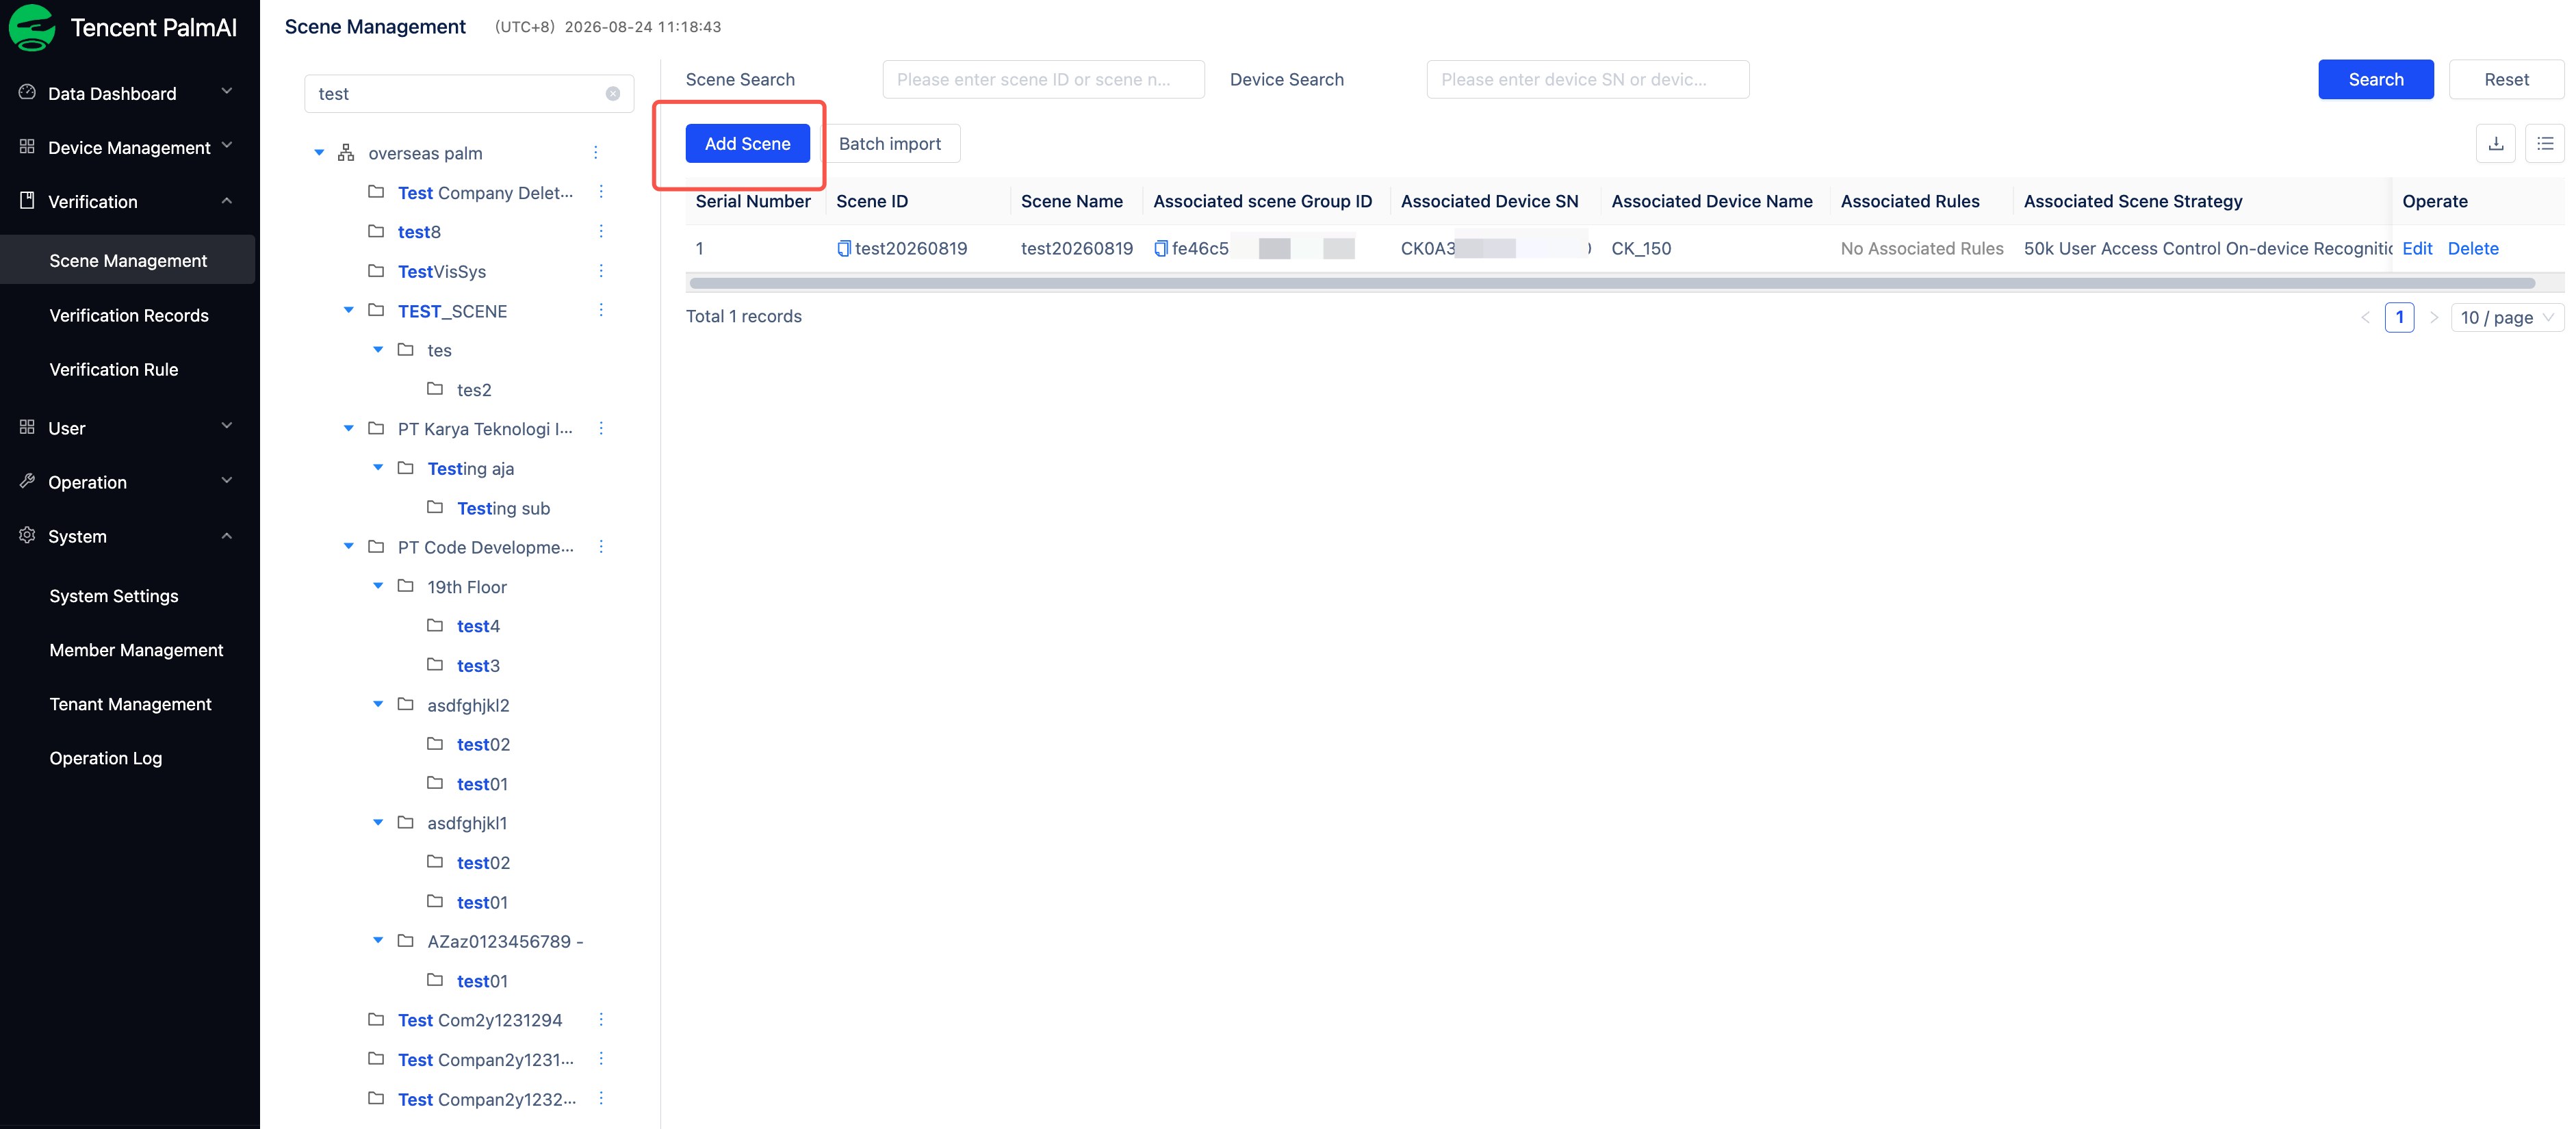
- Click Add scene on the right side of the page.
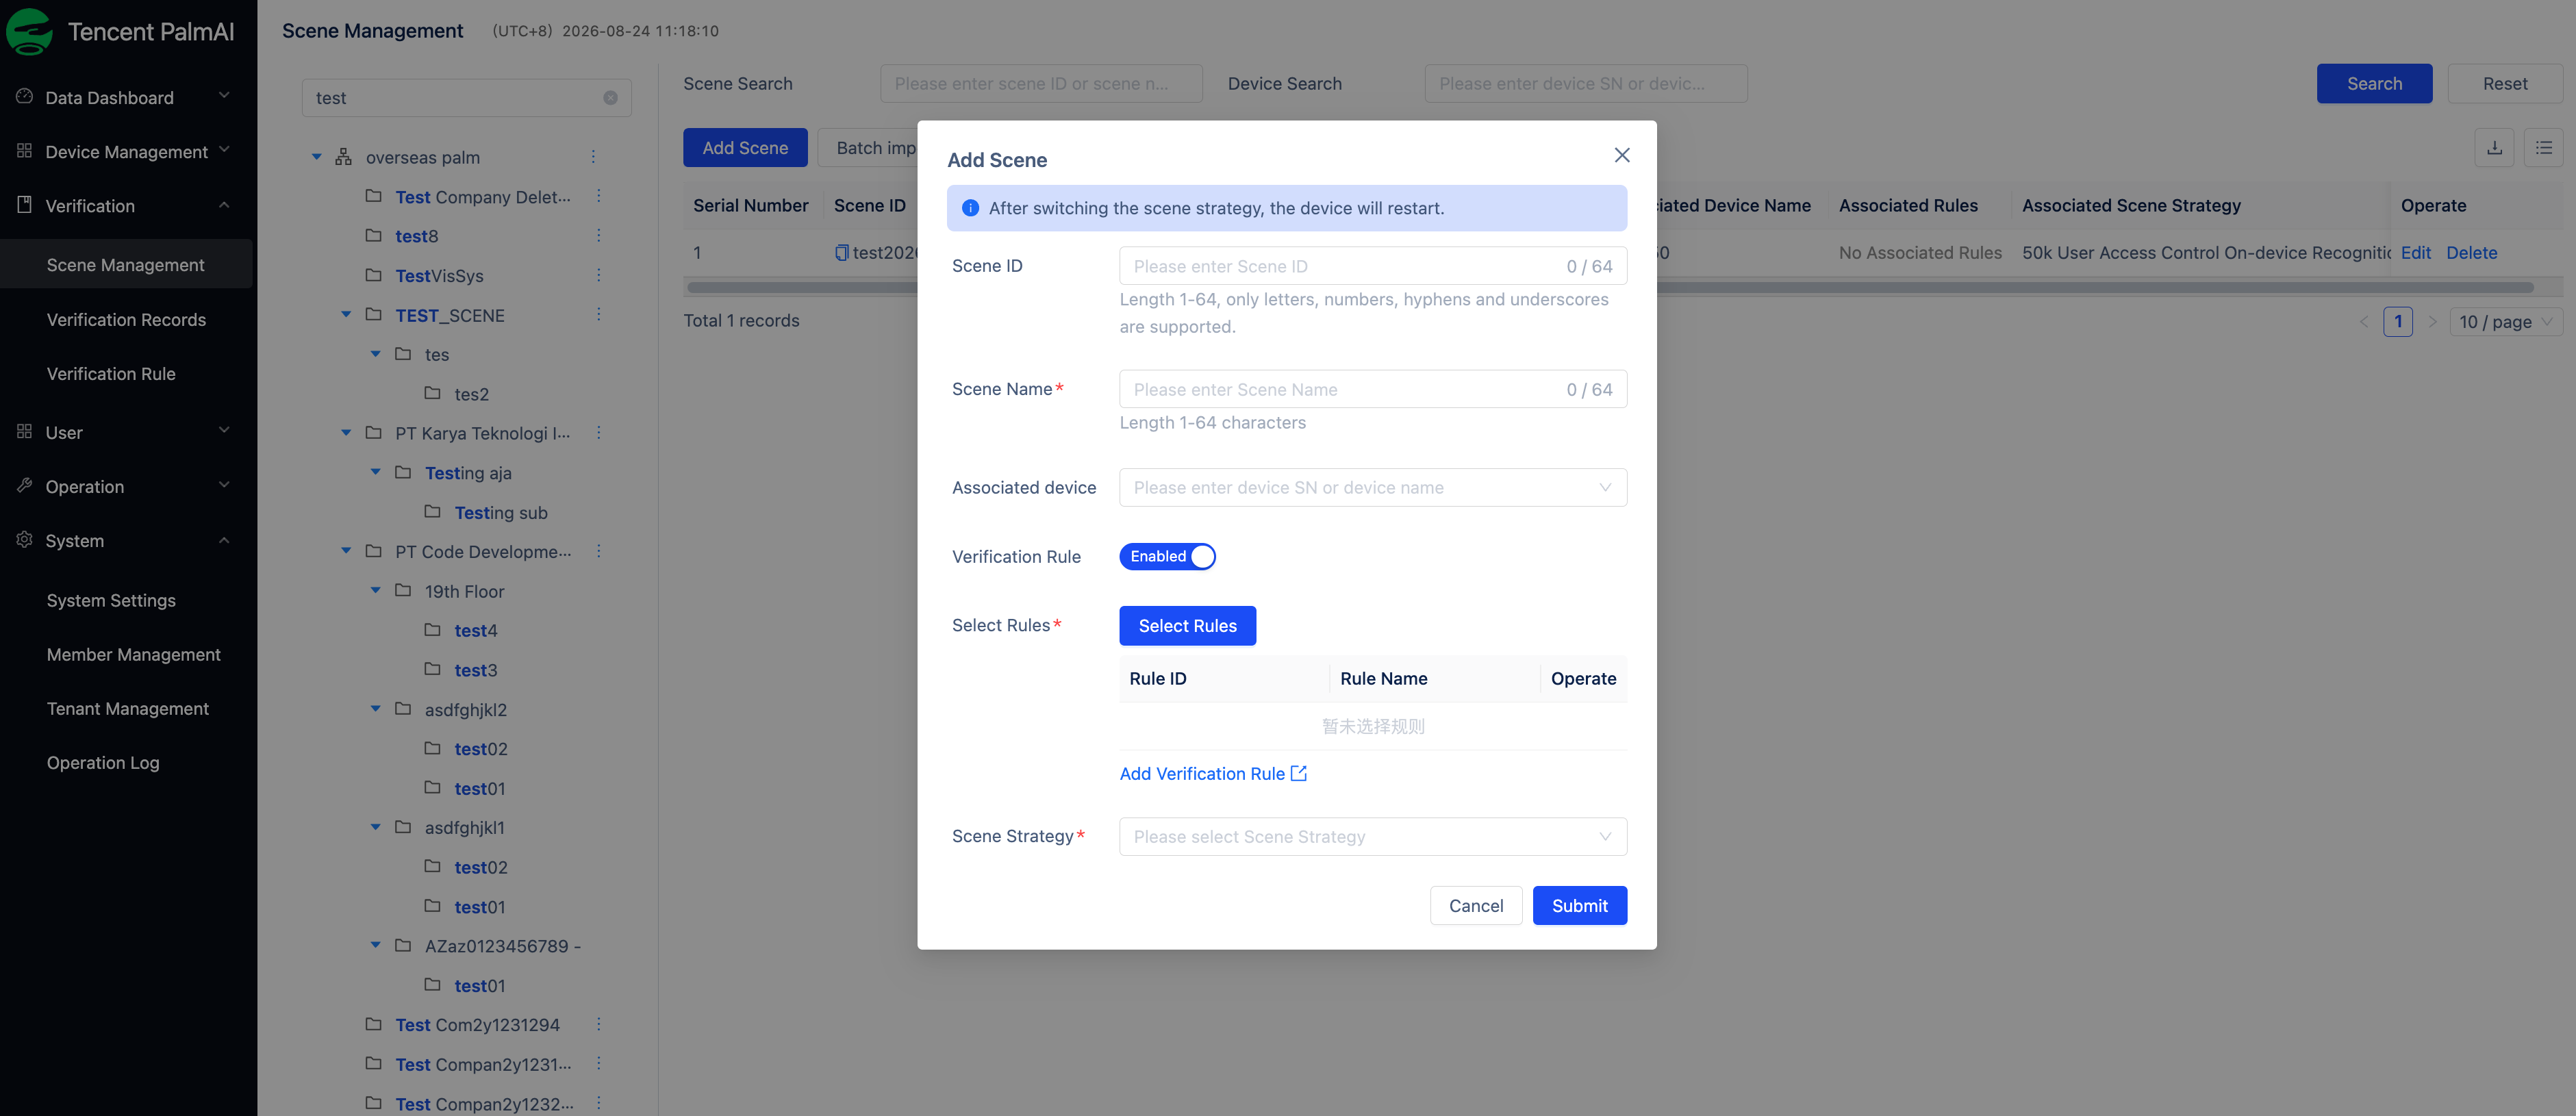
- Enter the scene name and select associated devices.
- Choose whether to associate a verification rule.
- Select the Scene Strategy and Verification Mode.
- Submit the scene.
After the scene is created, the system dispatches the selected Scene Strategy to all devices in the scene. The devices automatically retrieve the latest configuration data and restart. The new strategy takes effect after restart.
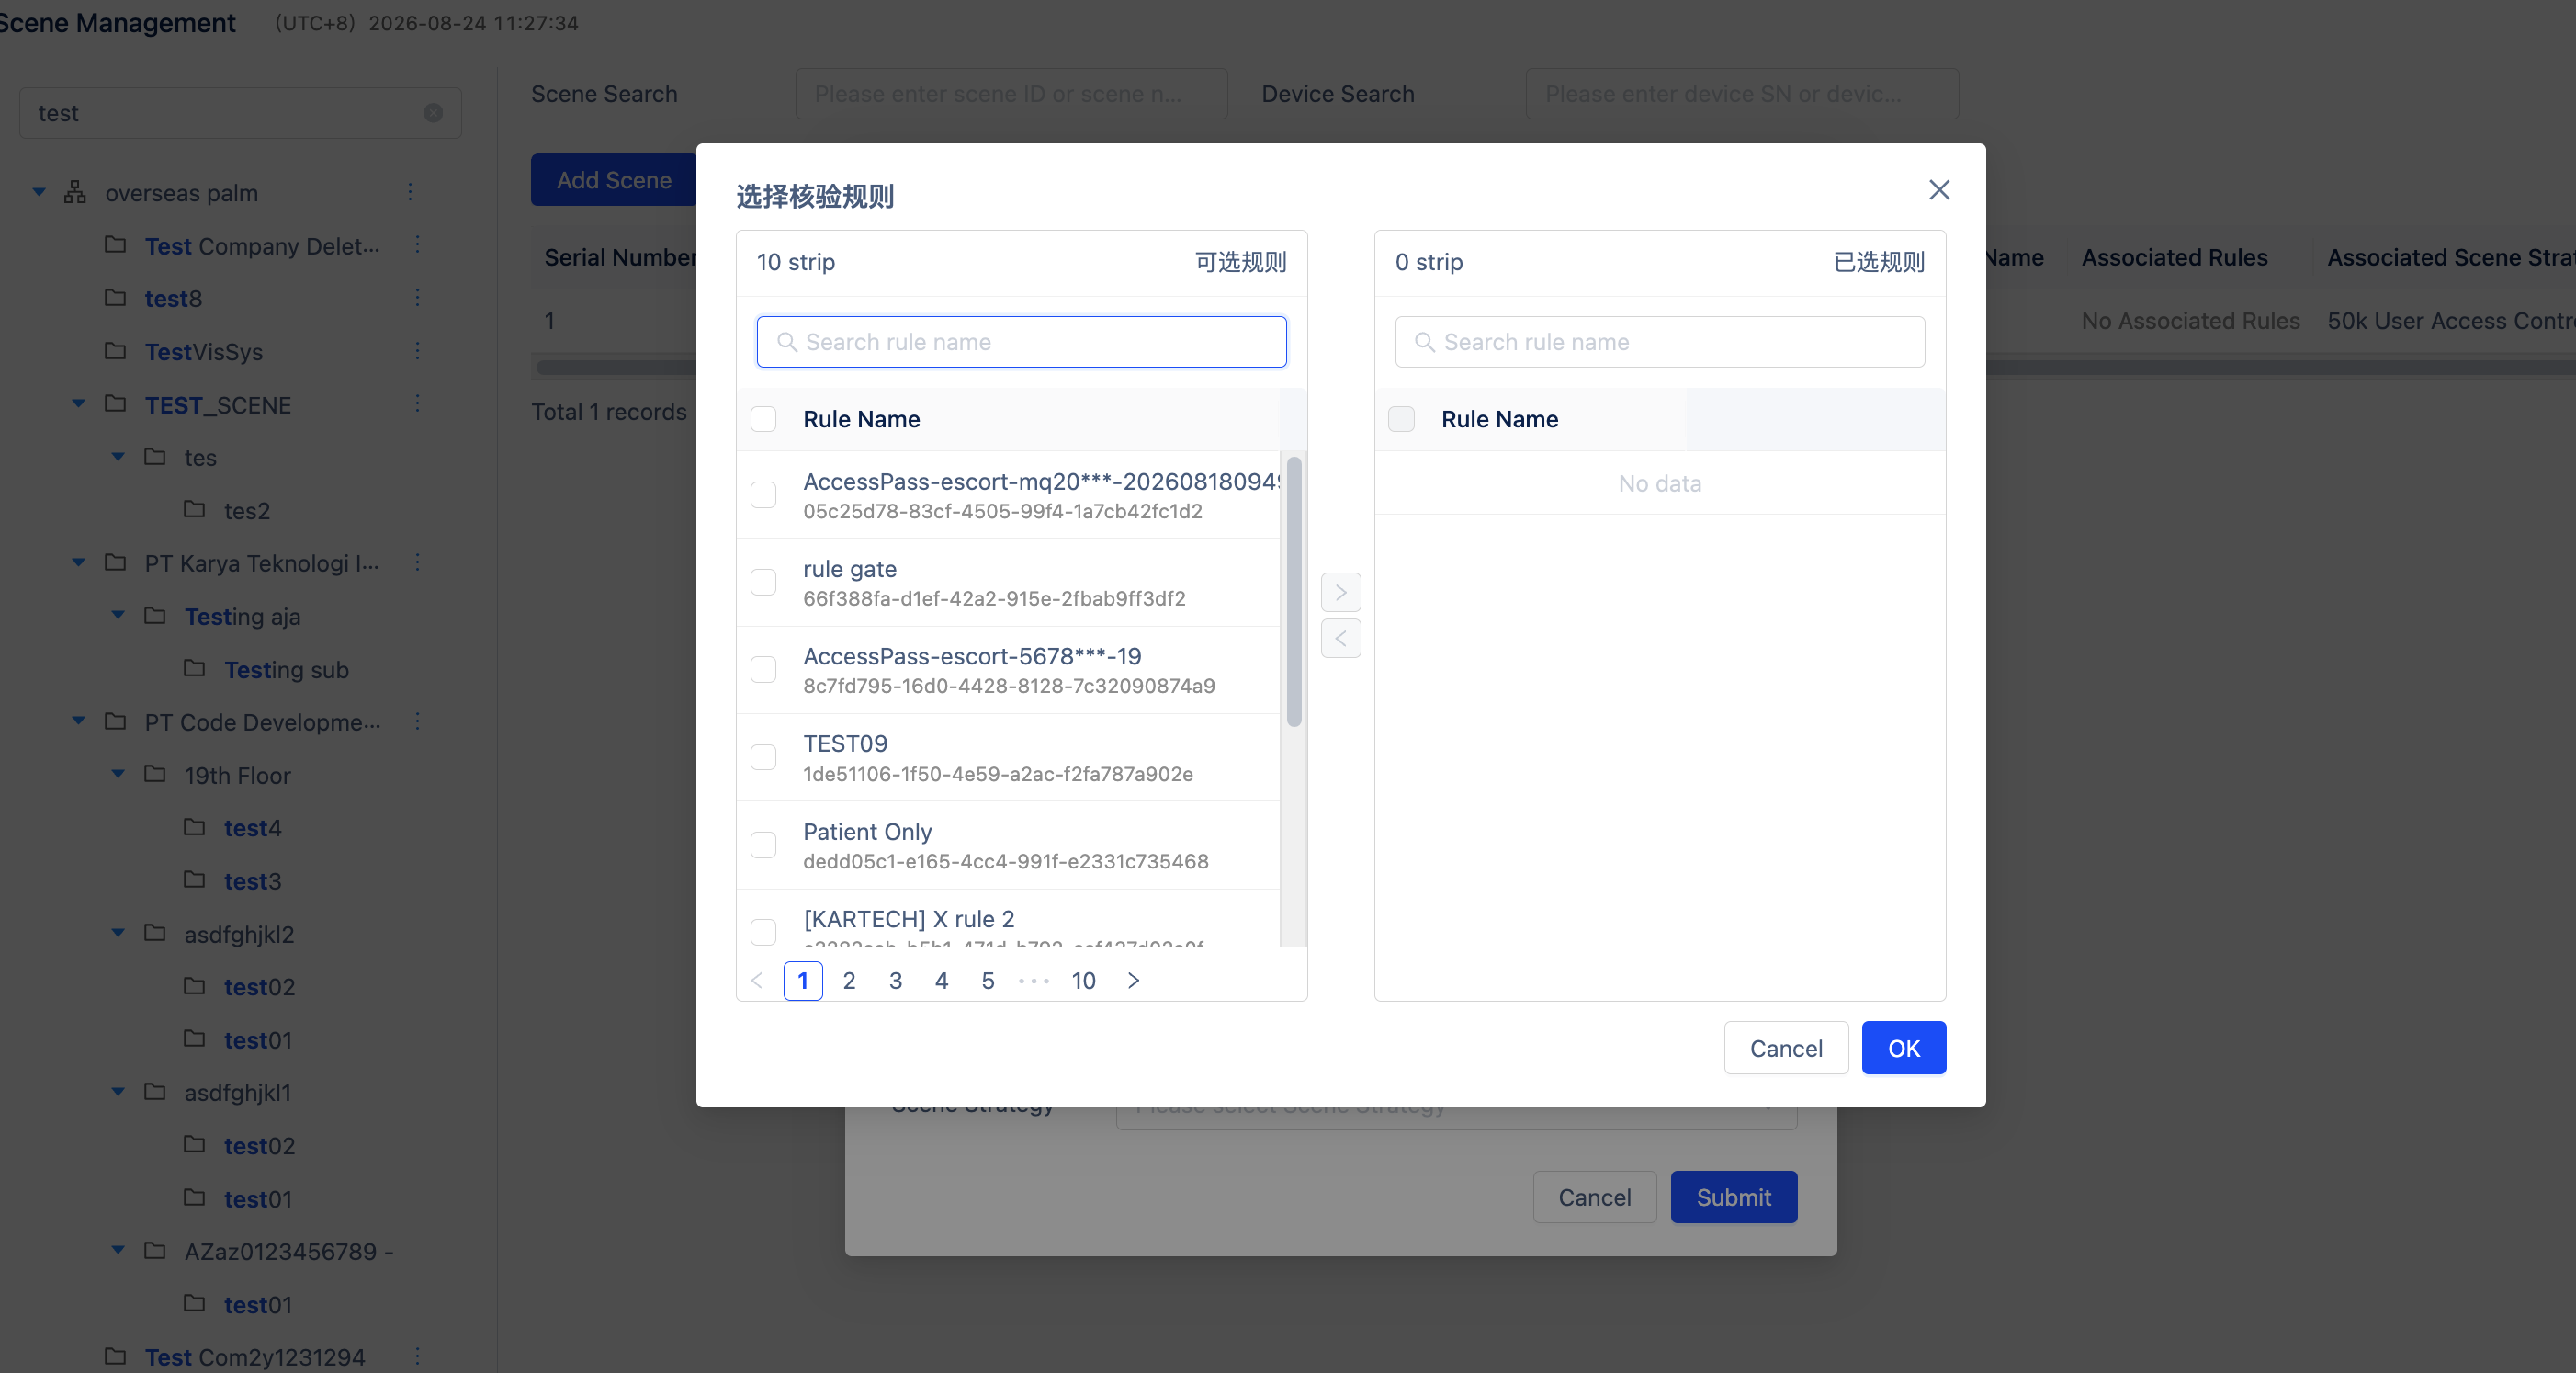
- Verification Rule selection: When creating or editing a scene, users can choose whether to associate a Verification Rule. Enter a rule ID or rule name to search for a rule. Clicking Add Verification Rule opens the page for adding a Verification Rule.
- Scene Strategy selection: When creating or editing a scene, users can select the corresponding Scene Strategy and associate a Palm Feature Database as needed. After submission, the system automatically dispatches the strategy configuration to devices in the scene. The devices retrieve the latest configuration data and restart, after which the new strategy takes effect. The scene list also displays the Scene Strategy and associated Palm Feature Database.
- The currently available Scene Strategies are listed below:
| Scene Strategy Name | Use Case | Core Capabilities |
|---|---|---|
| 100 User Demo On-device Recognition | Product demonstrations, experience showcases, or small-scale trials | 1. Uses a fully On-device Recognition mode 2. Supports a Palm Feature Database of up to 100 users 3. Provides fast recognition and the shortest Palm Scan duration 4. Uses a lower security policy without High Similarity detection or auxiliary Additional Verification. |
| 10k User Access Control and Attendance On-device Recognition | Routine enterprise Access Control and office attendance scenarios | 1. Uses a fully On-device Recognition mode 2. Supports a Palm Feature Database of up to 50,000 users 3. Provides fast recognition while balancing efficiency and security. |
| 1M User eKYC Cloud Recognition | High-security identity verification scenarios such as finance and government services | 1. Uses a fully Cloud Recognition mode 2. Supports a Palm Feature Database of up to 1 million users 3. Provides high recognition accuracy and a low false acceptance rate 4. Enables security policies such as High Similarity detection, auxiliary Additional Verification, and Palm Liveness Detection. |
| 1M User eKYC Hybrid Recognition | Large-scale business scenarios such as major campuses, transportation hubs, or internet service platforms | 1. Uses a Hybrid Recognition mode 2. Supports up to 50,000 users in the on-device Palm Feature Database and up to 1 million users in the cloud Palm Feature Database 3. Balances recognition efficiency and security, provides high recognition accuracy, and supports multiple security policies, including Palm Liveness Detection, High Similarity detection, and auxiliary Additional Verification. |
Creating Scenes in Batches
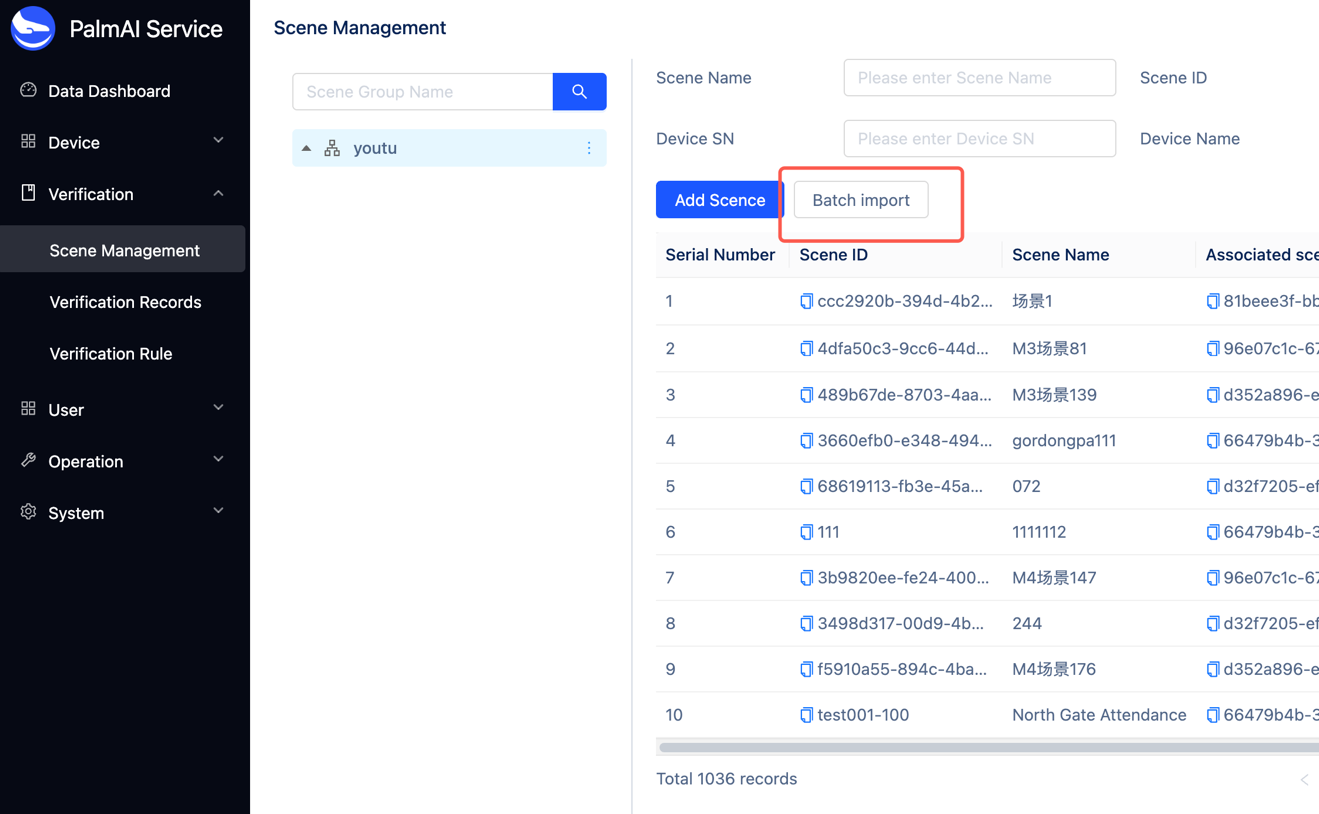
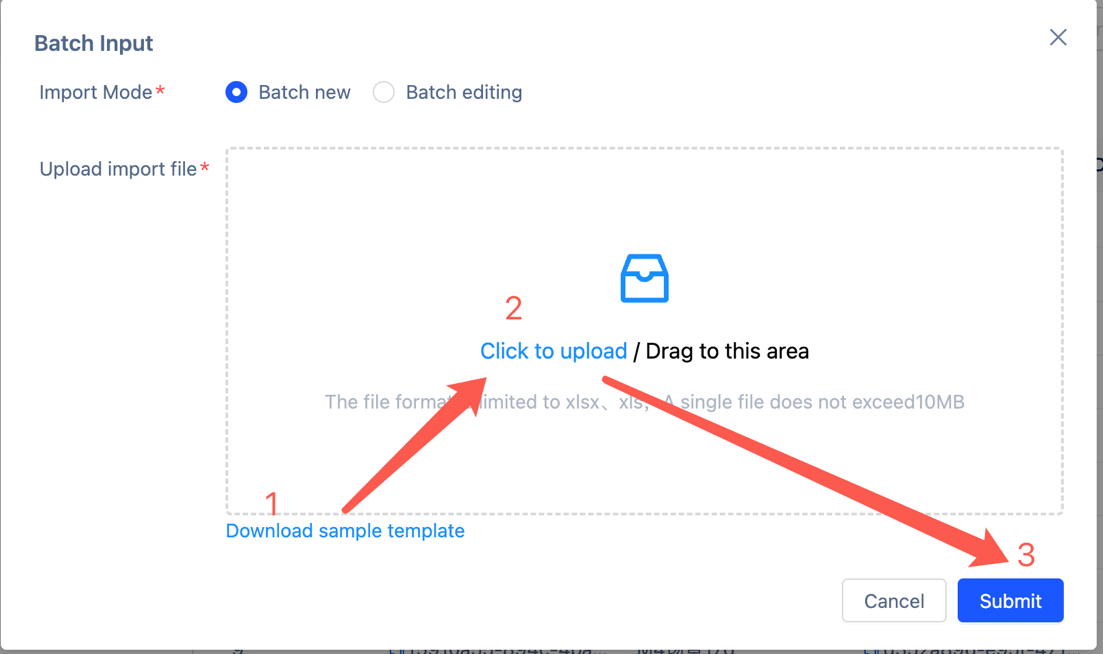
- Click Batch import.
- Select Batch new to go to the batch import page.
- Download the import template.
- Enter scene information as specified in the template and upload the template.
- Click Submit.
After submission, the success and failure results appear at the top of the page. If the failure count is greater than 0, a button for downloading failure information appears.
Note
Do not modify the import template or delete its instructions. Scene Name must be unique within a scene group; duplicates cause an error. Clicking Submit starts the upload and displays the successful and failed results at the top. If the failure count is greater than 0, a button for downloading failure information appears. The upload fails in any of the following cases:
-
The device cannot be found under the current entity.
-
The device is registered under the current entity but is already bound to another scene.
-
A scene with the same name already exists in the current scene group.
3.2.2.2 Editing a Scene
Scenes can be edited individually or in batches. The editable scope differs between the two methods. Select the method appropriate for your needs.
Editing a Single Scene
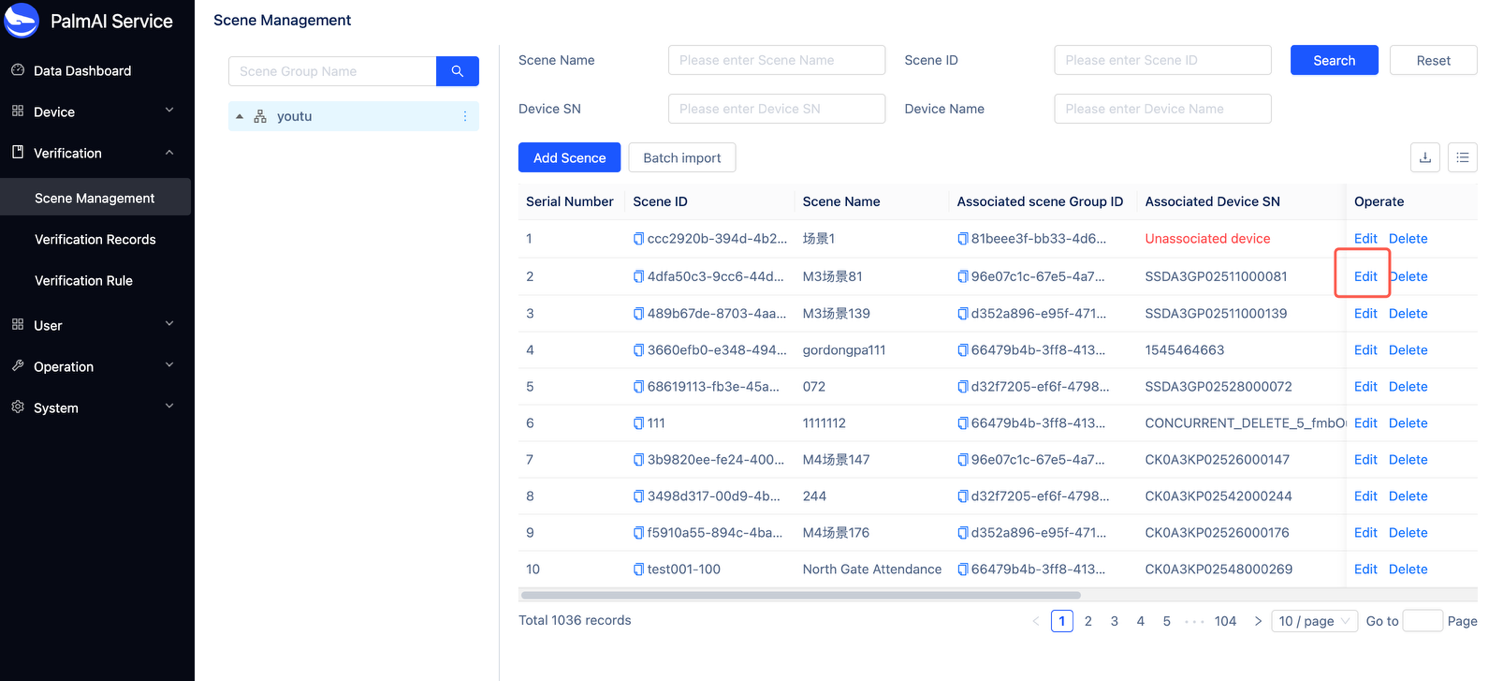
- Select the target scene.
- Click Edit.
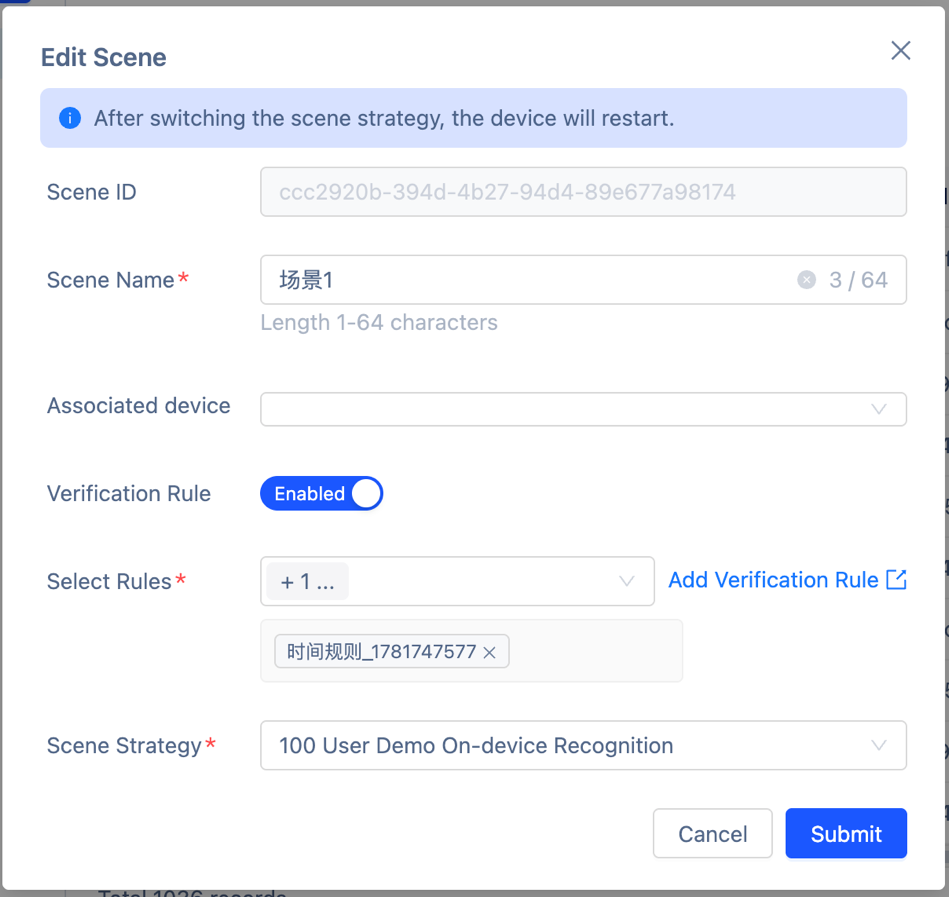
- Change the scene name, associated devices, Verification Rule, or Scene Strategy as needed.
- Save the changes.
After the Scene Strategy is updated, the system dispatches the new strategy configuration to devices in the scene. The devices automatically retrieve the latest configuration data and restart. The new strategy takes effect after restart.
Note
After an associated device is replaced, the original device can no longer upload verification records. Make sure the physical device has already been replaced on site. Scene Name cannot exceed 32 characters.
Editing Scenes in Batches
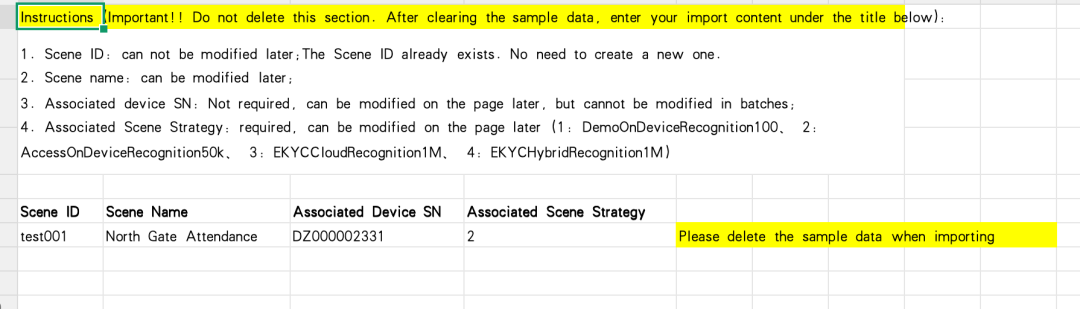
The batch editing template contains the following fields:
| Field | Required | Editing Instructions |
|---|---|---|
| Scene ID | Required | The unique identifier of an existing scene. It cannot be changed and does not need to be created again. |
| Scene Name | Required | The scene name can be changed. |
| Associated Device SN | Optional | Batch modification is not supported. To change it, use the scene editing page. |
| Associated Scene Strategy | Required | Enter the Scene Strategy number. 1 indicates DemoDeviceRecognition100, 2 indicates AccessOnDeviceRecognition50k, 3 indicates EKYCCloudRecognition1M, and 4 indicates EKYCHybridRecognition1M. You can also change it later on the scene editing page. |
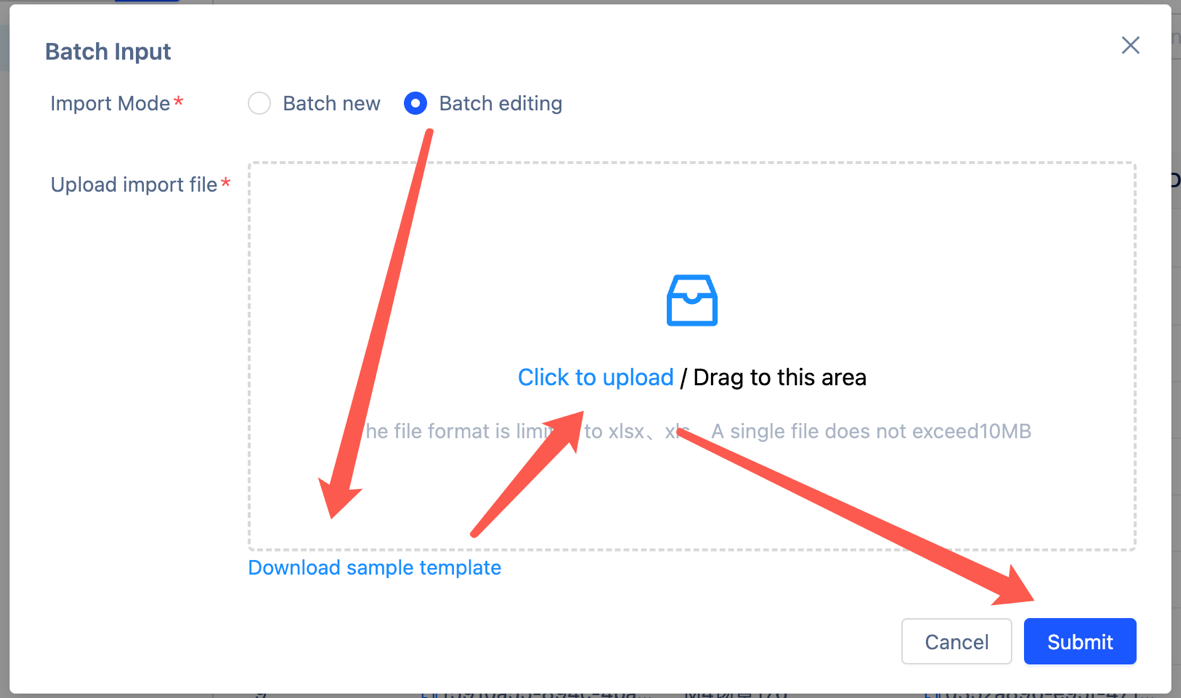
- Click Batch import to go to the batch editing page.
- Select Batch editing.
- Download the import template.
- Enter scene information as specified in the template and upload the template.
- Click Submit.
After submission, the success and failure results appear at the top of the page. If the failure count is greater than 0, a button for downloading failure information appears.
Note
Do not modify the import template or delete its instructions. The upload fails in any of the following cases:
- The Scene ID does not exist.
- The scene is already associated with a device.
- The scene has no associated device, but the specified device is not registered under the current entity.
- The scene has no associated device, but the specified device is already associated with another scene.
3.2.2.3 Deleting a Scene
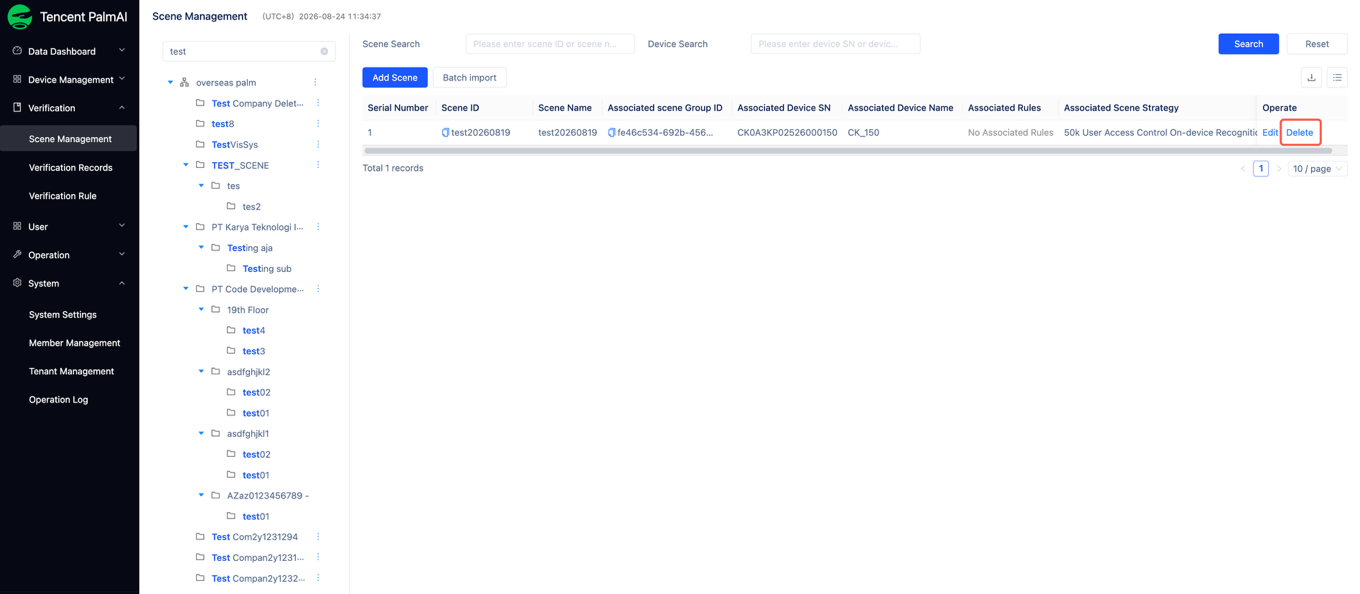
- Find the target scene and click Delete.
- Confirm the deletion in the confirmation dialog.
Warning
After a scene is deleted, associated devices can no longer upload verification records. Historical verification records are retained. If the scene associated with a record has been deleted,
(Deleted)is appended to the scene name.
3.2.2.4 Querying Scenes
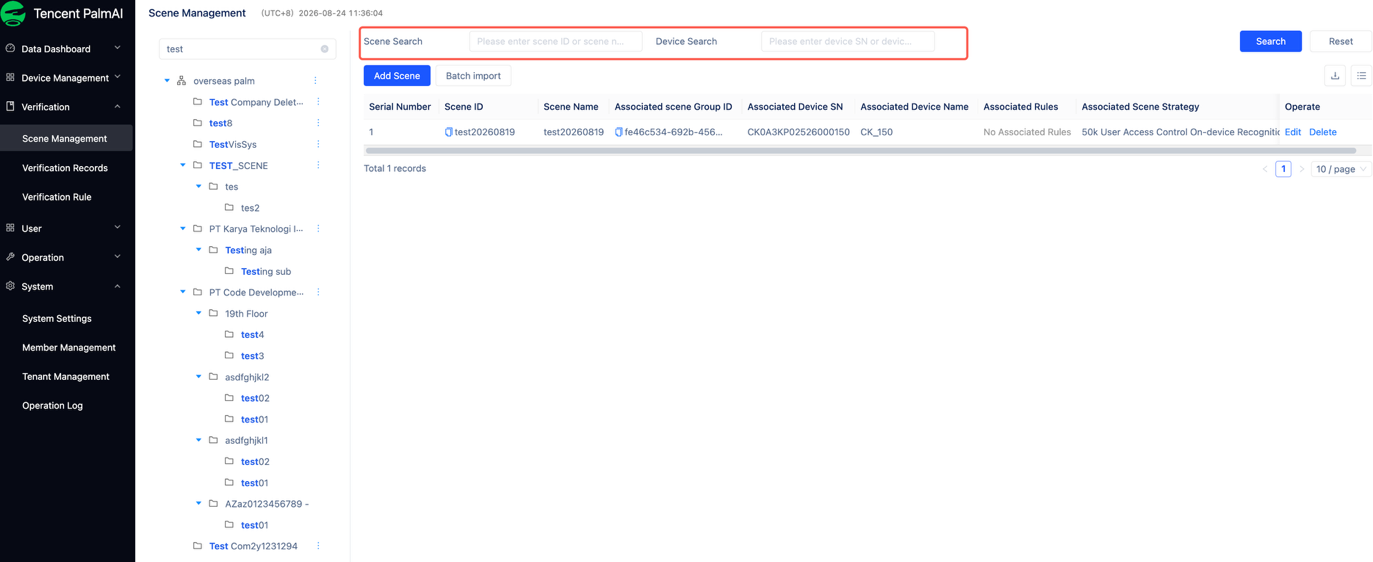
- Fuzzy search is supported by scene (Scene Name and Scene ID) and associated device (Device SN and Device Name). You can search only scenes you have permission to manage.
3.3 Verification Records
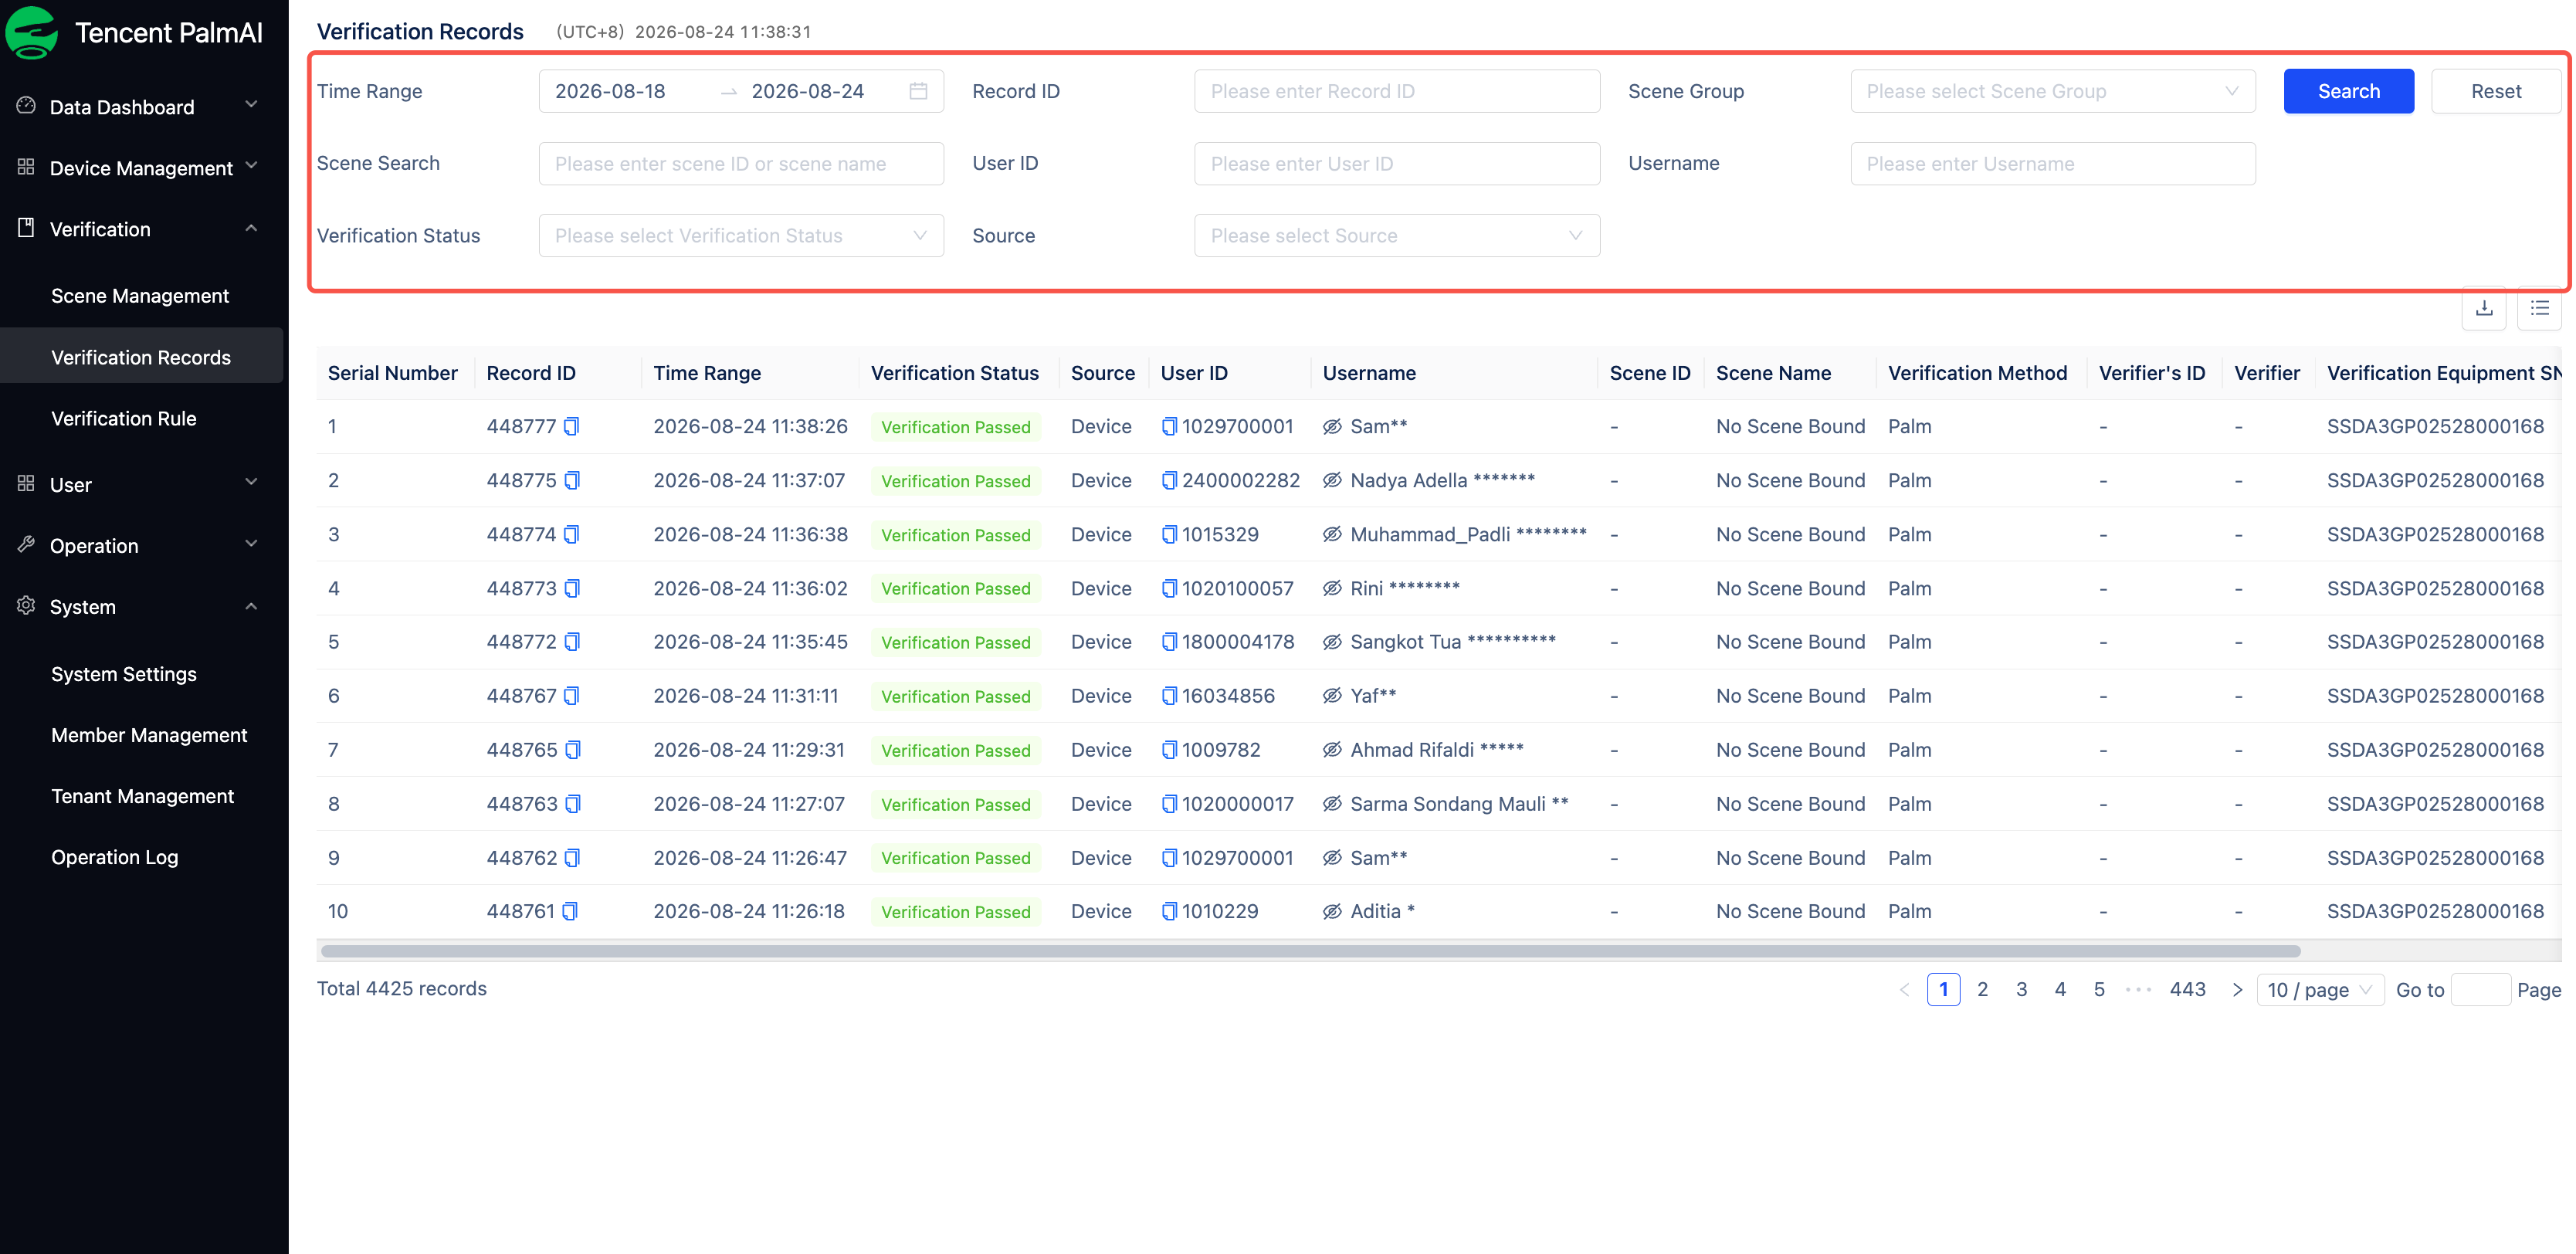
- Click Verification Records to open the Verification Records page.
- Search verification records by record ID, scene group, scene, user ID, username, verification status, or source.
- View verification records on the page or export them to an Excel file.
Members can view and export only the verification records under the scene groups they manage.
Note
The verification record push address can be configured in the tenant settings. For details, see "3.9.1 Creating a Tenant."
3.4 Verification Rules
Verification Rules can be added and edited. When adding a rule, you can configure time rules, eligible users, and external system verification.
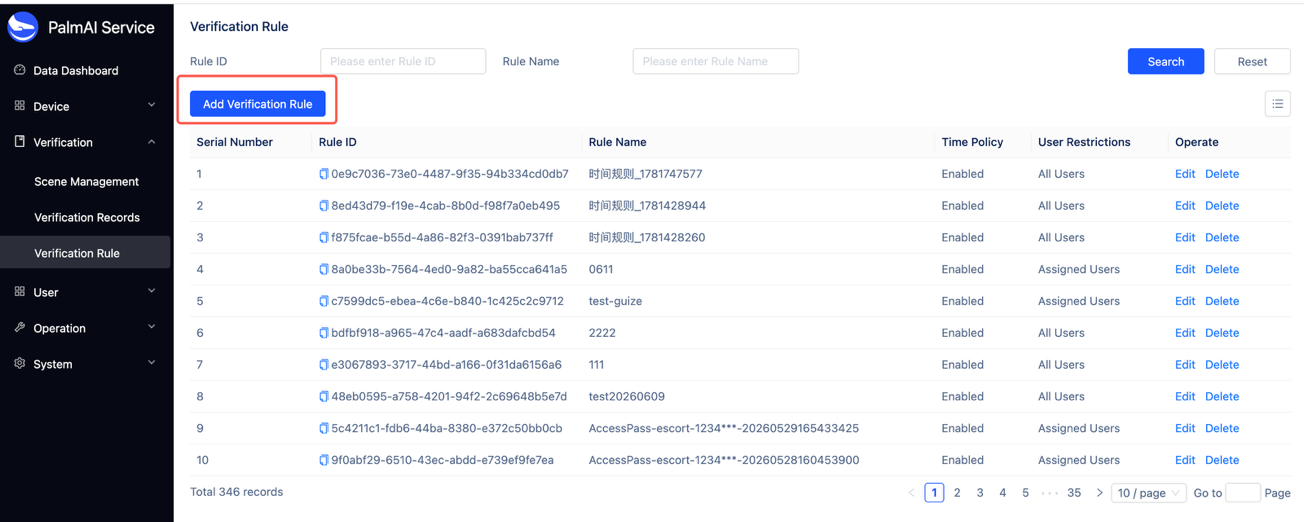
3.4.1 Adding a Verification Rule
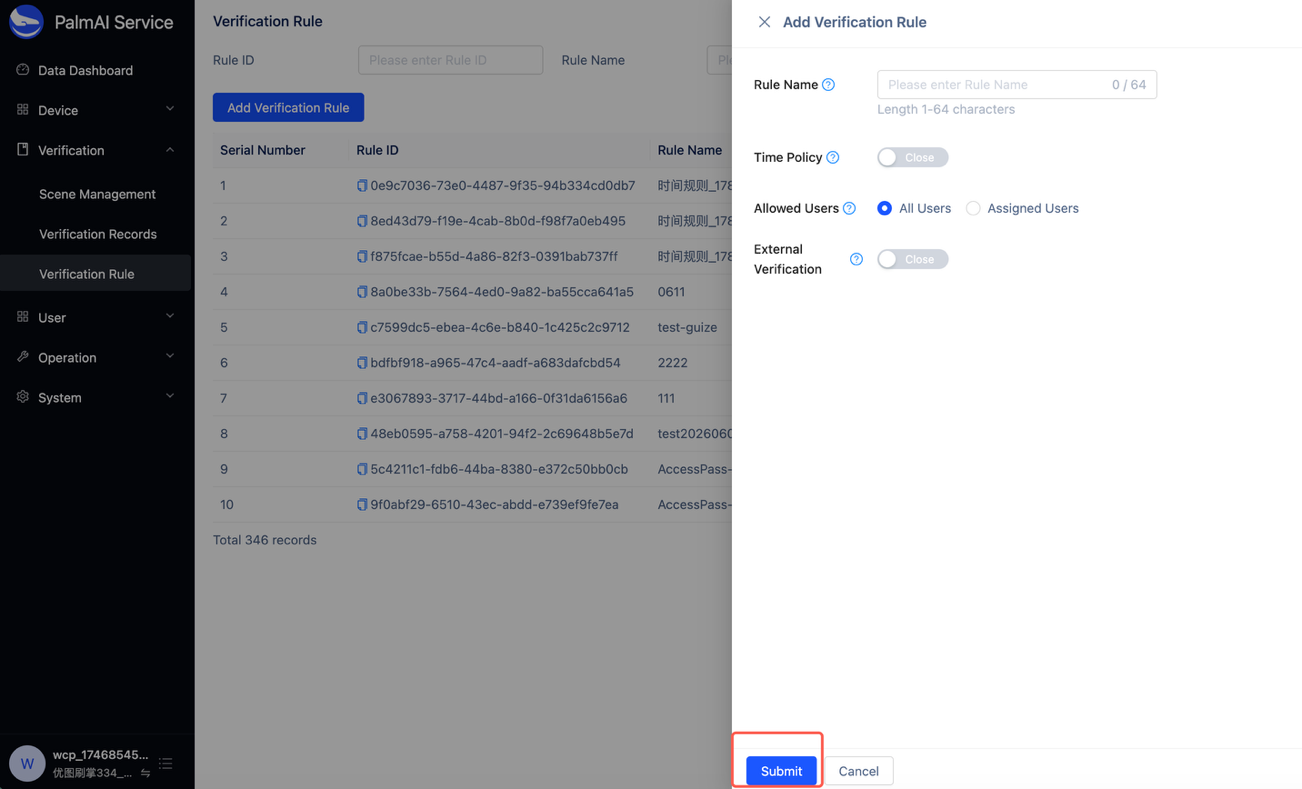
- Click Add Verification Rule.
- Enter the Rule Name. This field is required.
- Configure Time Rules as needed. This field is optional and lets you set available dates, restricted dates, and verification time slots.
- Select Eligible Users. This field is required.
- Configure External System Verification as needed.
- Submit the Verification Rule.
Configuring Time Rules
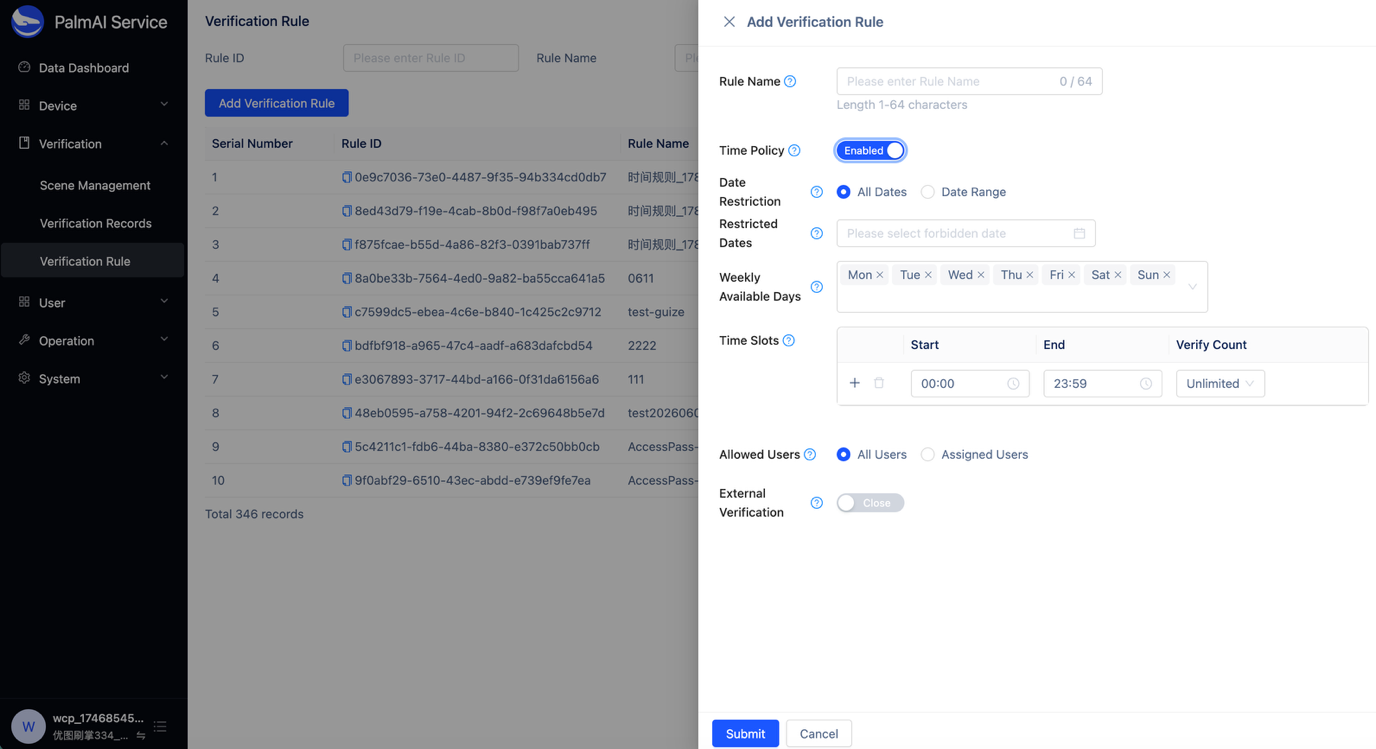
- Click the Time Rules button.
- Set the effective date range of the Verification Rule:
- When All Dates is selected, the rule applies to all dates. You can still configure dates on which verification is unavailable under Restricted Dates.
- When the rule is effective only within a specified date range, select Date Range and set the effective date range. You can also configure Restricted Dates.
- Under Weekly Available Days, select the days of the week on which verification is available.
- Under Time Slots, set the effective periods on available verification dates. Multiple periods can be configured.
Restricted Dates and Weekly Available Days apply together. For example, after Monday and Wednesday are selected under Weekly Available Days, verification is available only on Mondays and Wednesdays within the effective date range. If a Monday is also configured under Restricted Dates, the Verification Rule does not apply on that date.
Restricted dates take precedence over available dates.
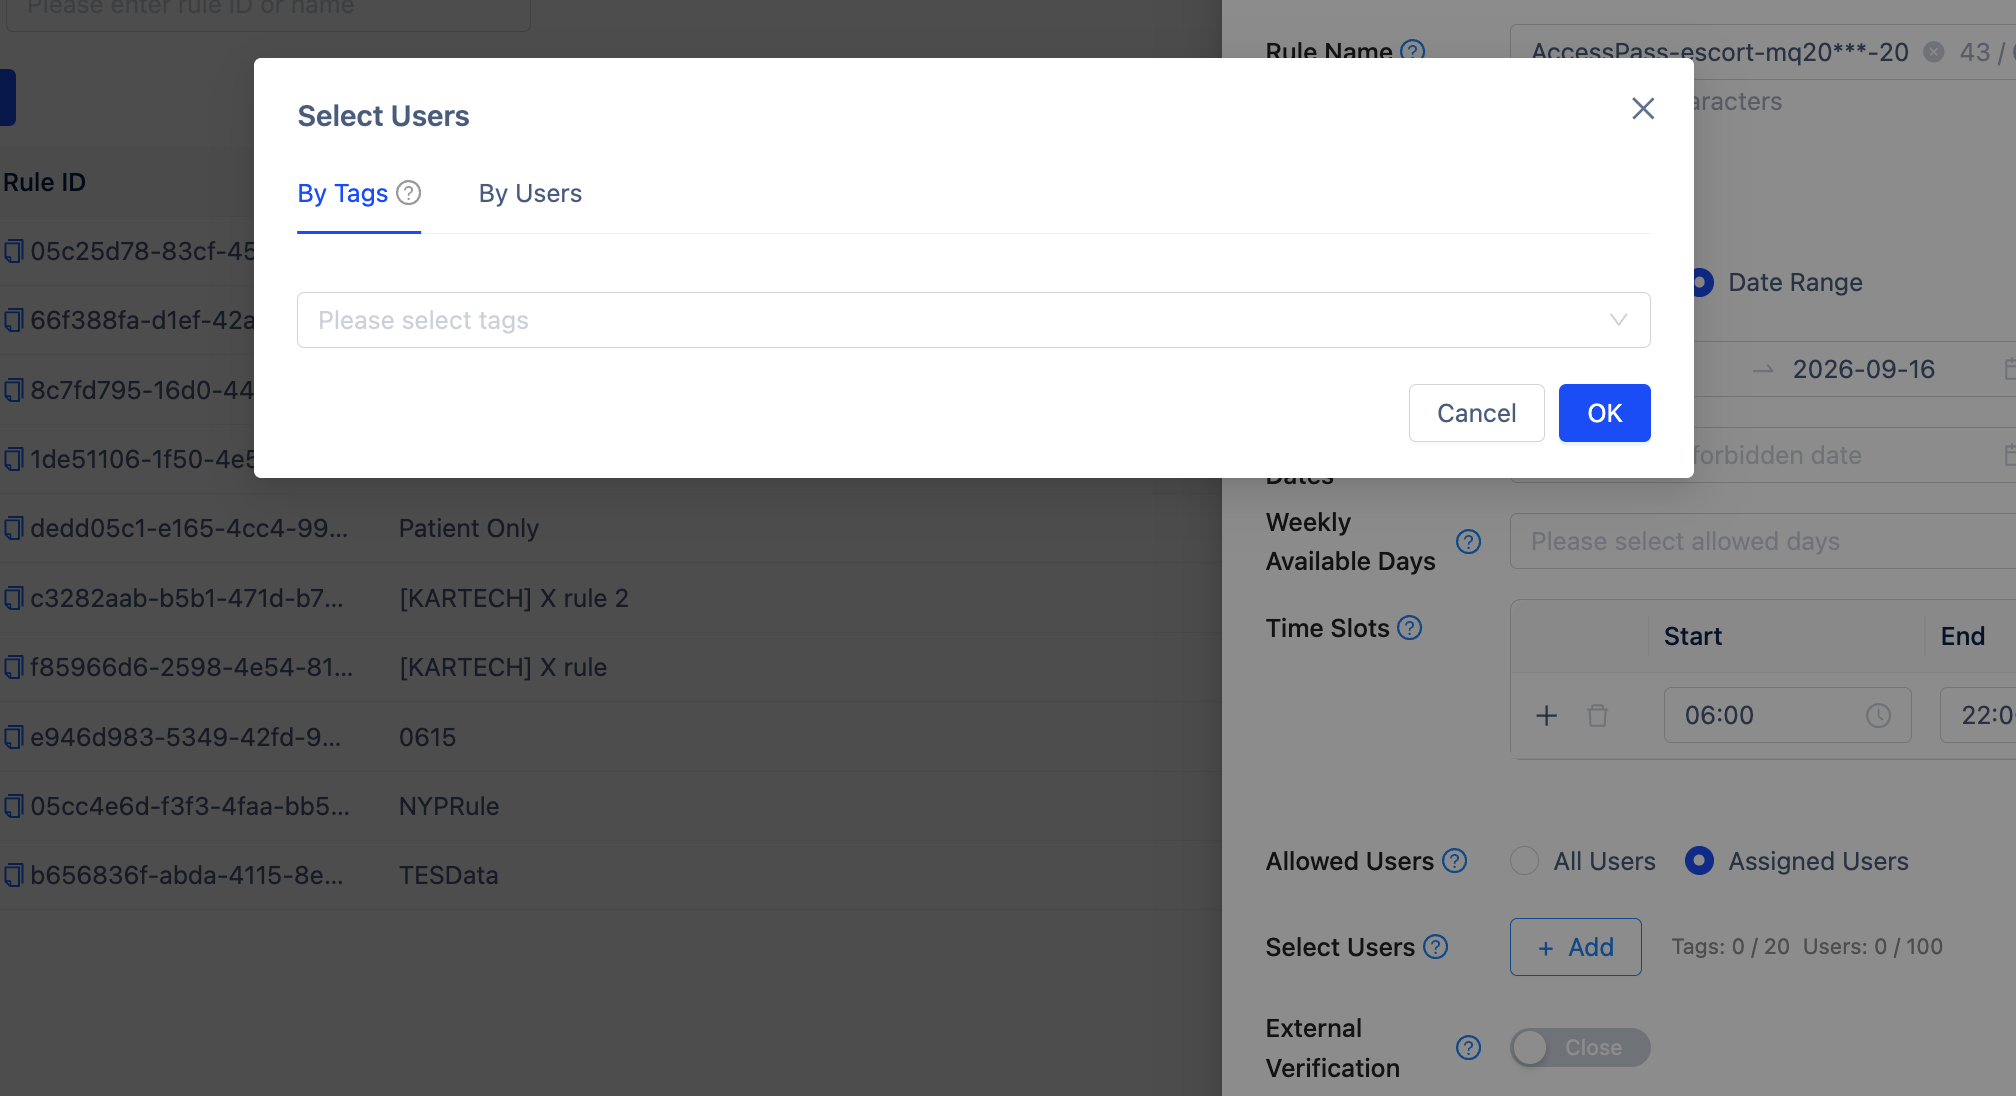
Configuring Eligible Users
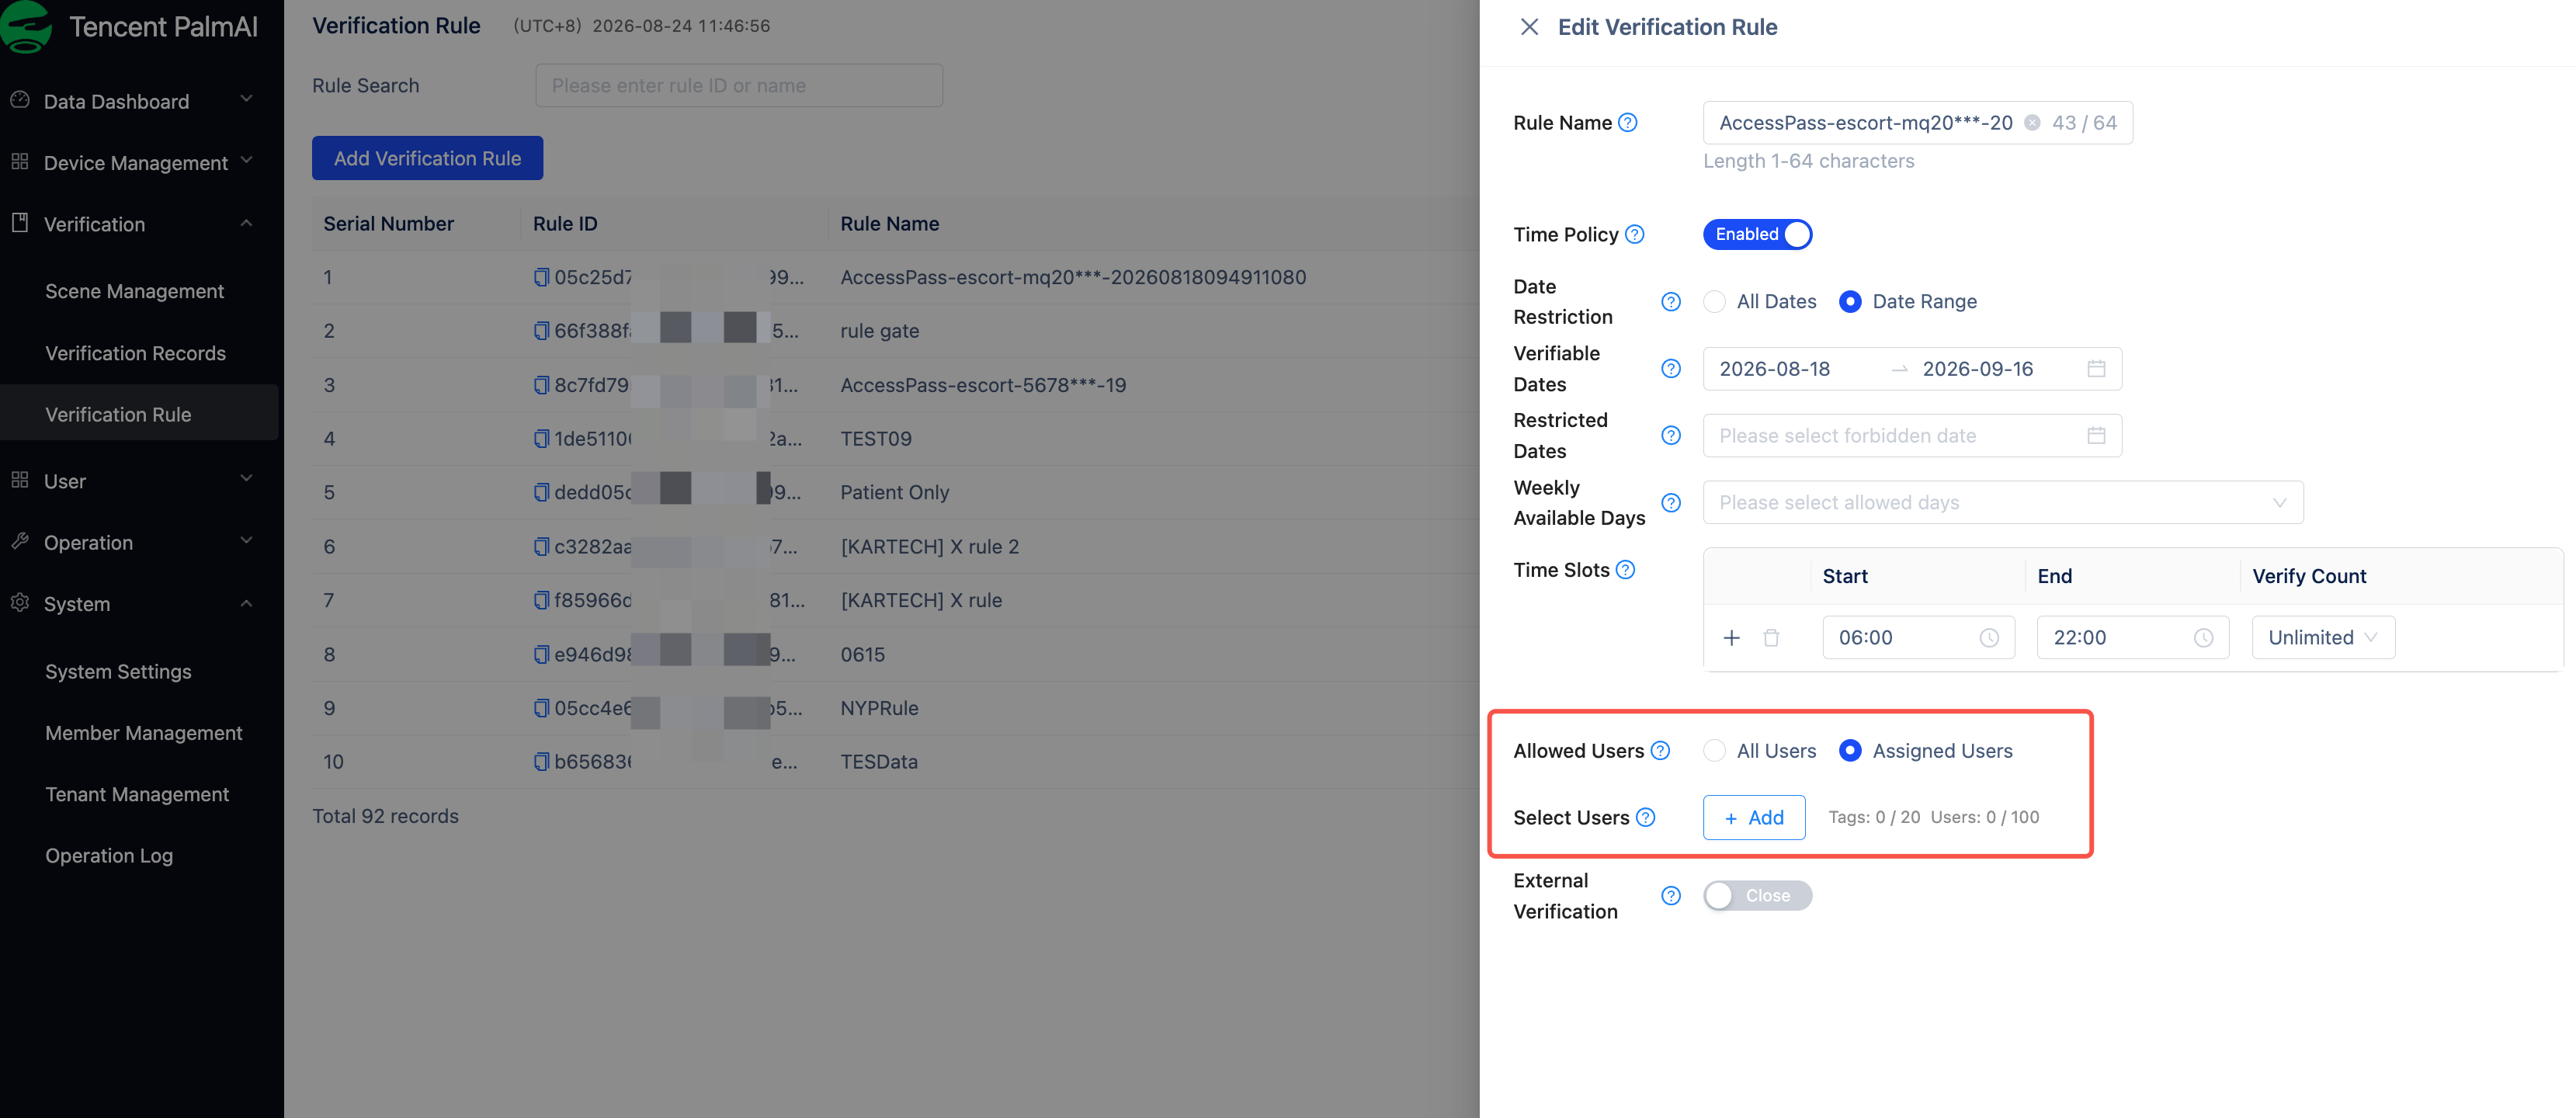
Eligible users can include all users or specified users only. When specifying users, you can select all users under a tag in batches or select individual users directly.
Configuring External System Verification
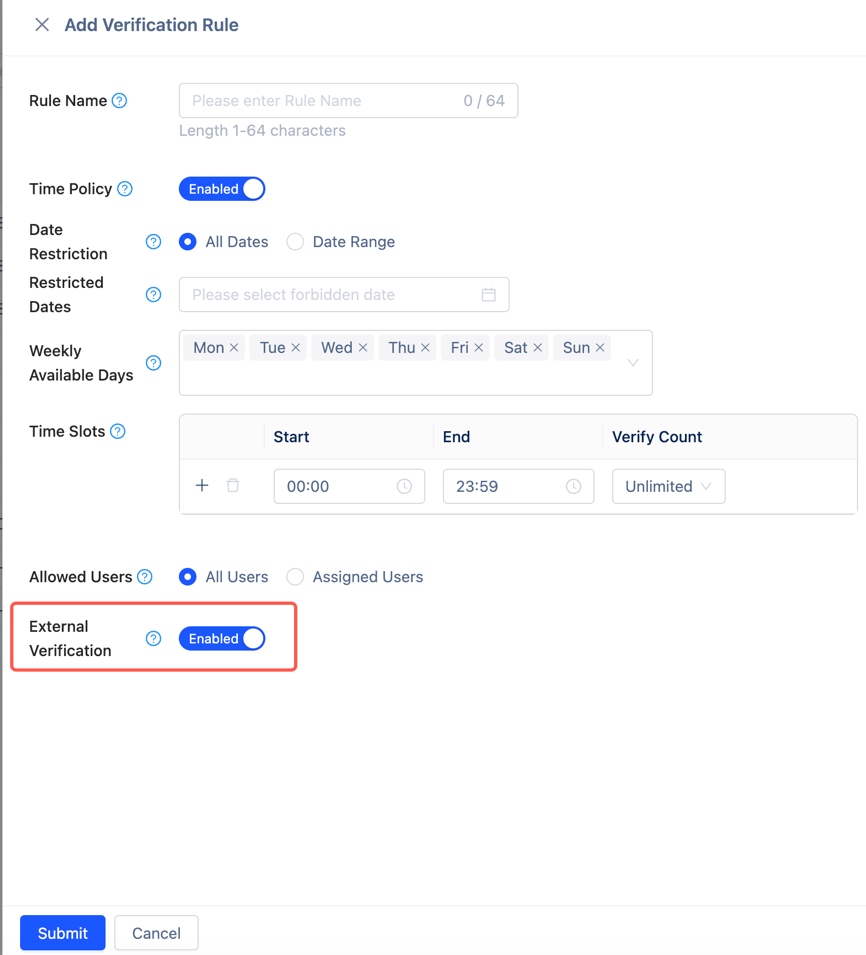
After external system verification is enabled, Palm Print Verification follows this process:
- Pass the local Verification Rule.
- Receive the final verification result from the external system.
Verification succeeds only when both the local Verification Rule and external system verification succeed. The external system returns the result through the configured verification record notification address. If no address is configured, contact the administrator.
3.4.2 Editing a Verification Rule
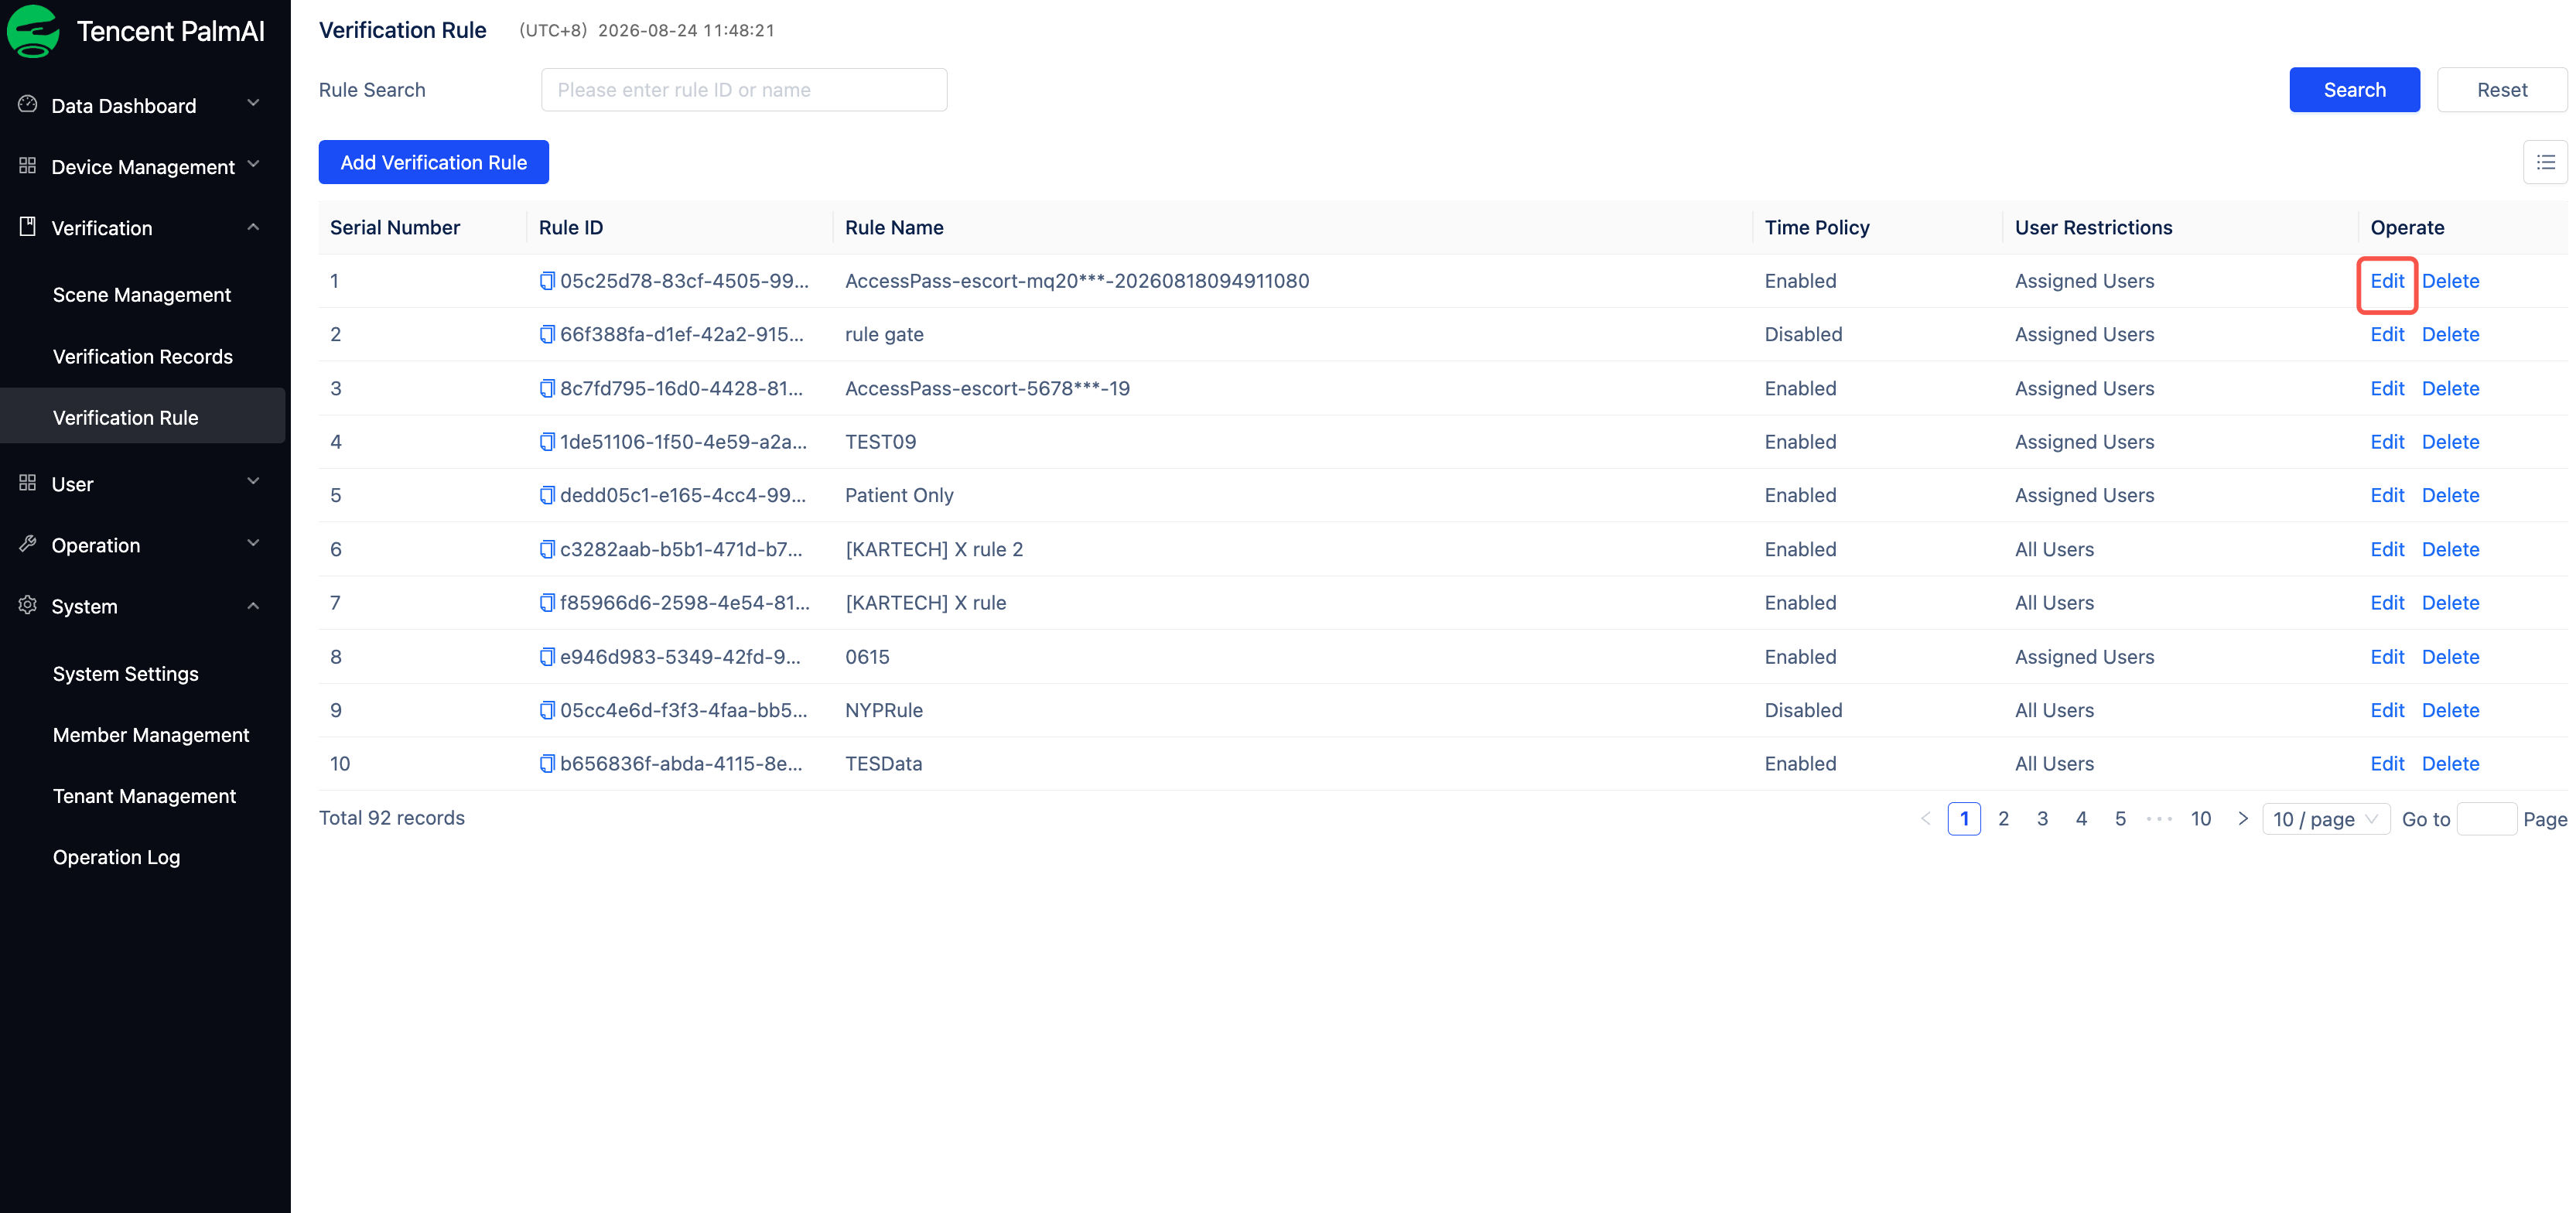
- Find the target Verification Rule.
- Click the edit button.
- Modify the rule configuration.
- Submit the changes.
3.5 User Management
A tenant's Scene Mode is either Open Scene or Closed Scene. You can view the current tenant's Scene Mode under System Management > Tenant Management in PalmAI Admin Web:
- Open Scene: User information does not need to be added before users register their palms. The system automatically creates a user after Palm Registration succeeds.
- Closed Scene: A user must be created in PalmAI Admin Web before registering a palm. Users can be created individually or imported in batches.
After a user is created, palm registration and user binding can be completed in the following ways:
| Registration Method | Description |
|---|---|
| Mobile Palm Registration | The user preregisters a palm through a mobile App or the Mobile Palm Registration H5 page, then performs the first Palm Scan and completes activation on an on-site device. |
| Device Input Registration | The user performs a Palm Scan on a verification device, then enters user information as prompted on the screen to complete registration. |
| Phone Scan QR Registration | The user performs a Palm Scan on a verification device, then scans a QR code with a phone as prompted on the screen to complete registration. |
| Device Scan QR Registration | The user enters registration information on an H5 page to generate a registration QR code, then performs a Palm Scan and scans the QR code on the device to complete registration. |
| Host Input | An administrator enters user information in the Host software and guides the user through a Palm Scan on the device to complete registration. |
3.5.1 Creating a User
Users can be created individually or imported in batches. Select the appropriate method based on the number of users you need to create.
Creating a Single User
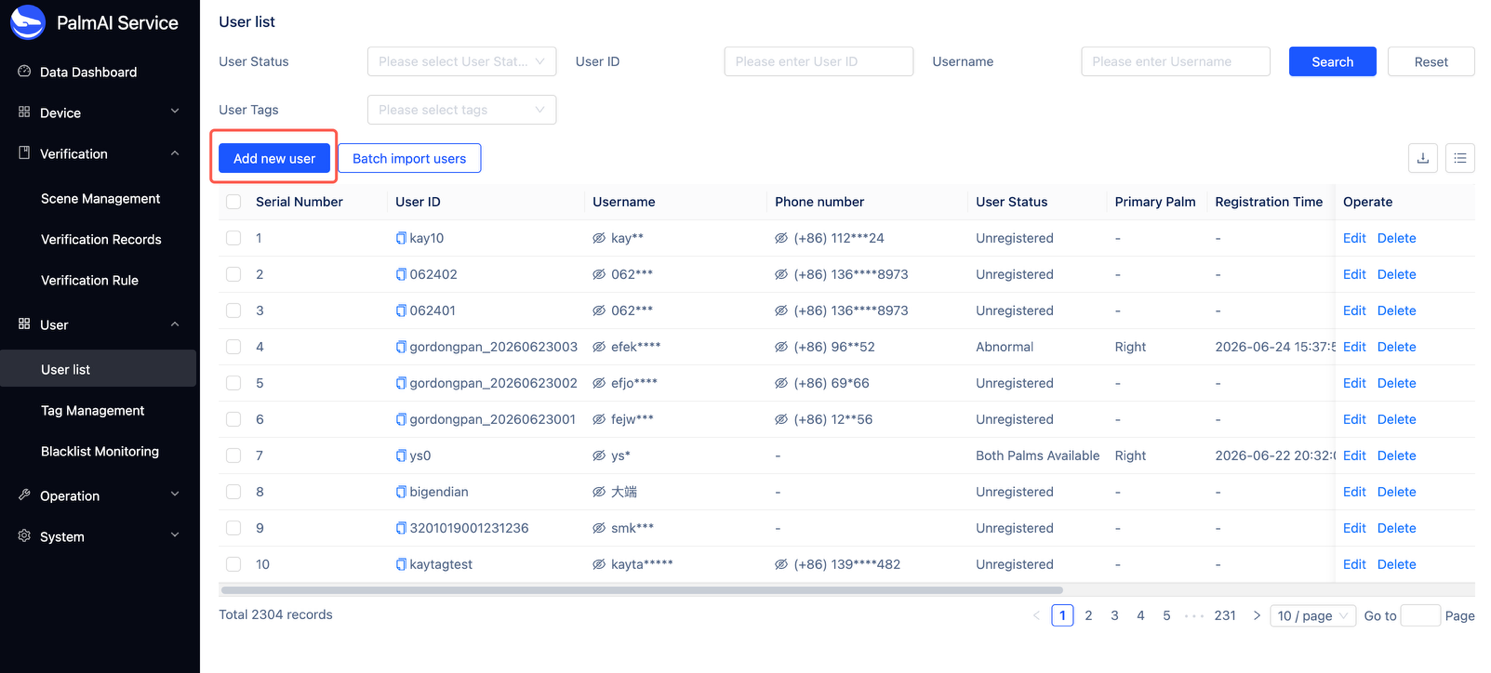
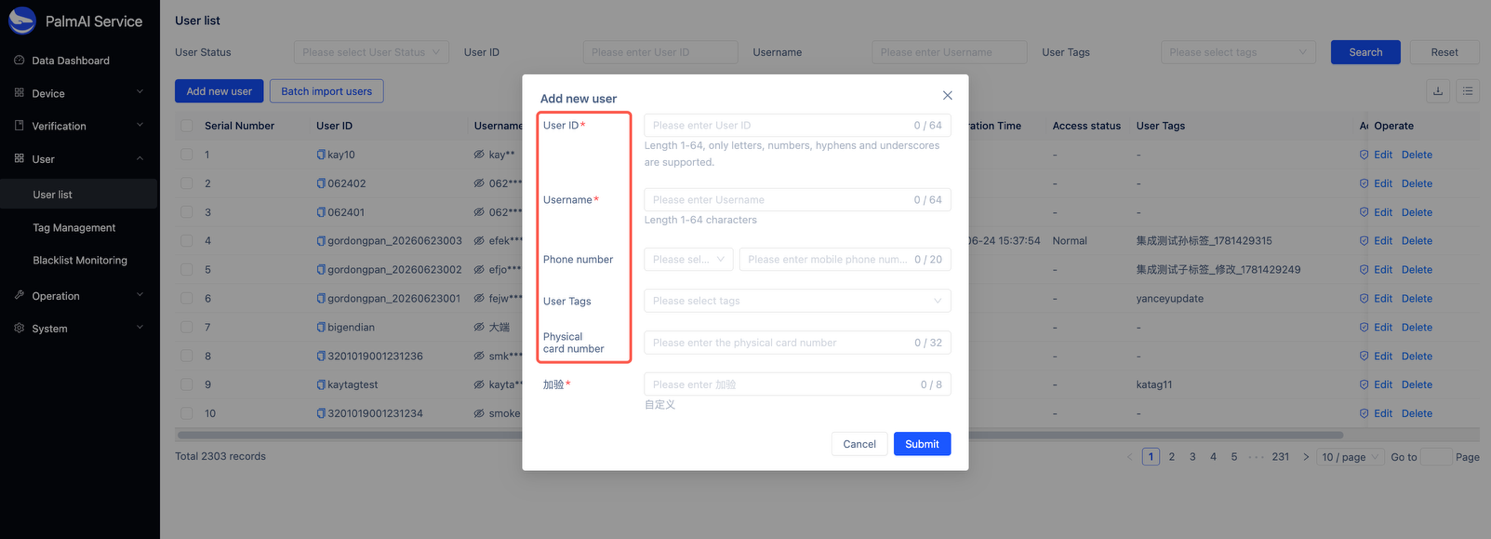
- Click Add new user.
- Enter the user information:
- User ID: Required.
- Username: Required.
- Phone number: Optional.
- User Tags: Optional.
- Physical card number: Optional. This field is required when an M3 device uses Wiegand mode.
- Submit the user information.
Creating Users in Batches
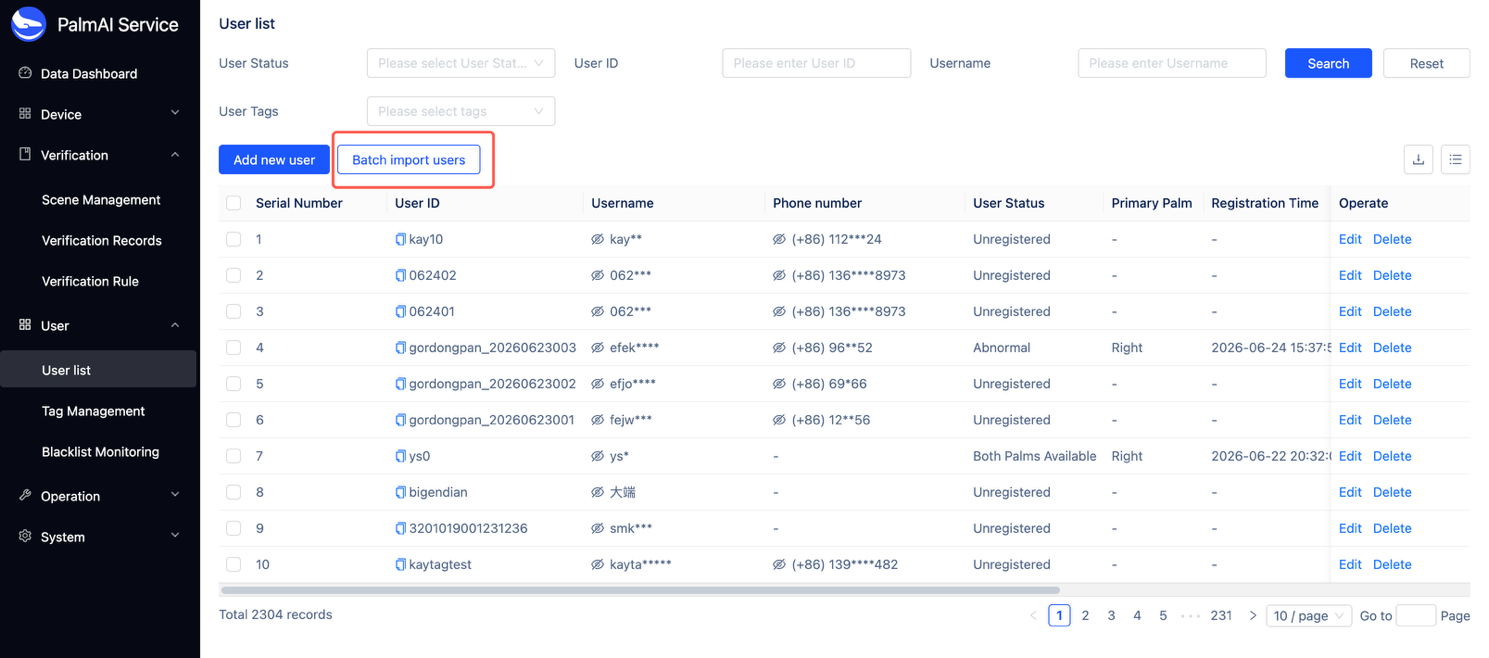
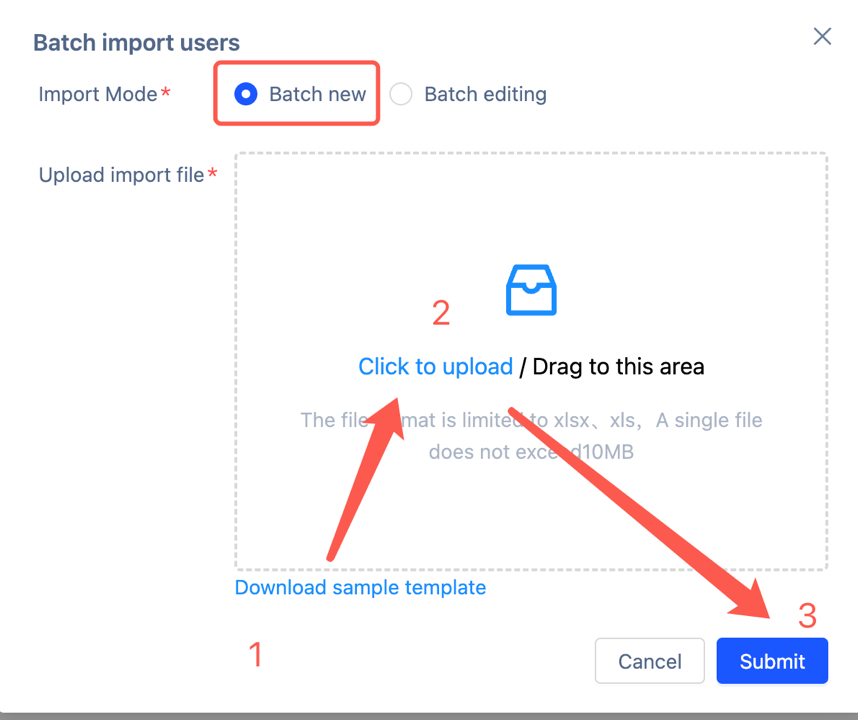
- Click Import users in batches to go to the batch import page.
- Select Batch new.
- Download the import template.
- Enter user information as specified in the template and upload the template.
- Click Submit.
After submission, the success and failure results appear at the top of the page. If the failure count is greater than 0, a button for downloading failure information appears.
Note
Do not modify the import template or delete its instructions. User ID is the user's unique identifier and cannot be changed after import. The upload fails in any of the following cases:
-
The User ID is already registered in the system.
-
The User ID does not meet the format requirements.
-
The phone number does not meet the format requirements.
-
The Physical Card Number does not meet the format requirements.
Custom Additional Verification Field
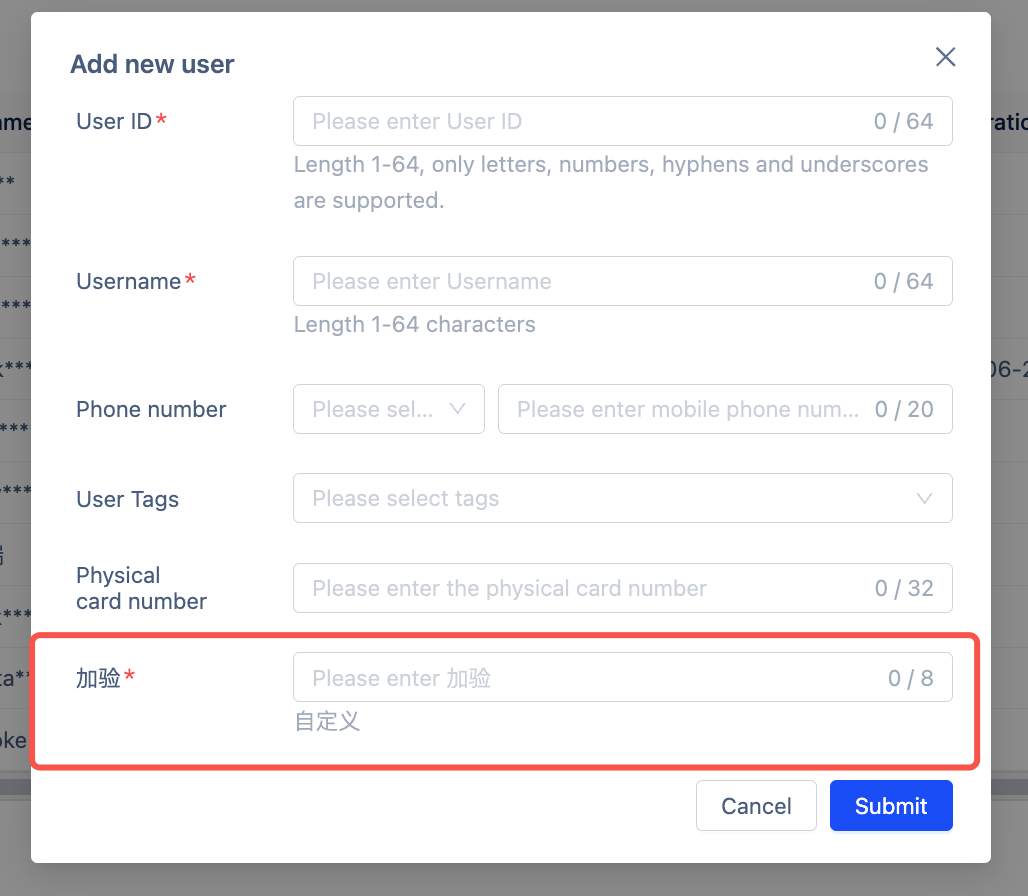
If Custom Numeric Field Verification is enabled for the tenant, the corresponding custom numeric field must be entered when creating a user. The field name depends on the backend configuration, such as employee ID or device number. The language is user-defined. For configuration instructions, see "3.9.4 Tenant-Level Additional Verification Configuration." Values from 4 to 8 digits are supported. Users without a value in this field cannot pass Additional Verification.
3.5.2 Editing a User
User information can be edited individually or in batches. Select the appropriate method as needed.
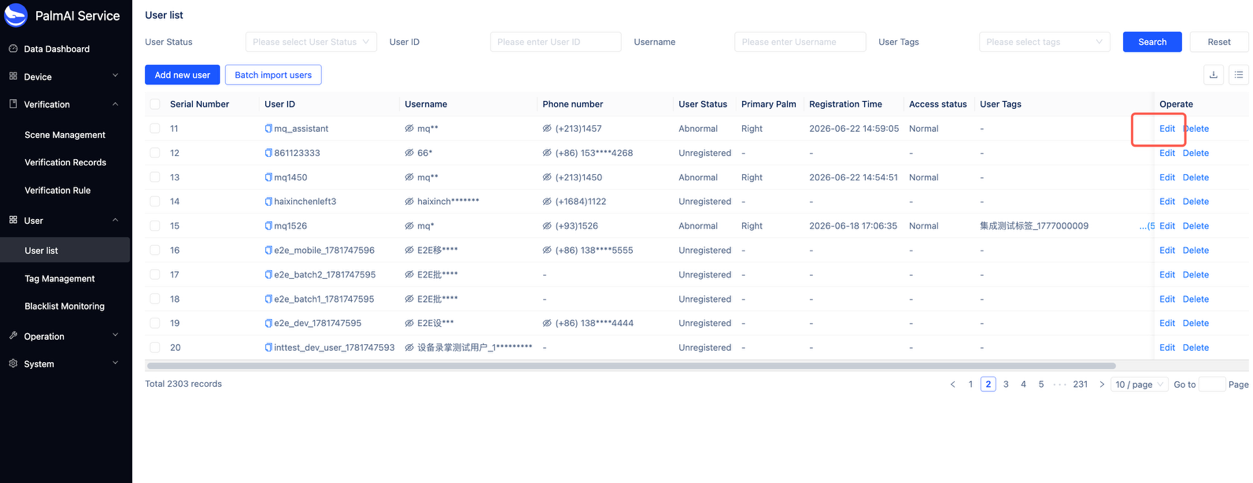
Editing a Single User
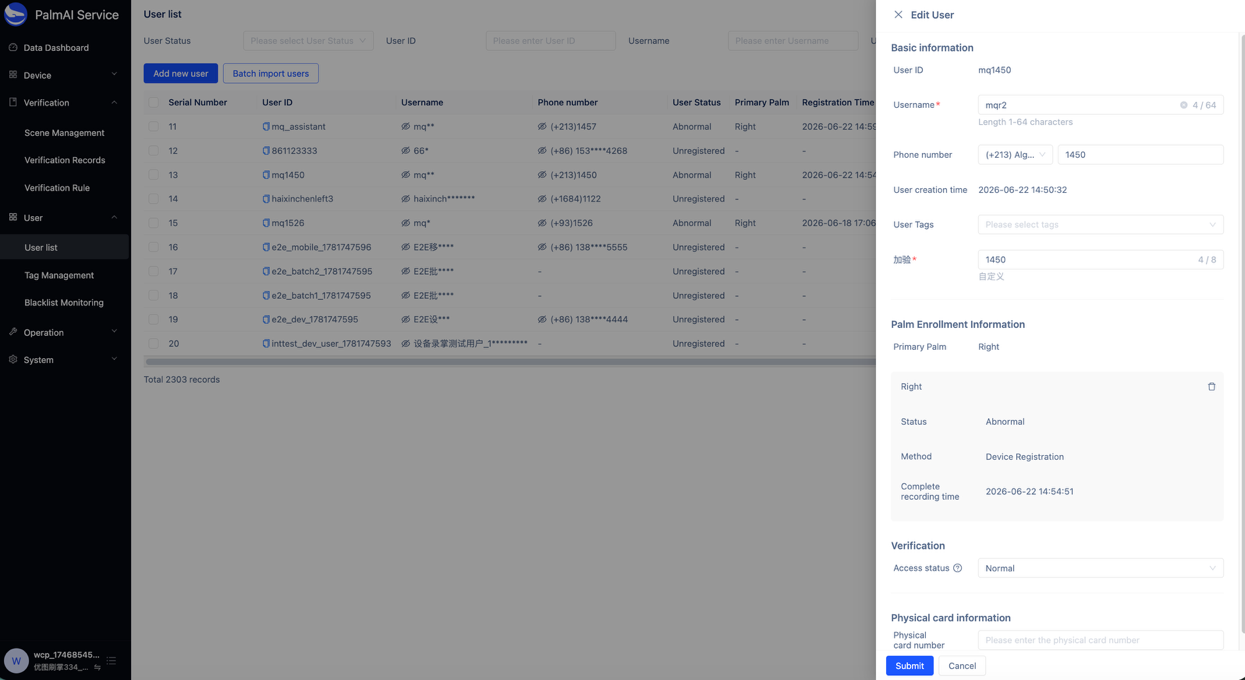
- Find the target user and click Edit.
- Change Username, Phone number, or Physical card number as needed. User ID cannot be changed.
- Save the changes.
Note
When the user's Registration Status is
Registered, the Verification module appears on the editing page. You can set the user's Access Status, whose default value isnormal. This module does not appear if the user's palm has not been registered.
Editing Users in Batches
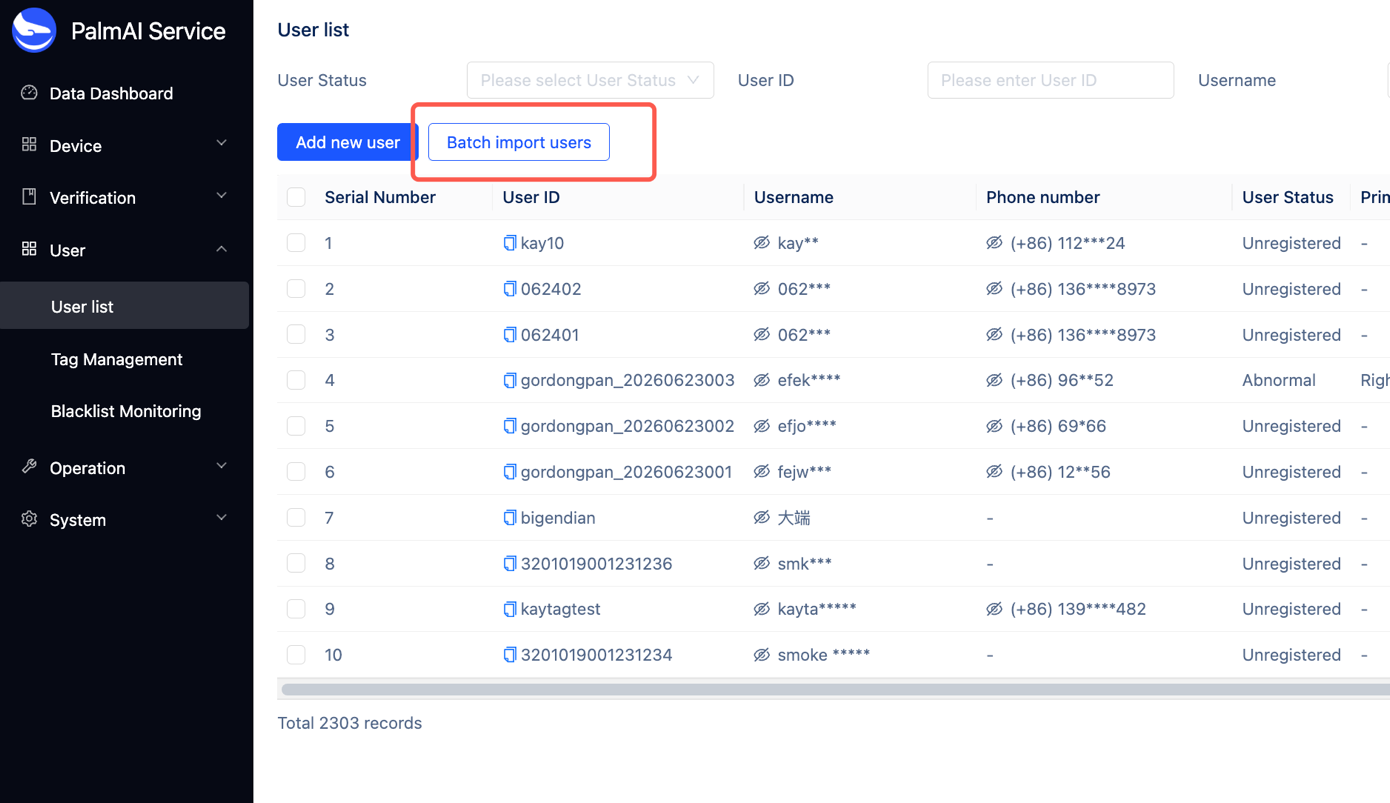
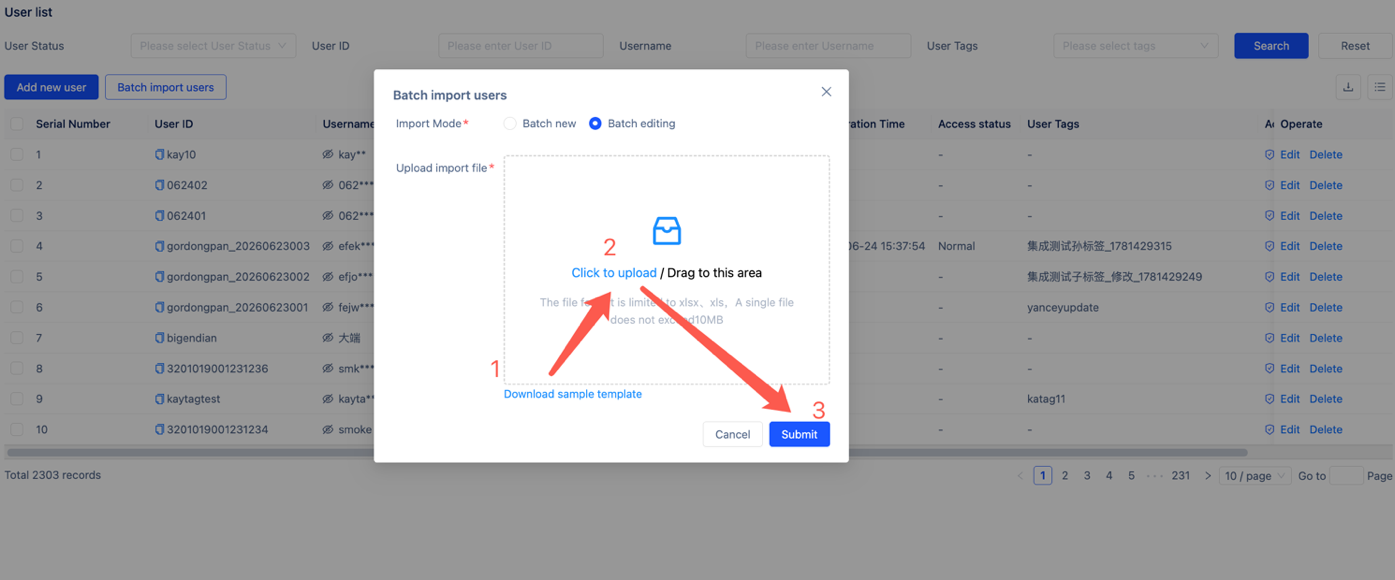
- Click Import users in batches to go to the batch editing page.
- Select Batch editing.
- Download the import template.
- Enter user information as specified in the template and upload the template.
Note
Do not modify the import template or delete its instructions. User ID is the user's unique identifier and cannot be changed after import.
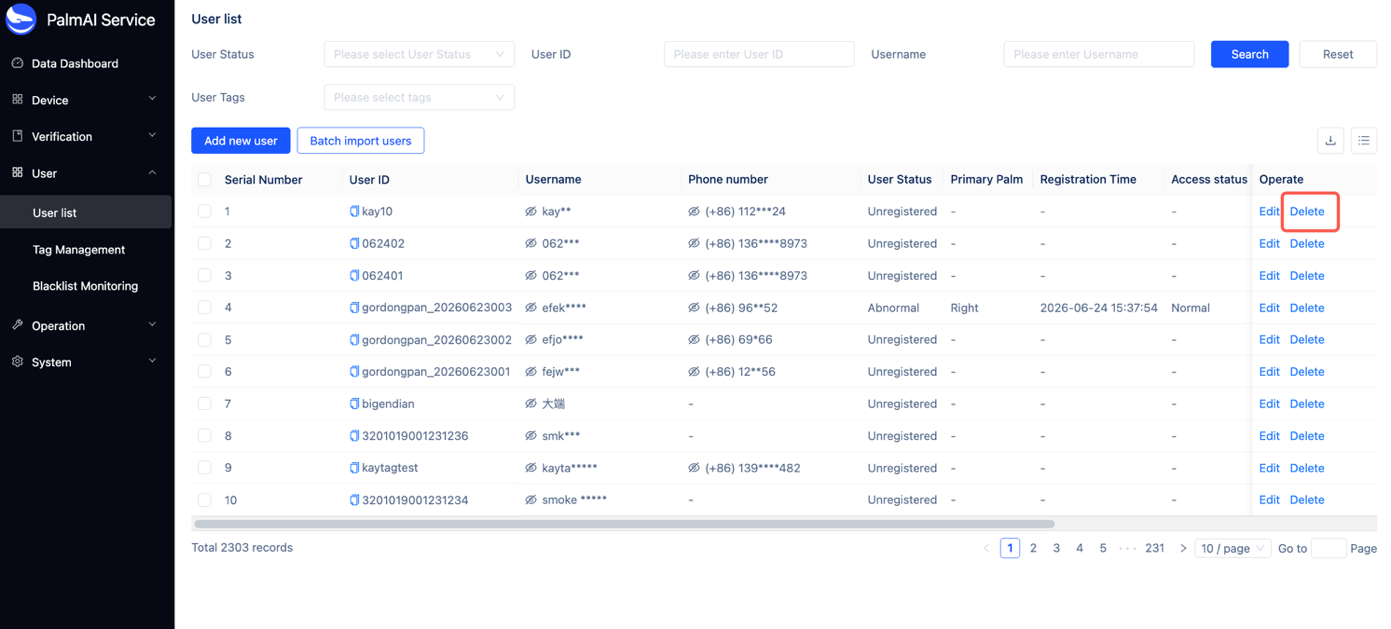
3.5.3 Deleting a User
- Find the target user and click Delete.
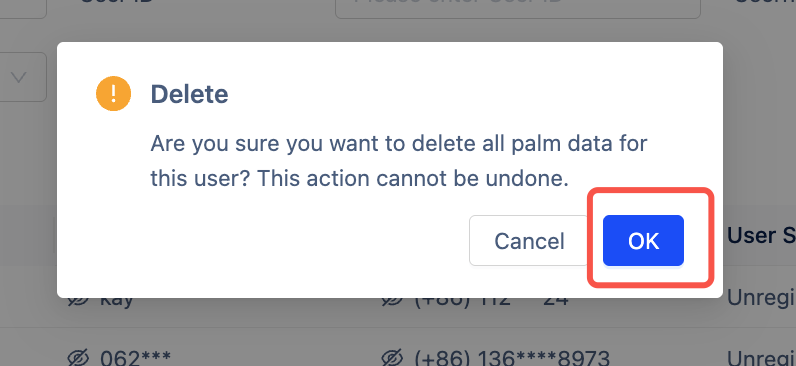
- Confirm the deletion in the confirmation dialog.
Warning
When a user is deleted, the system also deletes the user's Palm Print information. The palm must be registered again after the user is recreated. Deletion does not affect existing verification records, and the deleted user no longer appears in Verification Rules.
3.5.4 User Tag Management
User Tag Management supports creating, renaming, and deleting User Tags and binding them to users by organization or department hierarchy, up to three levels. This enables isolated group management for large user populations, such as dividing permission and visibility scopes by department or region.
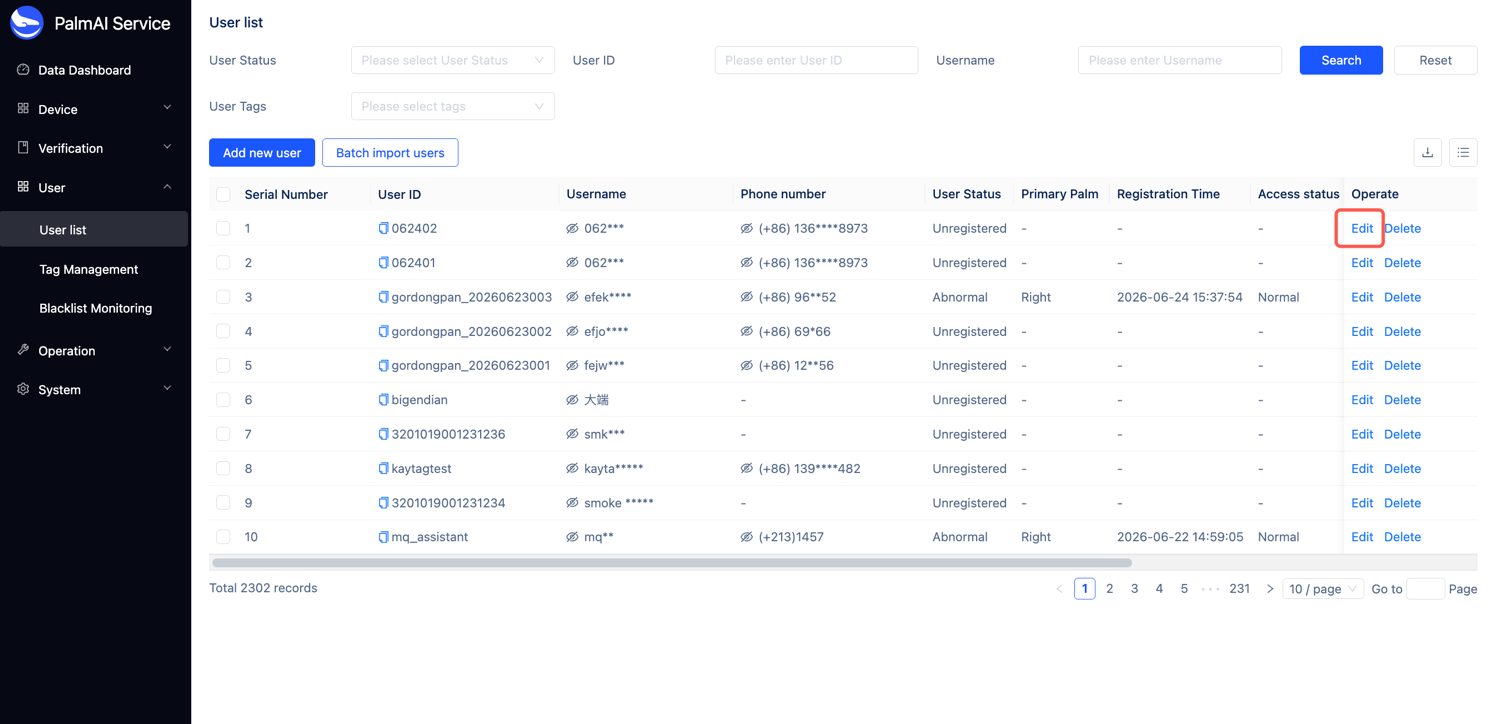
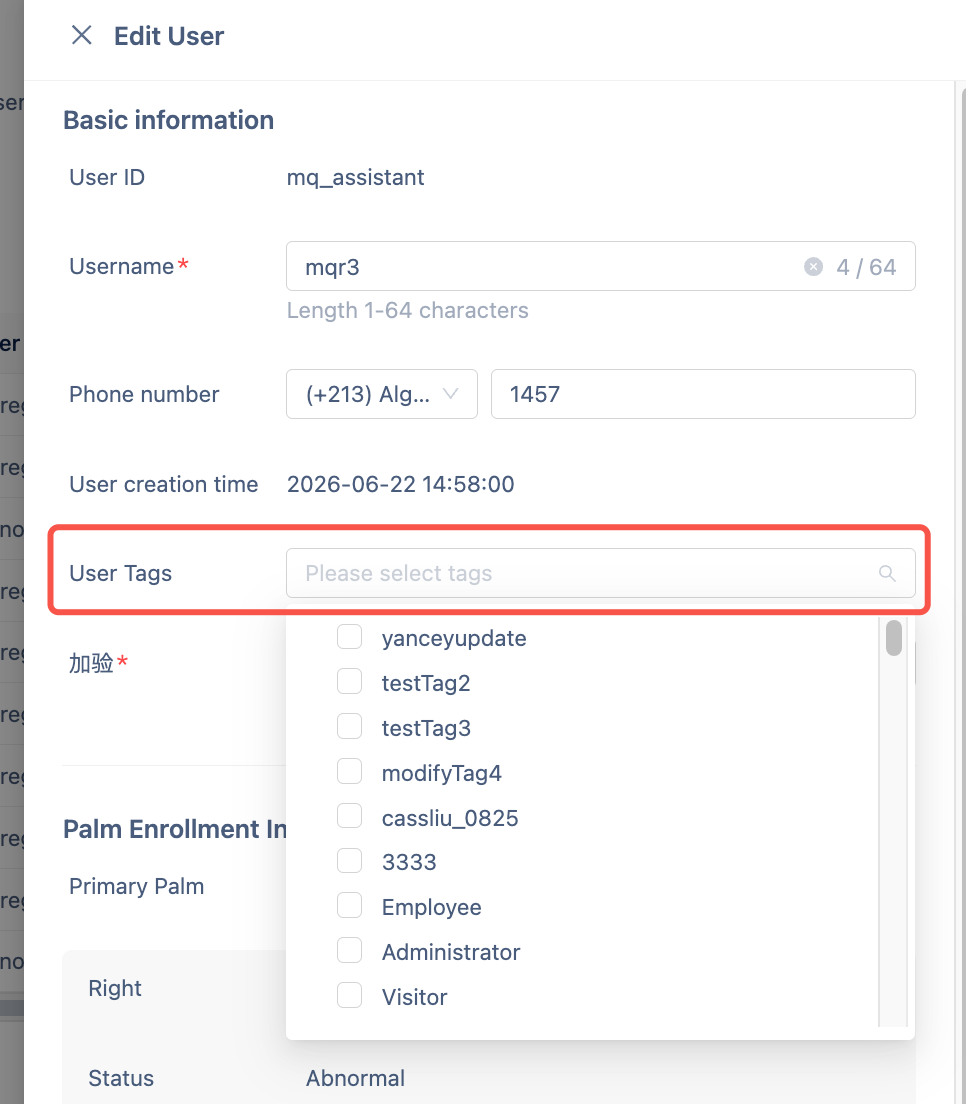
Selecting a Tag for a User
- Go to the User List page.
- Find the target user and click the edit button.
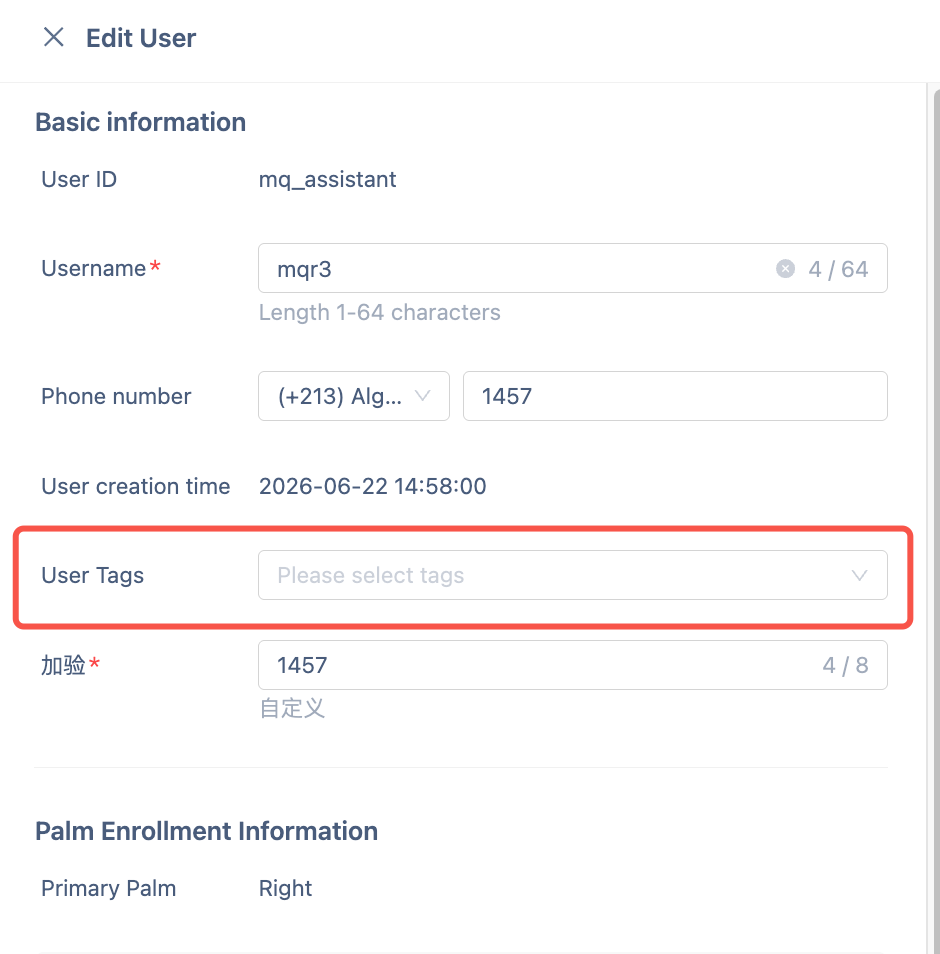
- Click the tag field and select a tag from the tag list.
- Submit and save.
Creating a Tag
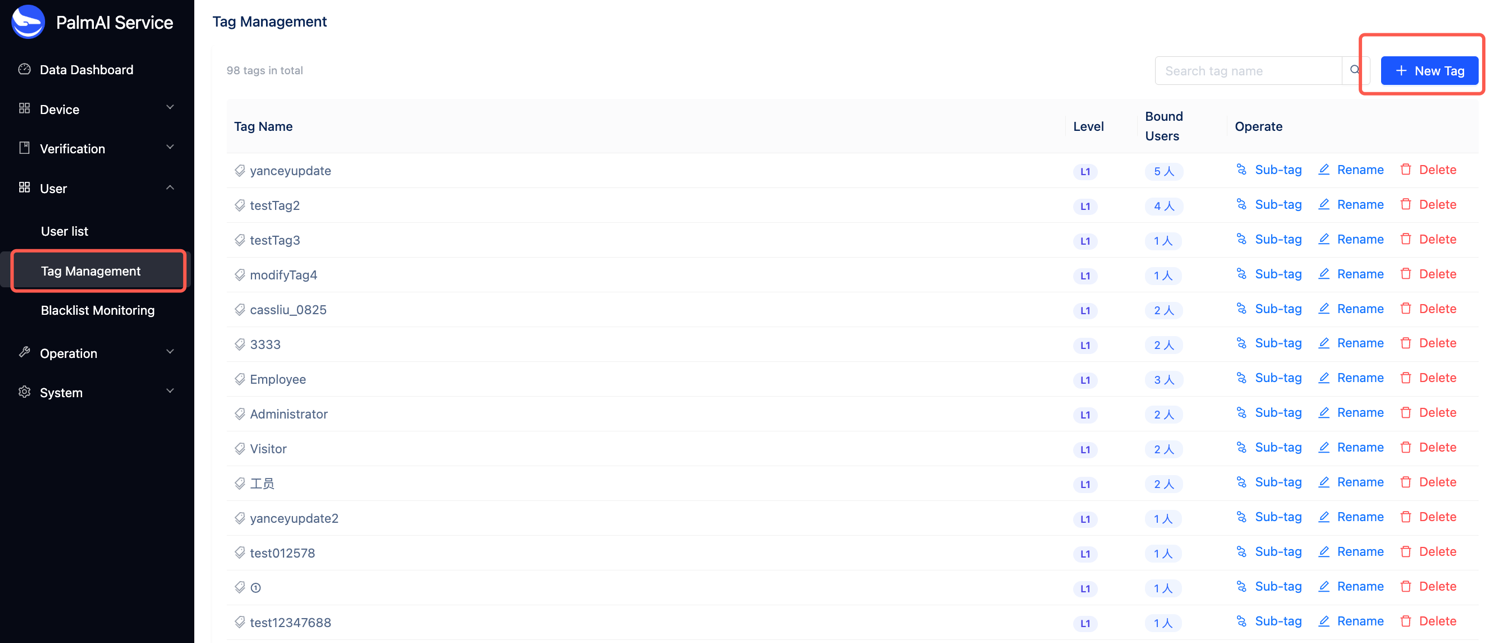
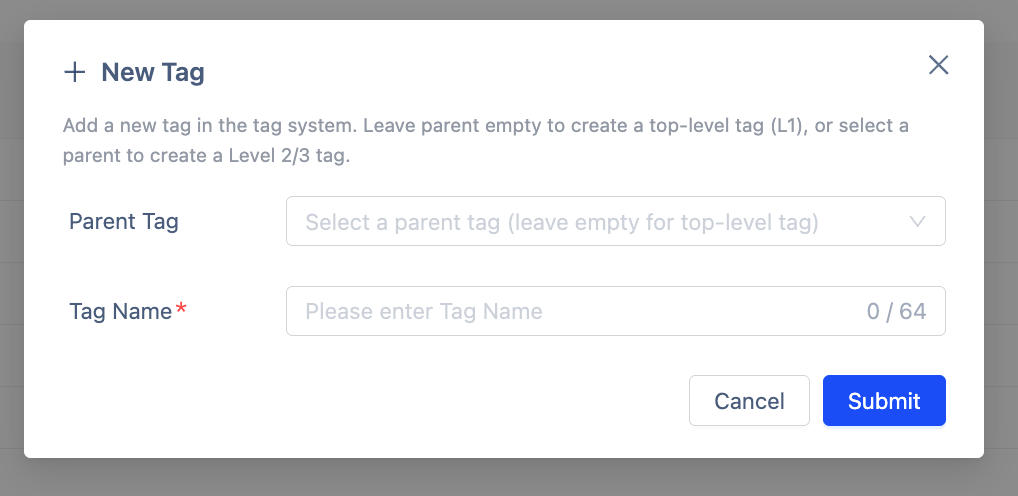
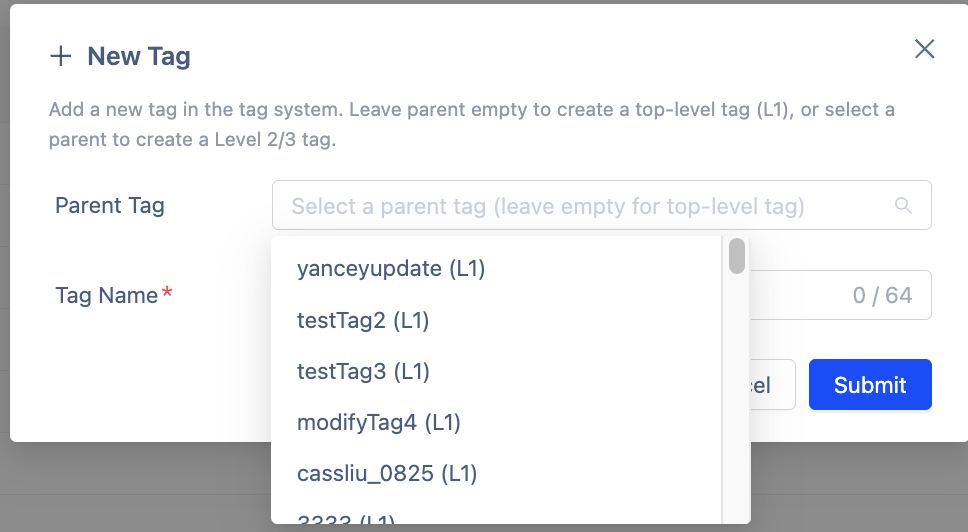
- Go to the Tag Management page, or access Tag Management from any user's editing page.
- Select the option to create a tag.
- Select a parent tag as needed.
- Enter the tag name.
- Submit and save.
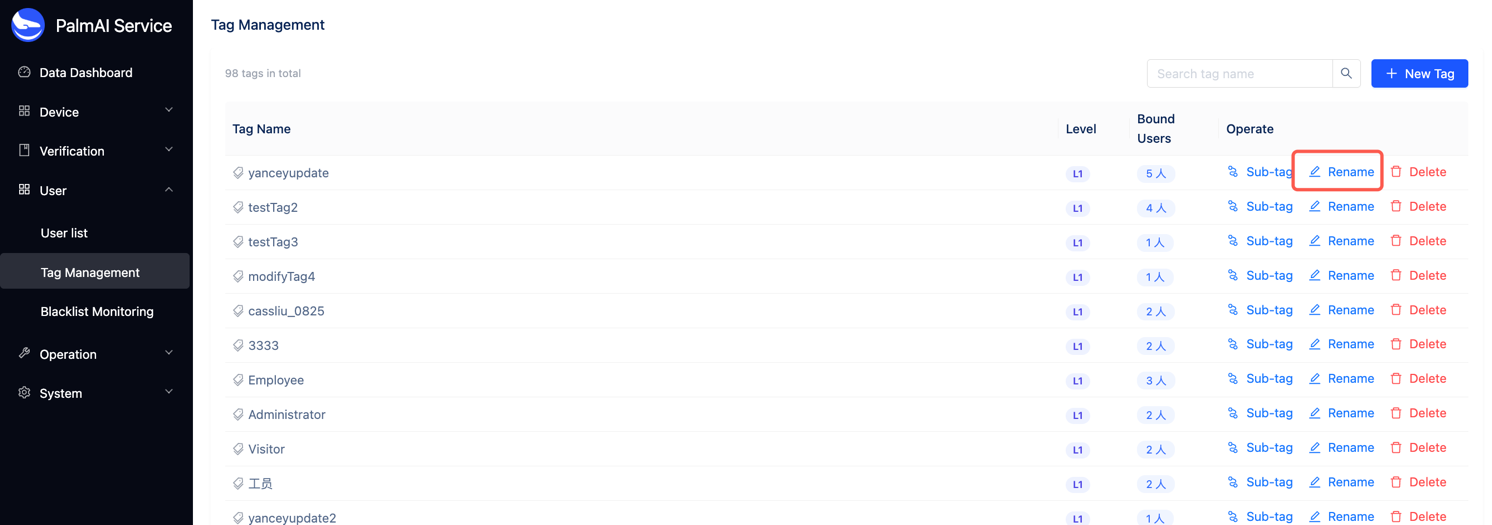
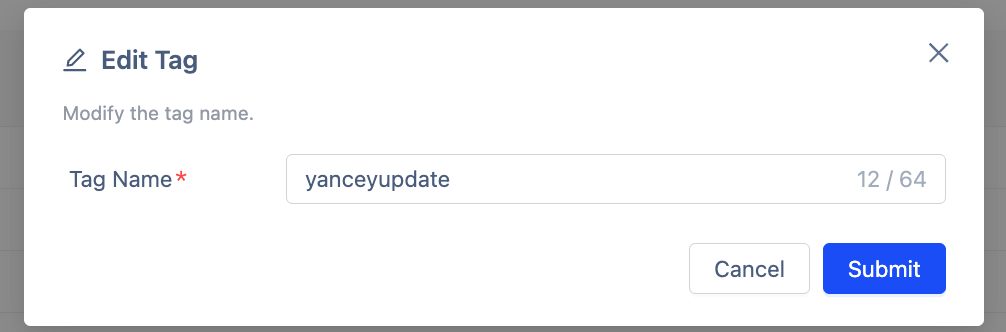
Renaming a Tag
- Find the target tag.
- Click Rename.
- Change the tag name and save.
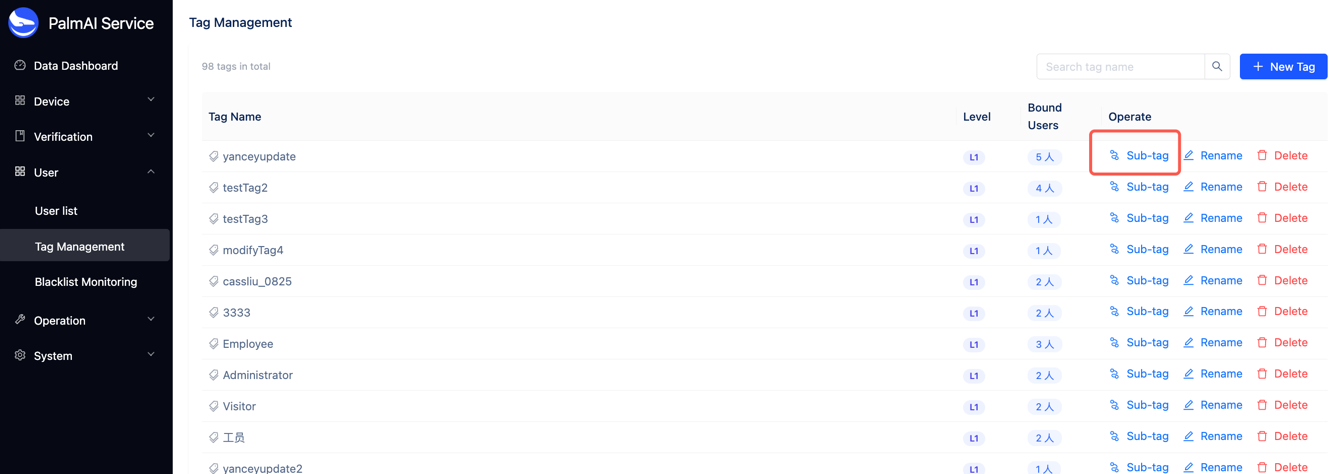
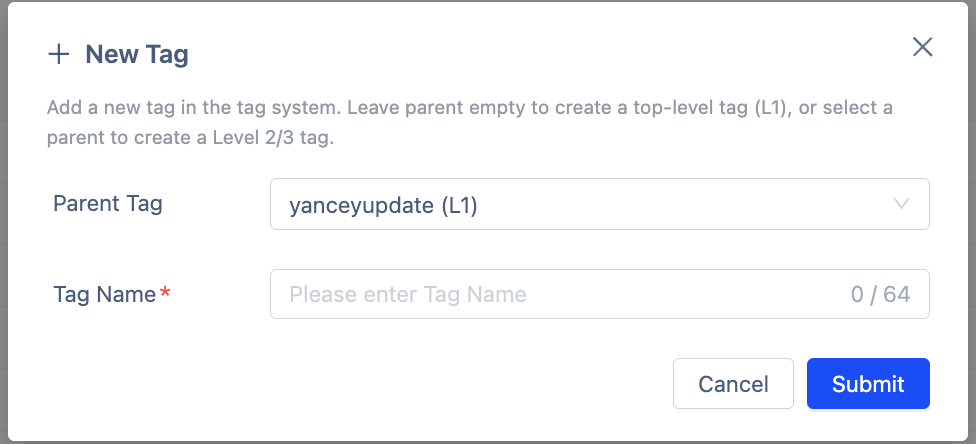
Creating a Sub-Tag
- Find the target parent tag.
- Click Sub-tag.
- Enter the sub-tag name and submit.
Deleting a Tag
- Find the target tag.
- Click Delete.
- Confirm the deletion.
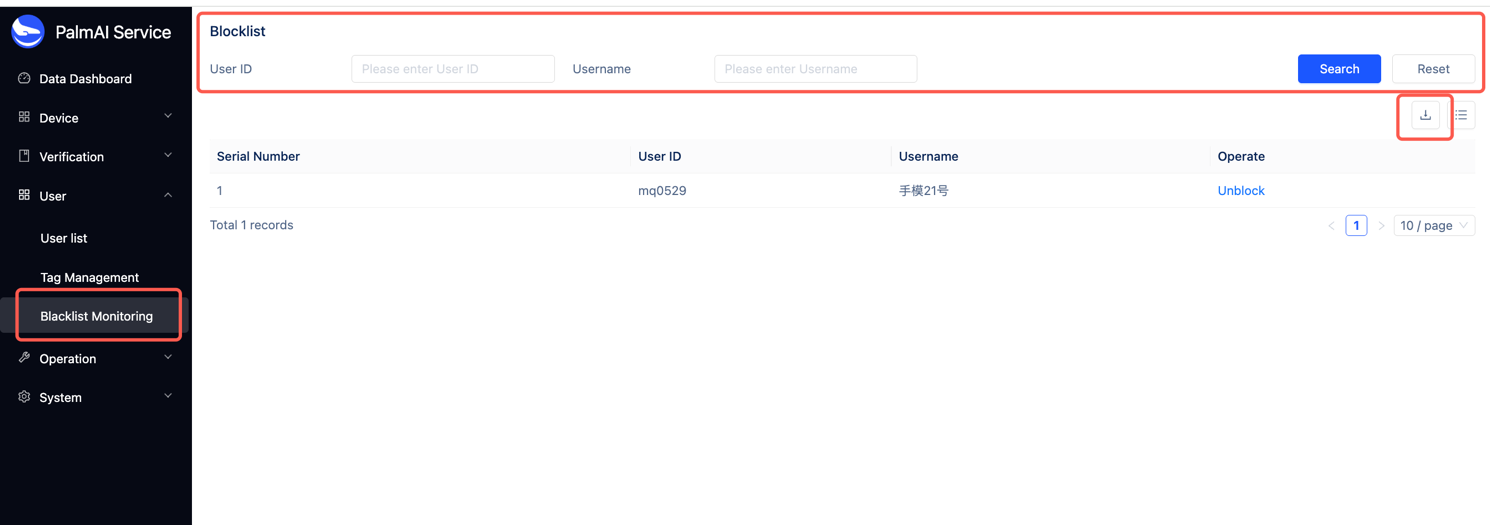
3.5.5 Blocklist Alerts
The Palm Algorithm Platform identifies Blocklist users. If a user is involved in a malicious attack or similar activity, the system marks the user as Blocklist, and the user cannot pass Palm Scan verification. An administrator can also set the user's Access Status to blocklist in the user list.
- Go to the Blacklist Monitoring page.
- Search for Blocklist users by User ID or Username.
- To export in batches, click the download icon. The exported fields are the same as the fields displayed on the page.
3.5.6 Viewing a User's Access Scope
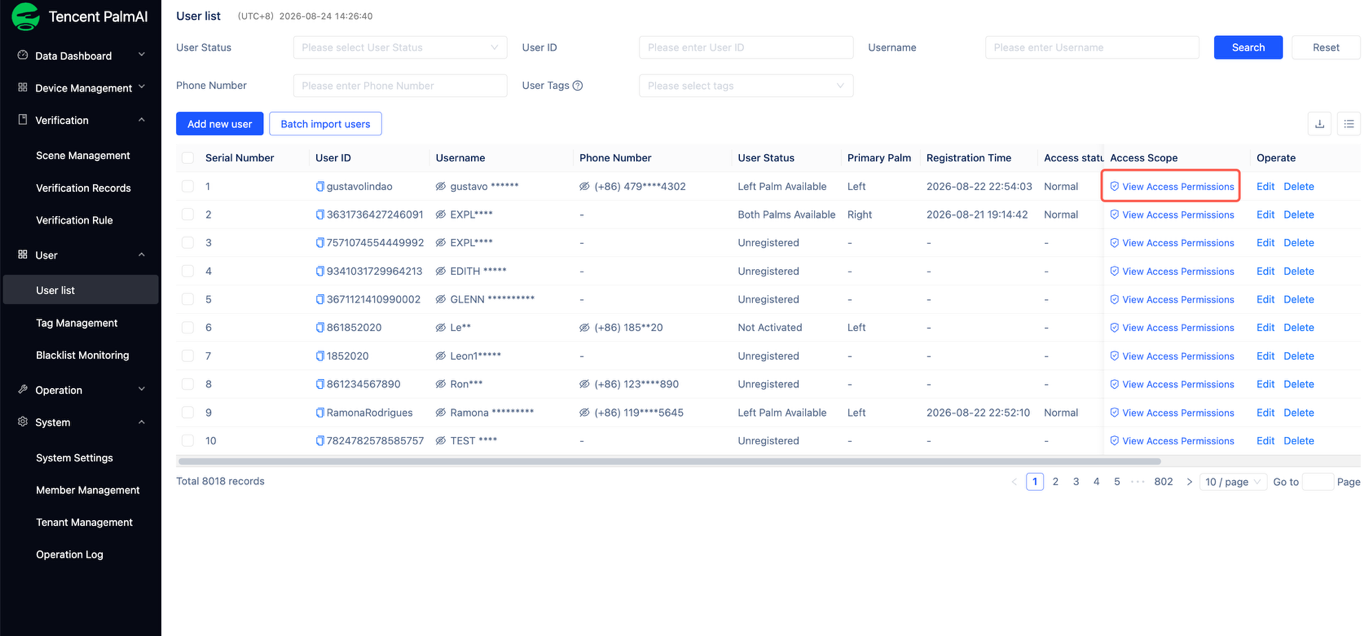
A user's access scope is configured in "3.2.2 Scene Management." This feature lets you view the scene groups, scenes, associated devices, Verification Rules, and other information that the current user can access.
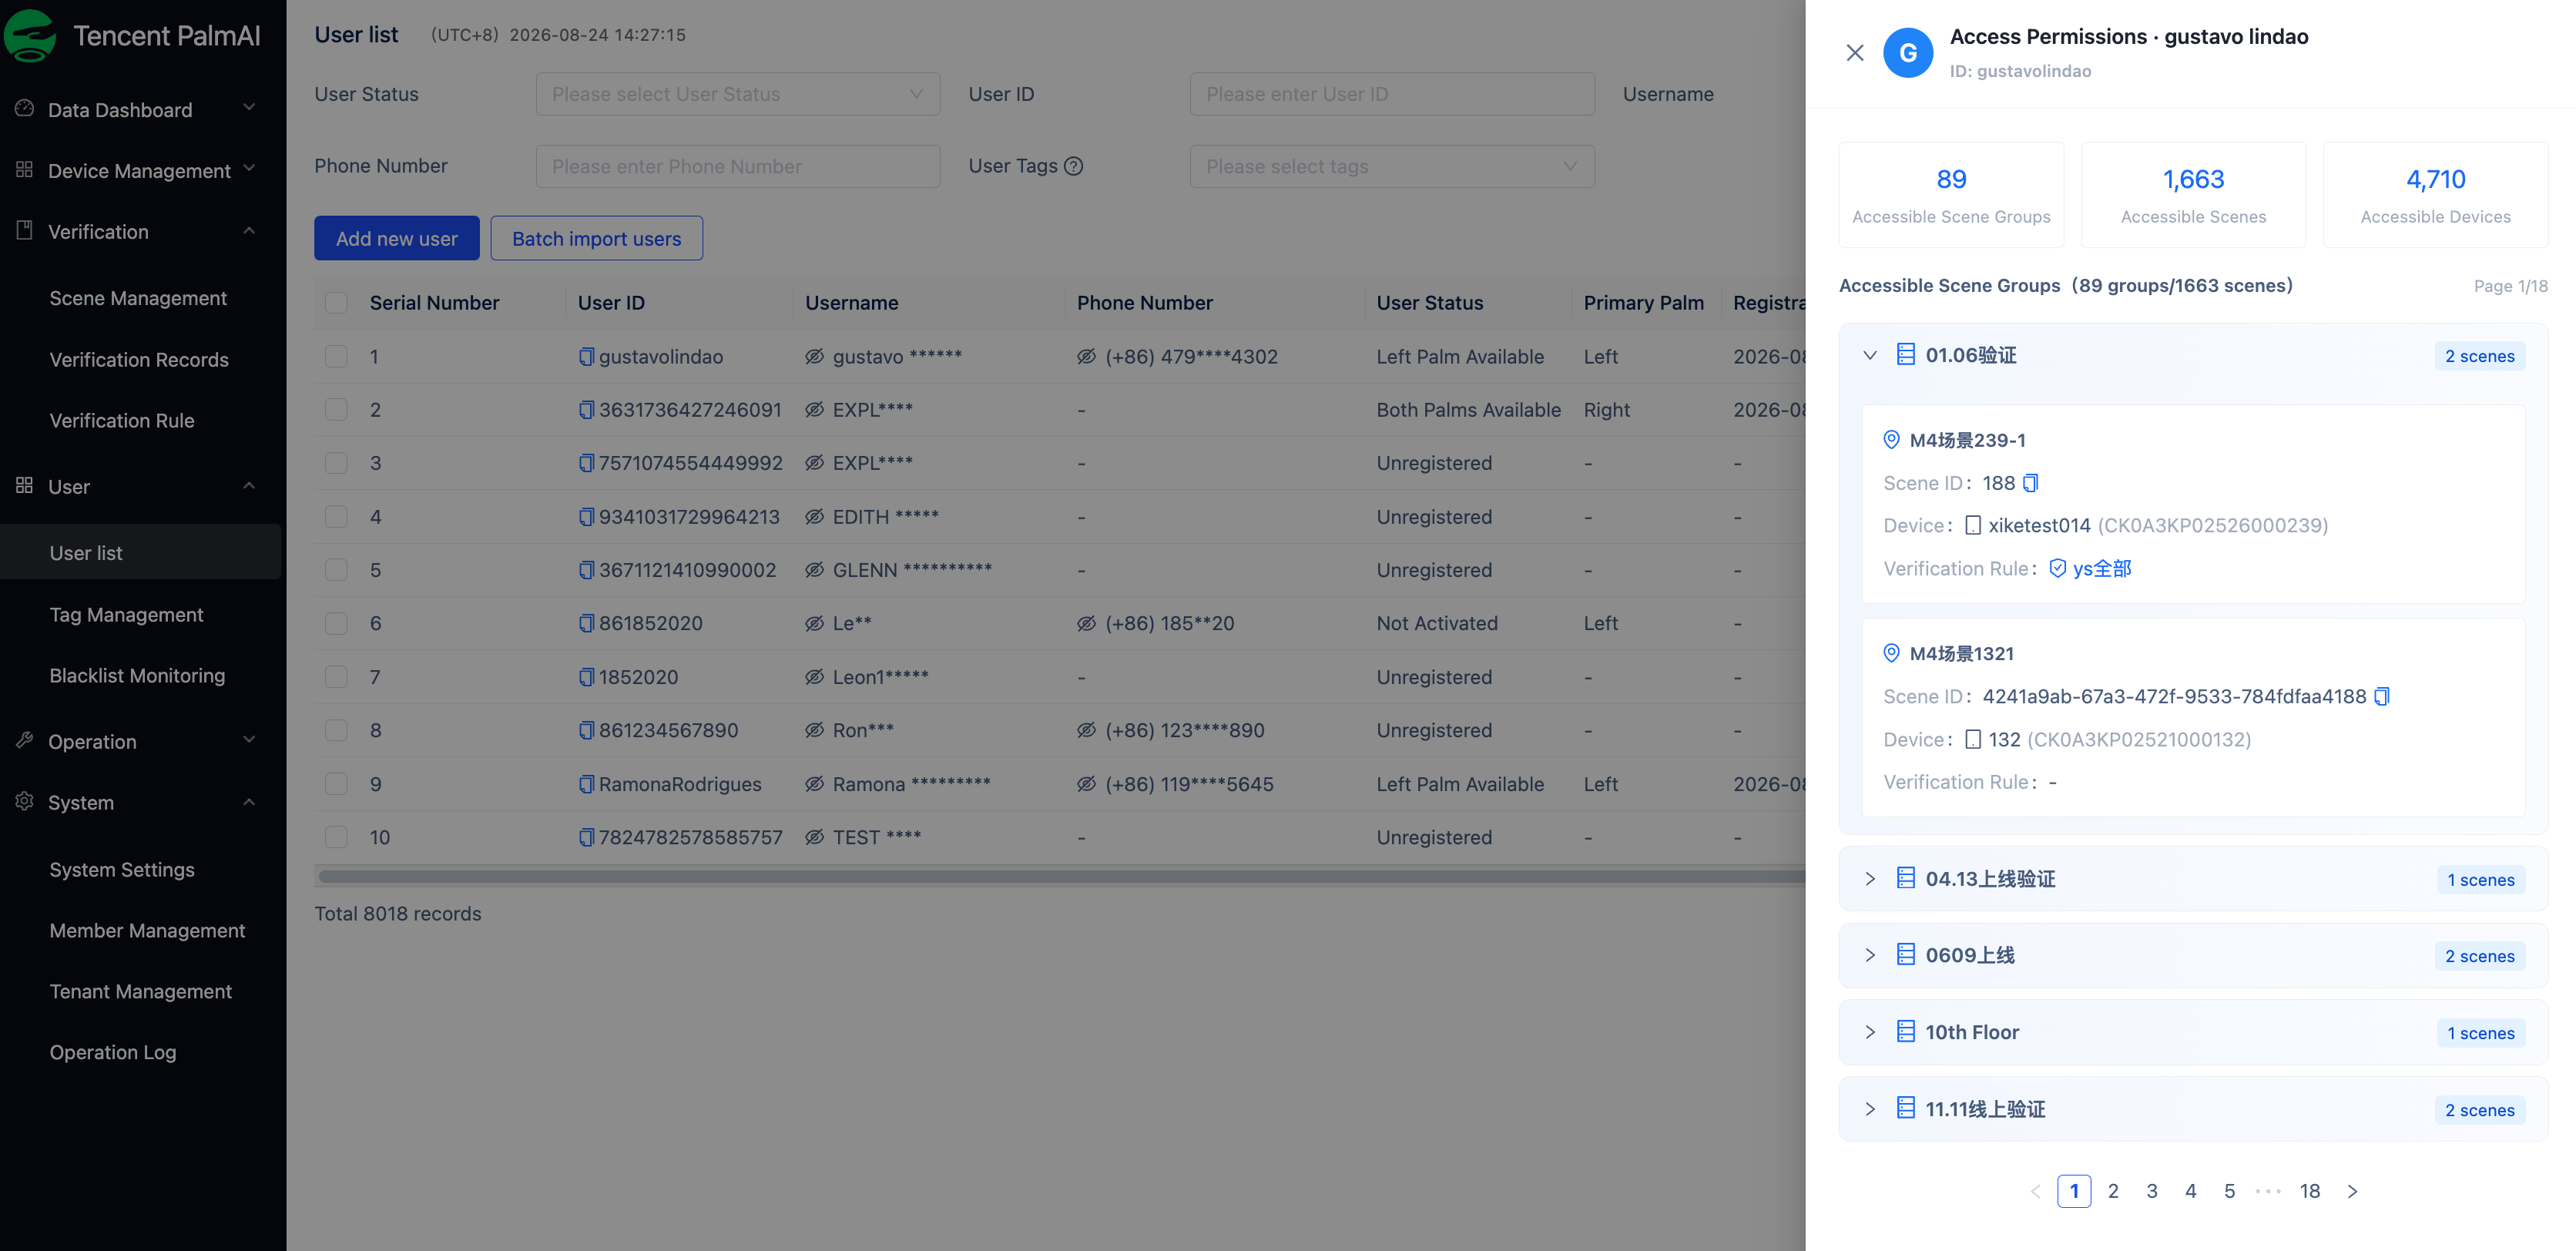
- View a user's access scope: Go to the User List page, find the target user, and click View Access Permissions. The scene groups, scenes, devices, and Verification Rules currently accessible to the user appear on the right.
- The top of the page summarizes the number of scene groups, scenes, and devices accessible to the user. Scene details are listed below by scene group and can be expanded to show the Scene ID, associated devices, and Verification Rules. Click a Verification Rule to view its details.
3.6 Member Management
Member Management is used to manage administrator accounts and their role permissions under a tenant. The platform uses a multi-tenant, multi-role permission system. Each tenant can create multiple administrator accounts based on its actual division of management responsibilities and assign appropriate roles to different administrators. Different roles provide different functional permissions and data visibility scopes. Administrators can view and operate only data within their permission scope.
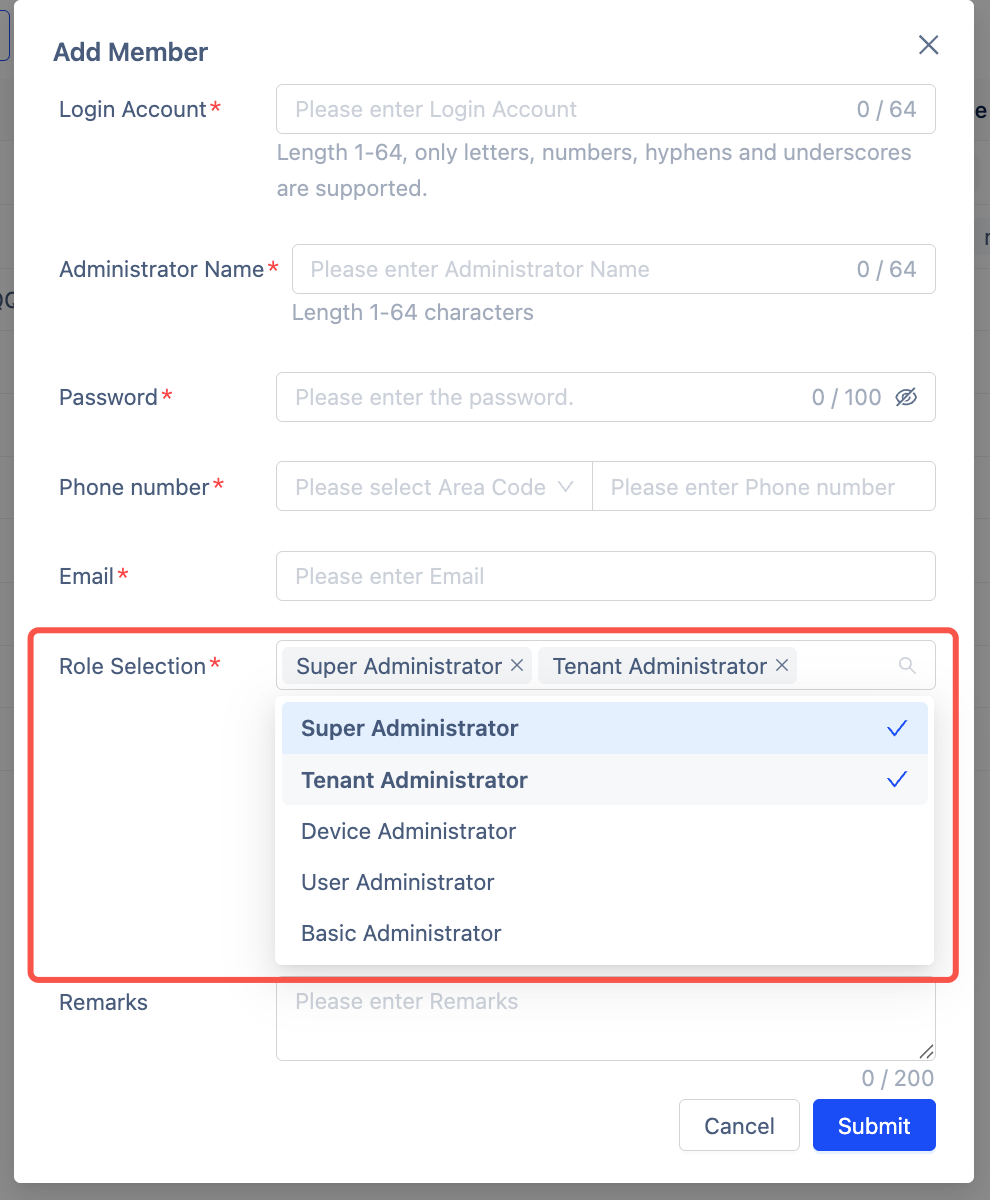
| Role | Description |
|---|---|
| Super Administrator | The role with the highest platform permissions. It is responsible for overall platform operations, maintenance, and settings and has all platform functional permissions. |
| Tenant Administrator | Has all permissions within one tenant and can create tenant members and assign roles to them. |
| Device Administrator | Has scene and device management permissions within one tenant, including add, delete, modify, and query operations, but no user management permissions. |
| User Administrator | Has user management permissions within one tenant, including add, delete, modify, and query operations, but no scene or device management permissions. |
| Basic Administrator | Can view basic data under its tenant, but cannot add, delete, modify, import, or export data. |
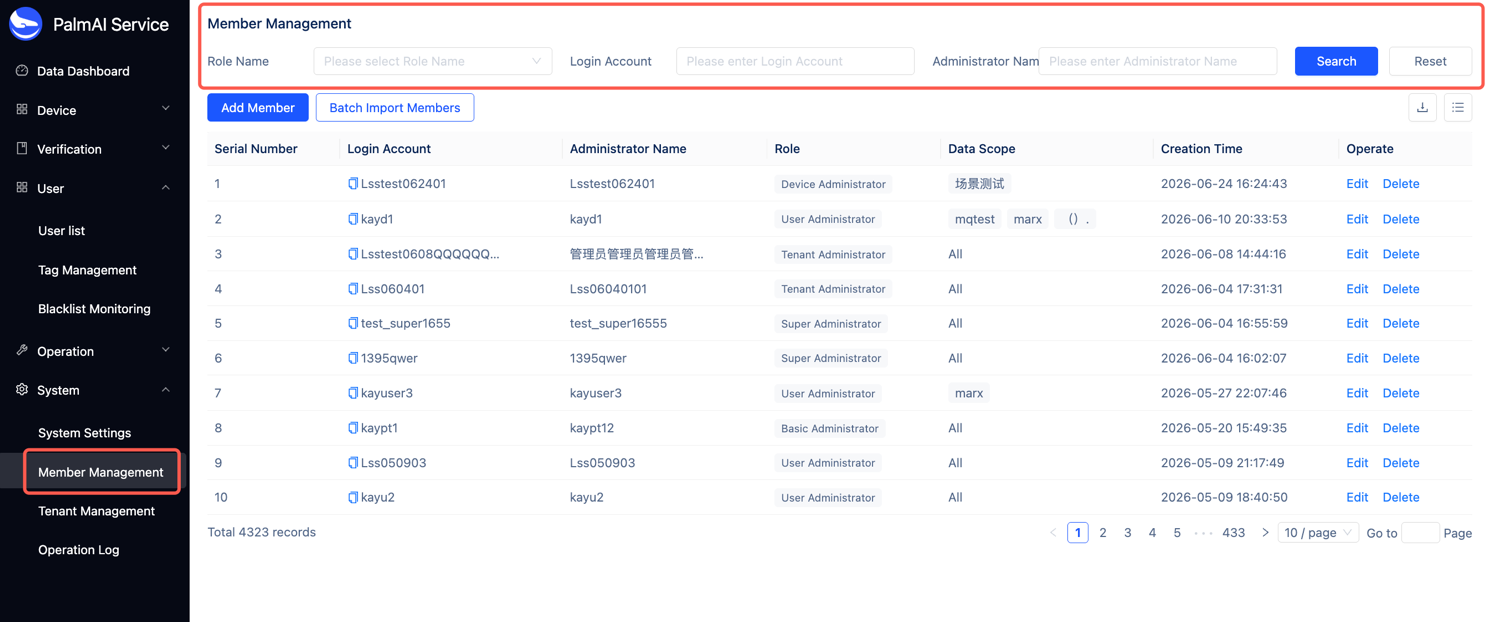
3.6.1 Viewing and Searching for Members
- Click Member Management to go to the Member Management page.
- View the member list or search for members by Role Name, Login Account, and Administrator Name.
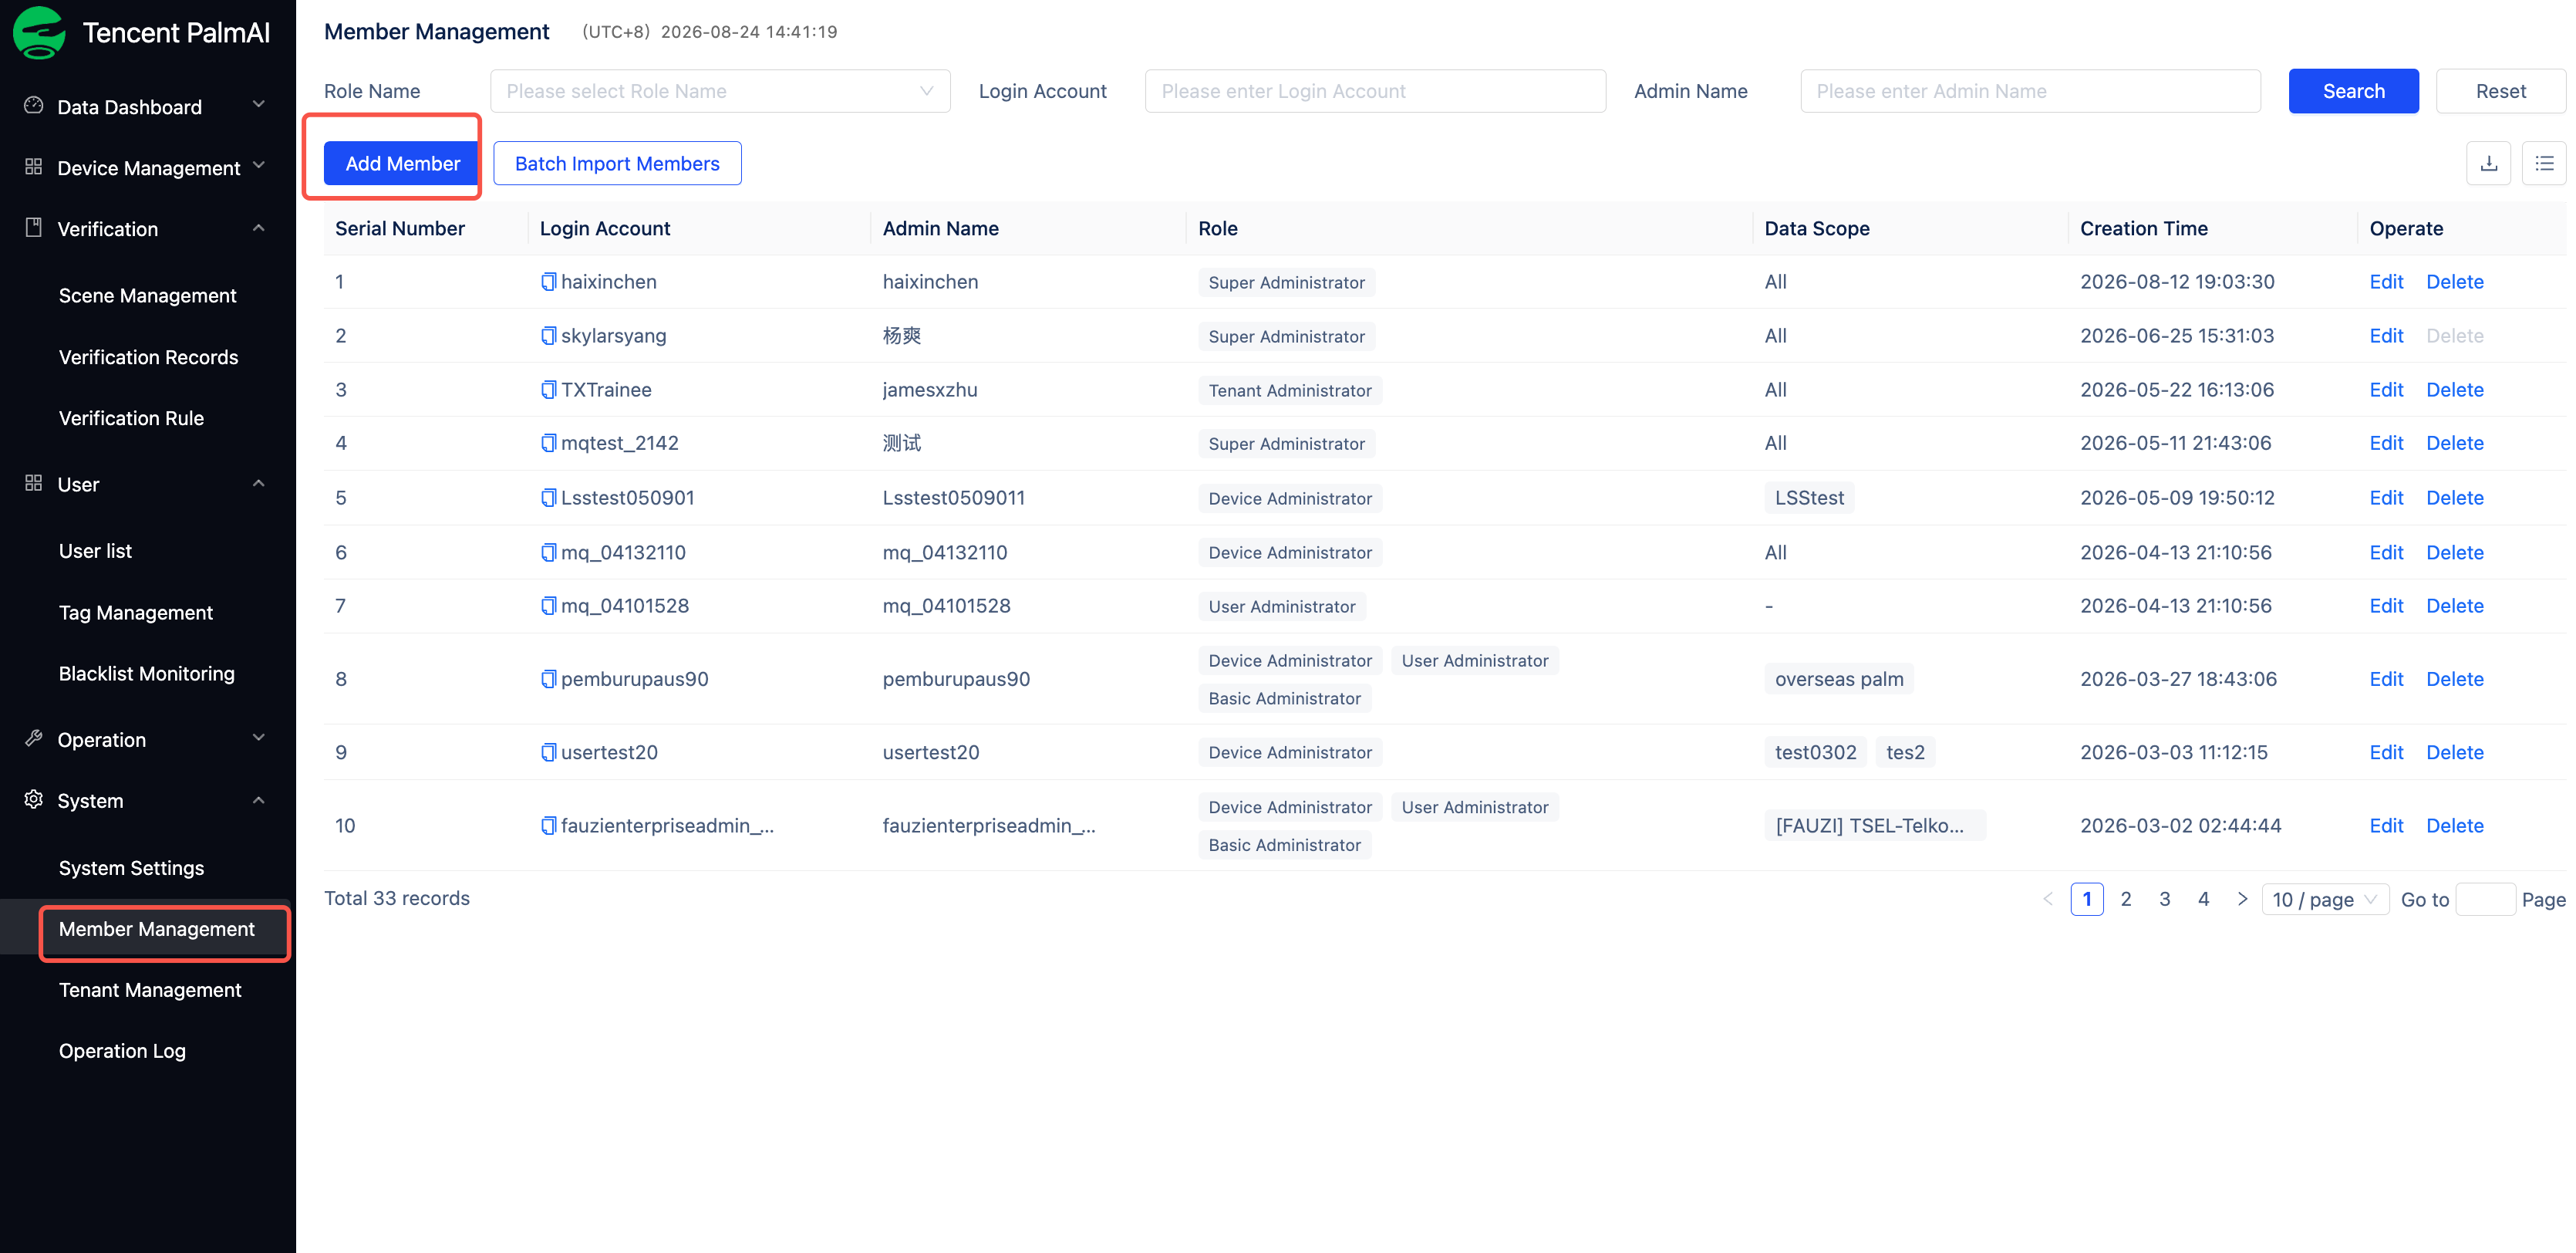
3.6.2 Creating a Member
Super Administrators and Tenant Administrators can create administrator accounts and assign roles and data permissions to them. Members can be created individually or imported in batches.
Creating a Single Member
- Click Add Member to go to the Add Member page.
- Enter the Login Account, Administrator Name, Password, Phone number, Email, and Remarks.
- Under Role Selection, select roles. Multiple selections are supported, and the member's permissions are the union of the selected role permissions.
- Configure the Data Scope. When configuring it by scene, select by scene group. Devices that are not bound to a scene group are placed in the default group and are visible by default.
- Submit the member information.
Note
Login Account must be unique. The system displays a message if it is duplicated. After the member is created successfully, send the initial password to the corresponding administrator through a secure channel in accordance with your organization's credential delivery policy.
Creating Members in Batches
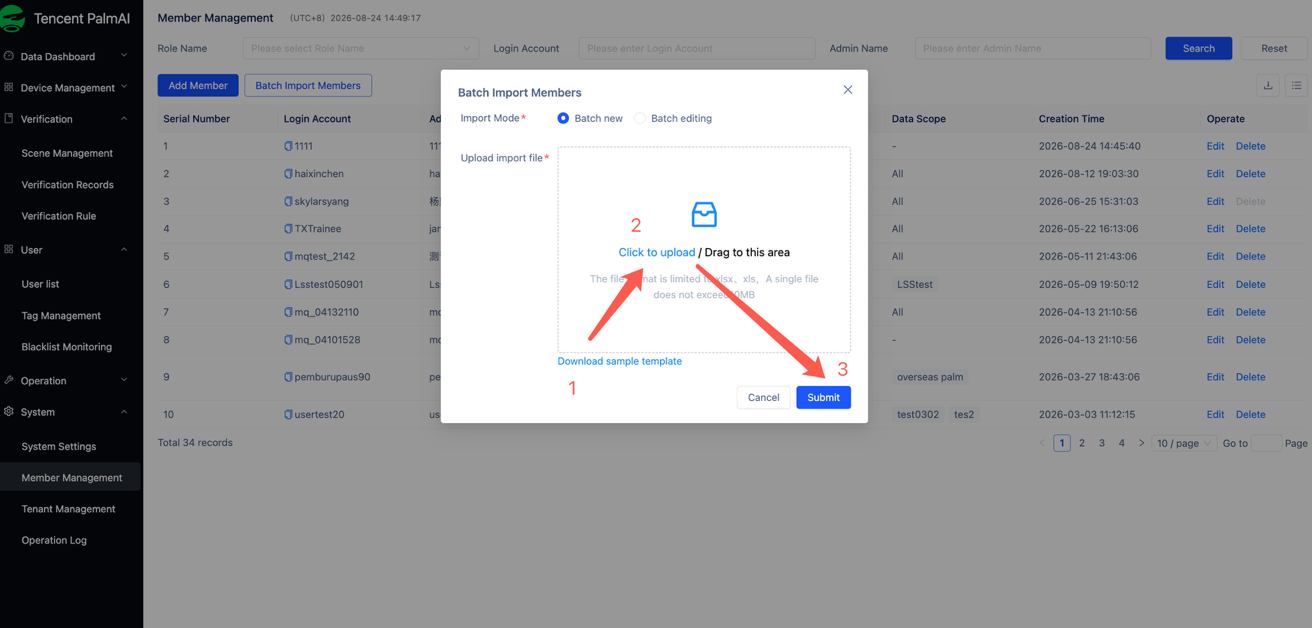
- Click Batch Import Members to go to the batch import page.
- Select Batch new.
- Download the import template.
- Enter member information as specified in the template and upload the template.
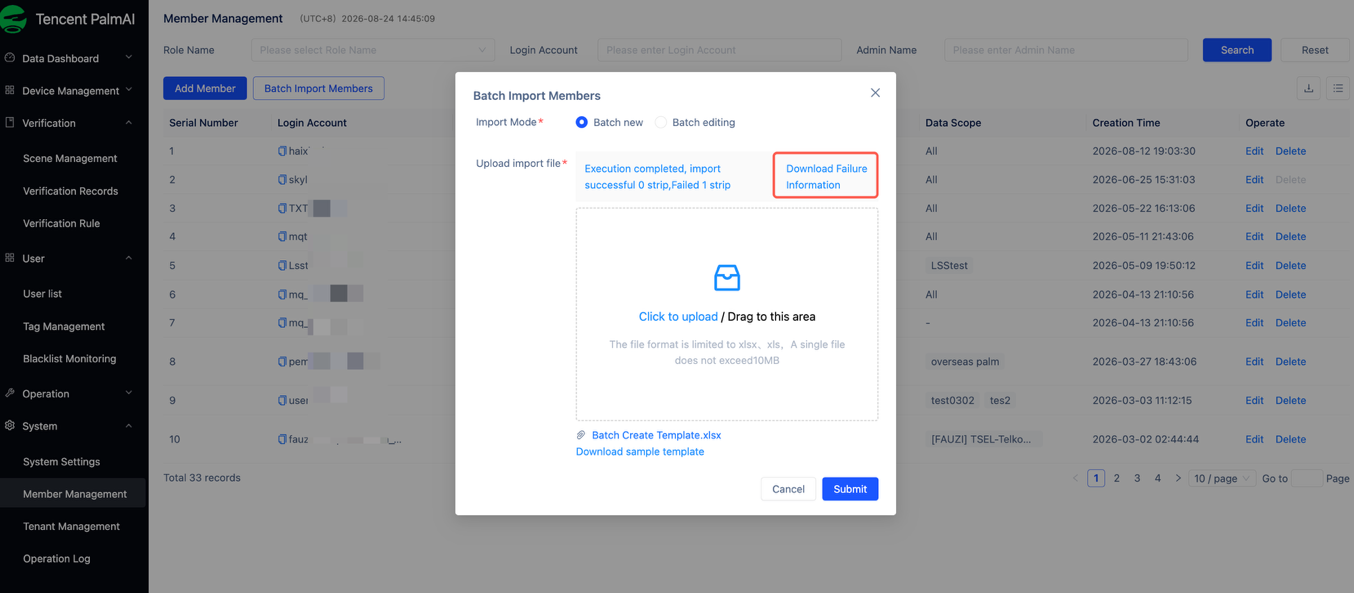
Note
Do not modify the import template or delete its instructions. Login Account is the administrator's unique identifier and cannot be changed after import. If the import fails, click Download Failure Information to download the error information.
3.6.3 Editing a Member
This section describes how to edit a member's basic information, change the Data Scope and password, and edit members in batches.
Editing Basic Member Information
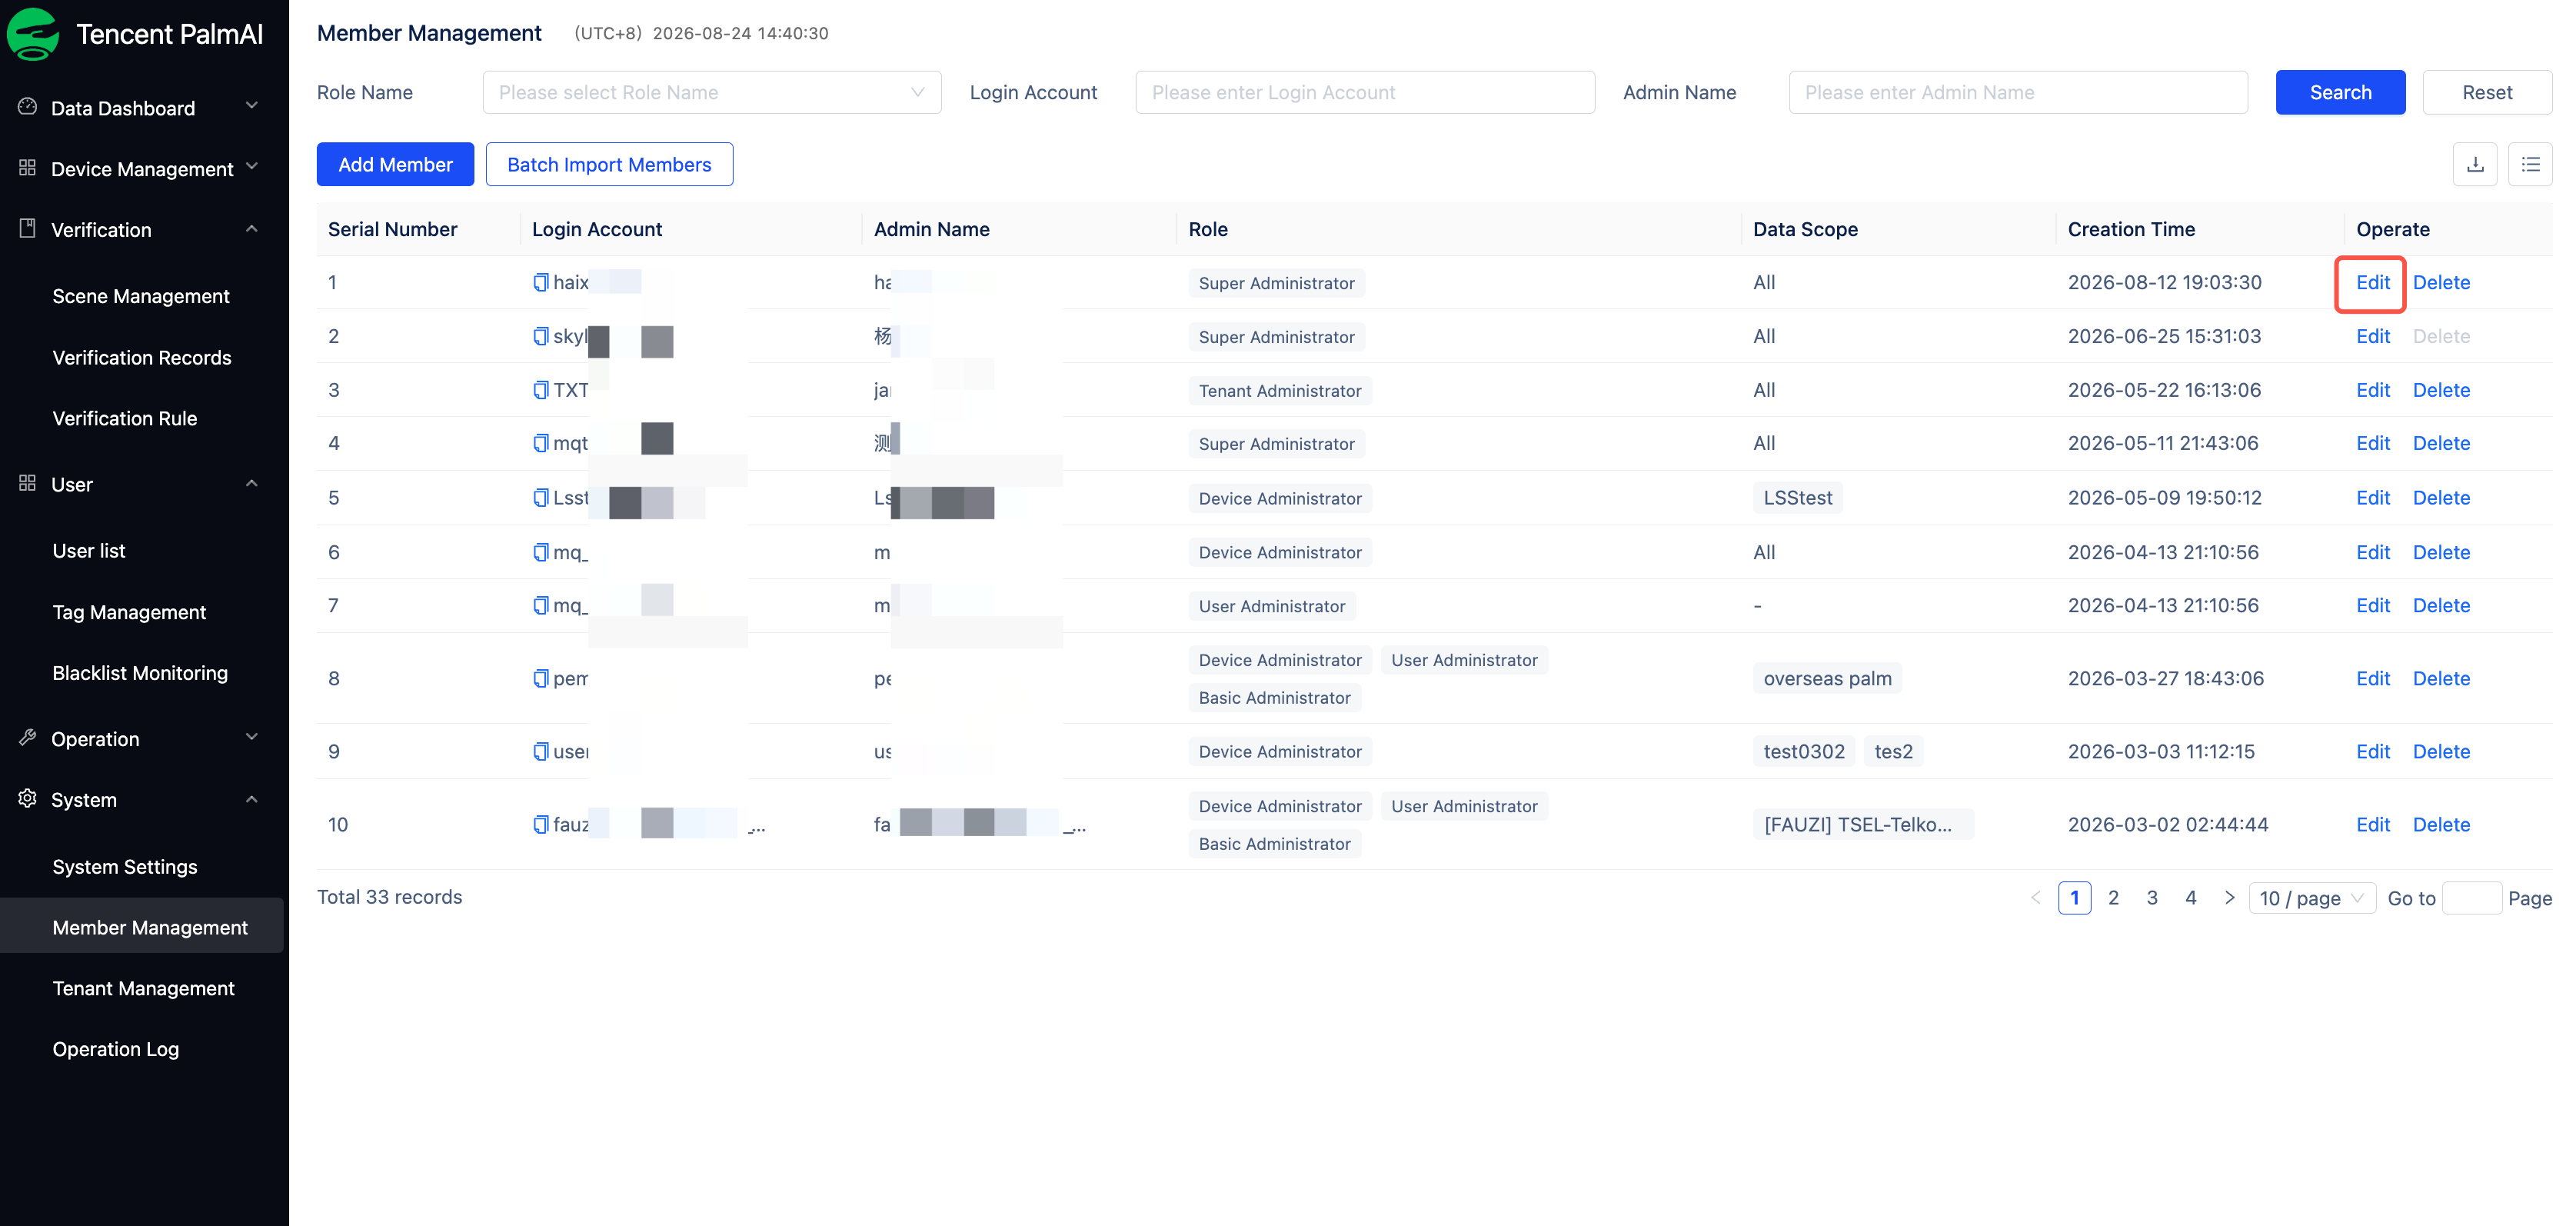
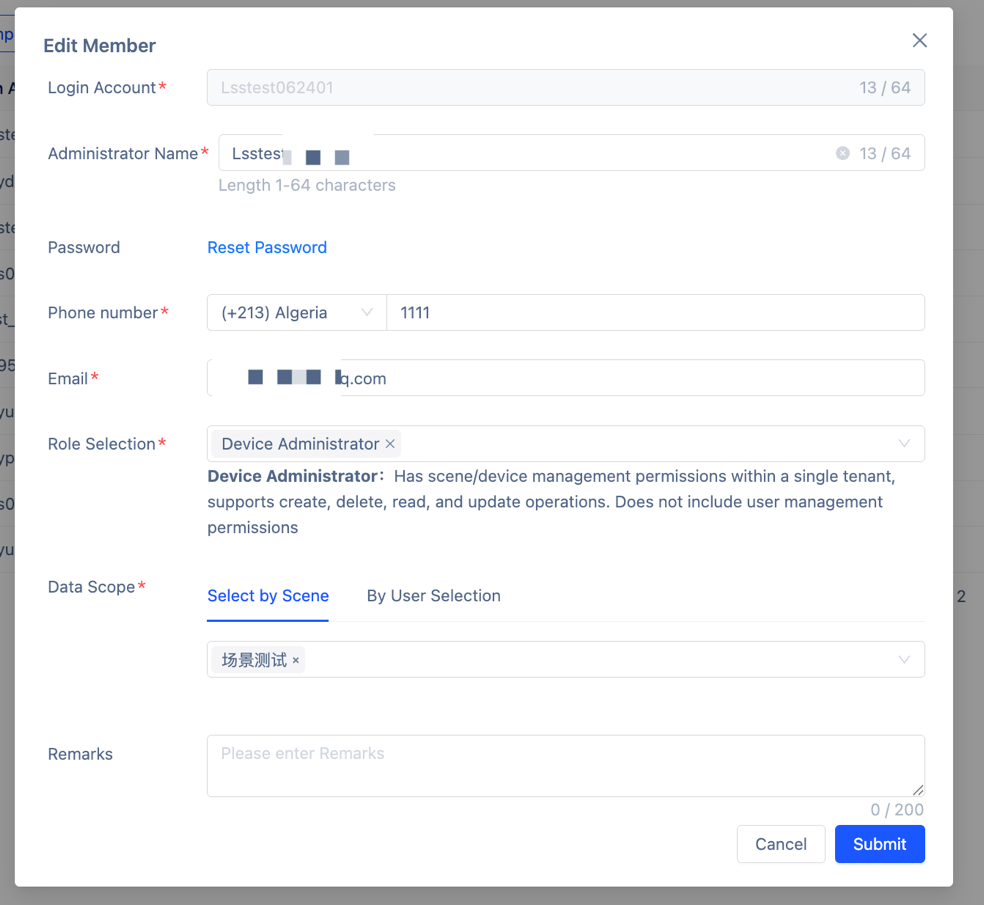
- Find the target member and click Edit.
- Change Admin Name, Phone number, Email, Role Selection, or Data Scope as needed.
- Save the changes.
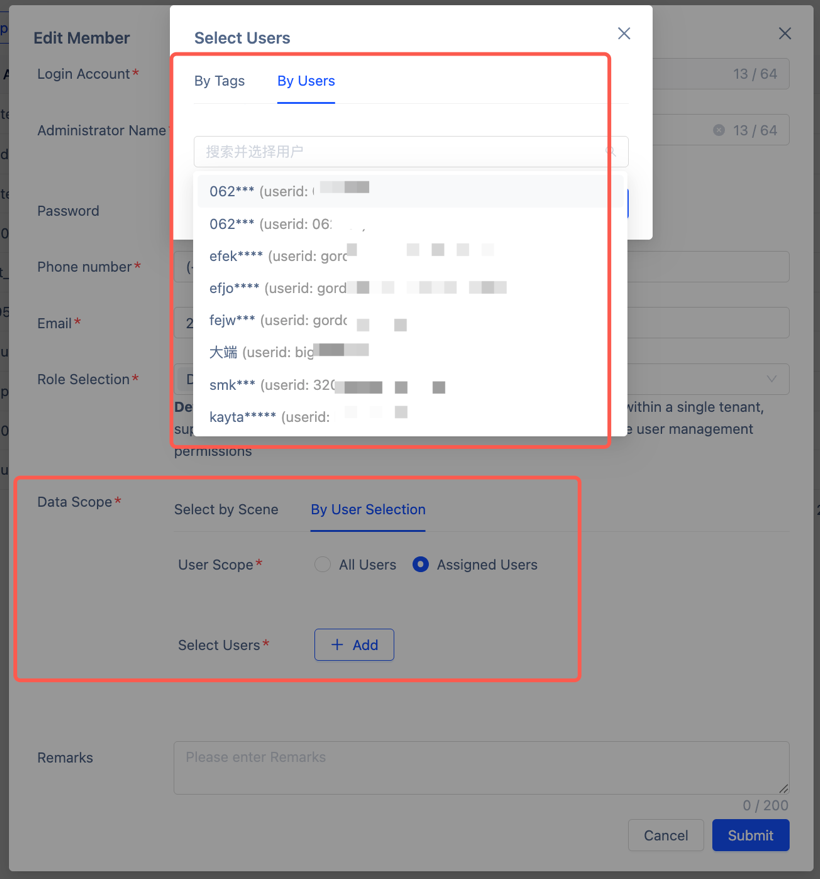
Changing the Data Scope
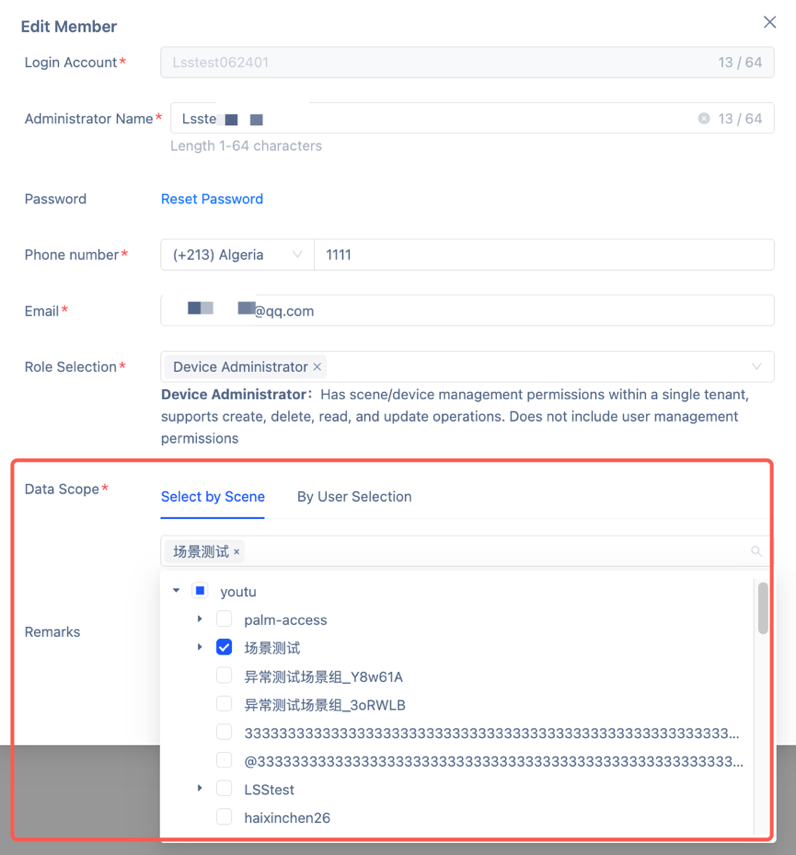
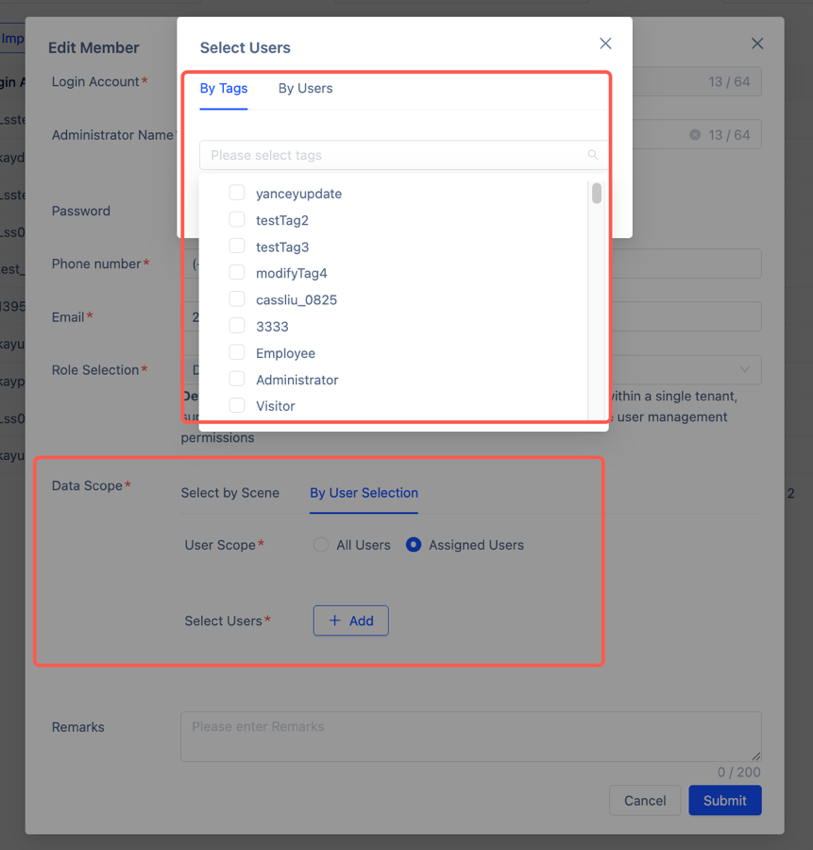
Under Data Scope, the Data Scope for Device Administrators, User Administrators, and Basic Administrators can be configured by scene or user:
- Select by Scene: Multiple scene tags can be selected.
- Select by User: All users or specified users can be selected, and users can also be selected by User Tag.
Tenant Administrators and Super Administrators can view all tenant data and system data by default.
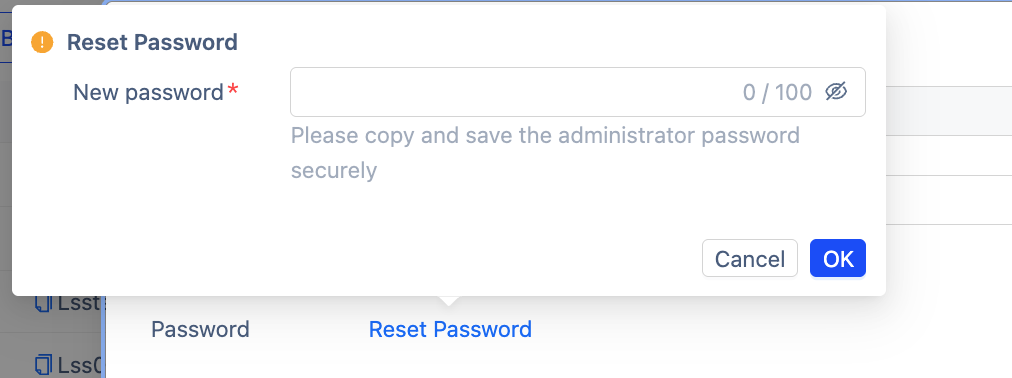
Changing a Member Password
- Click the Change Password button.
- Enter a new password in the dialog.
- Submit the new password.
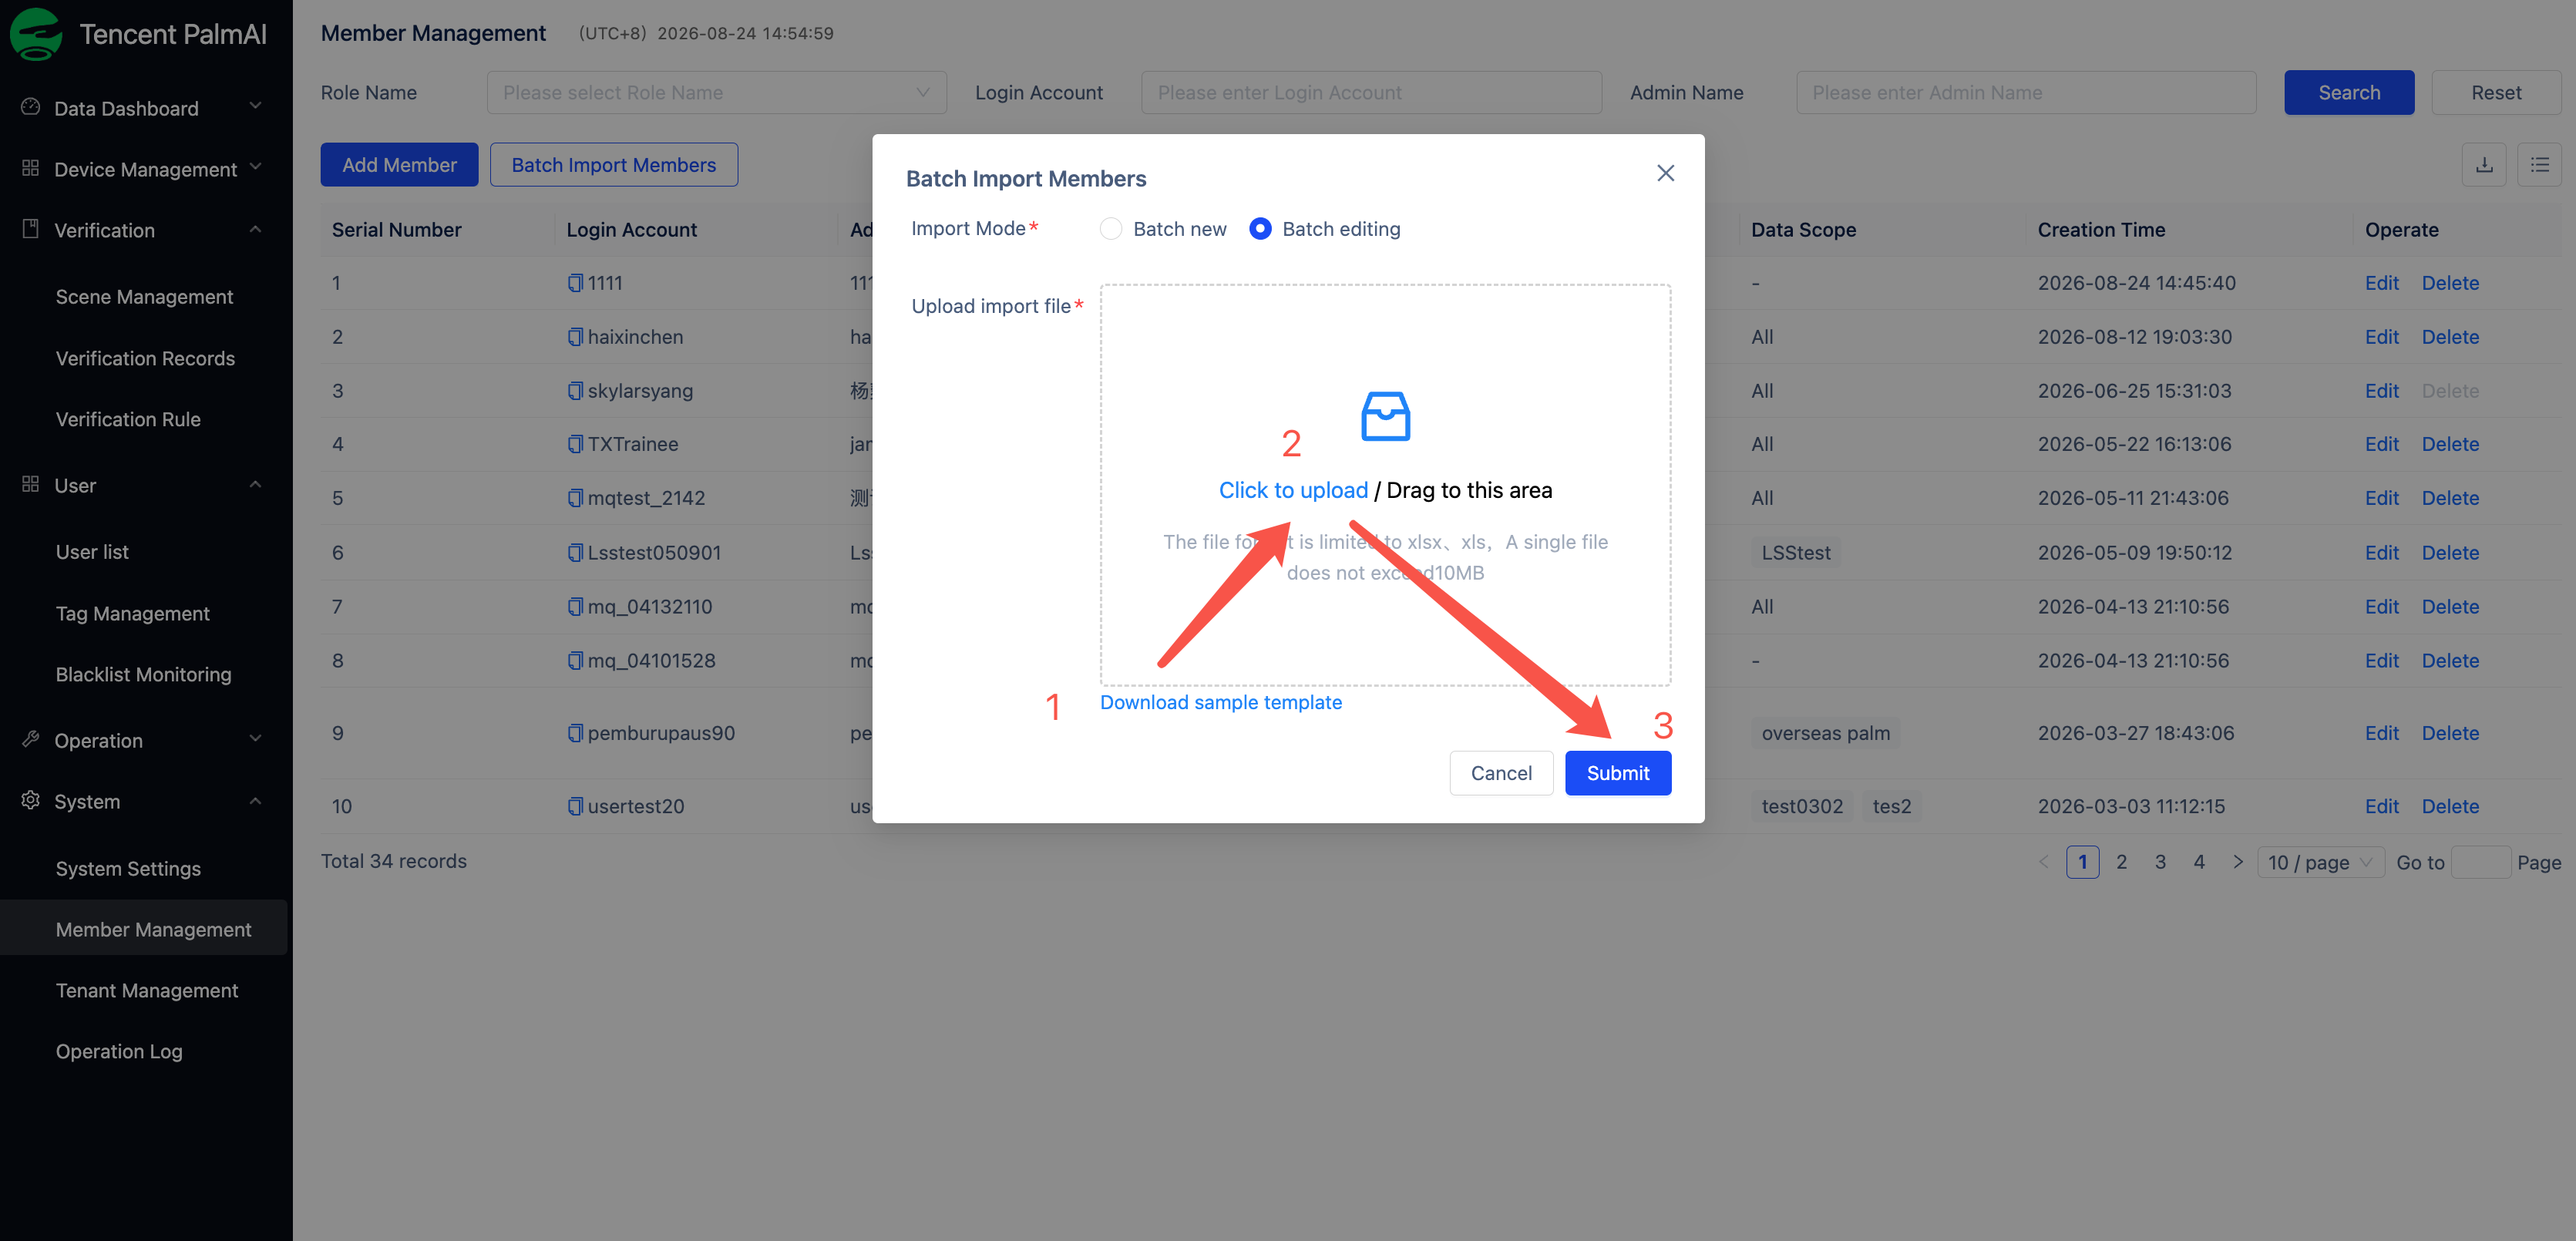
Editing Members in Batches
- Click Batch Import Members to go to the batch editing page.
- Select Batch editing.
- Download the import template.
- Enter member information as specified in the template and upload the template.
Note
Do not modify the import template or delete its instructions. Login Account is the administrator's unique identifier and cannot be changed after import. If the import fails, click Download Failure Information to download the error information.
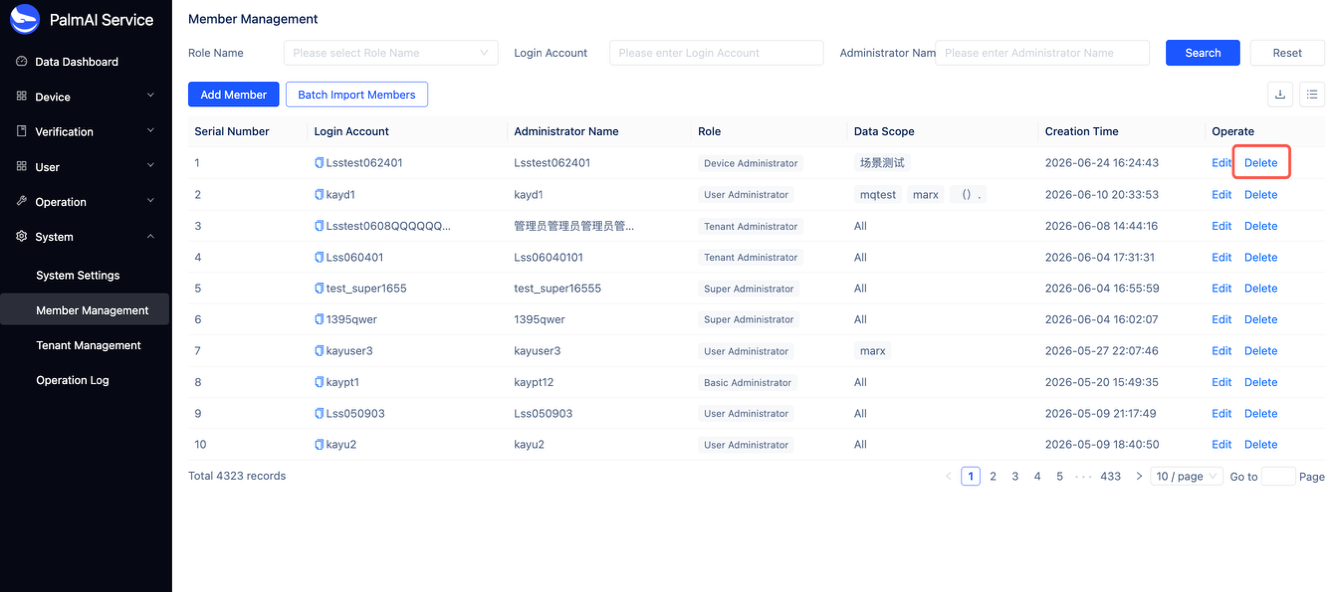
3.6.4 Deleting a Member
- Find the target member and click Delete.
- Confirm the deletion in the confirmation dialog.
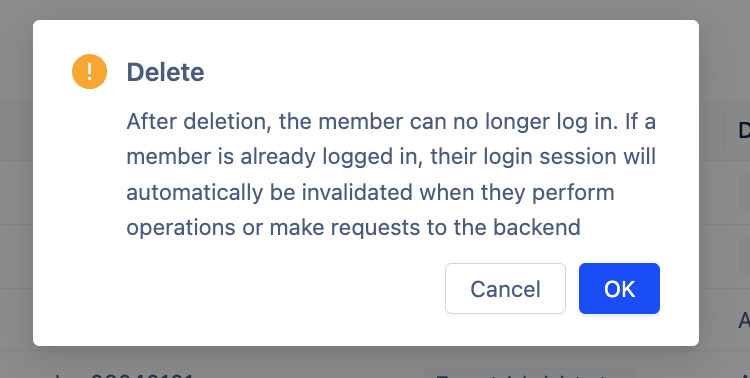
Warning
A deleted member can no longer log in. If a member who is currently logged in is deleted, the system automatically clears the member's login session when the member performs another operation or sends another request to the backend.
3.7 Operations Management
Operations Management provides centralized viewing and handling of issues reported by devices. Its troubleshooting tools query events and request chains to help Super Administrators locate and resolve business exceptions.
3.7.1 Issue Reporting
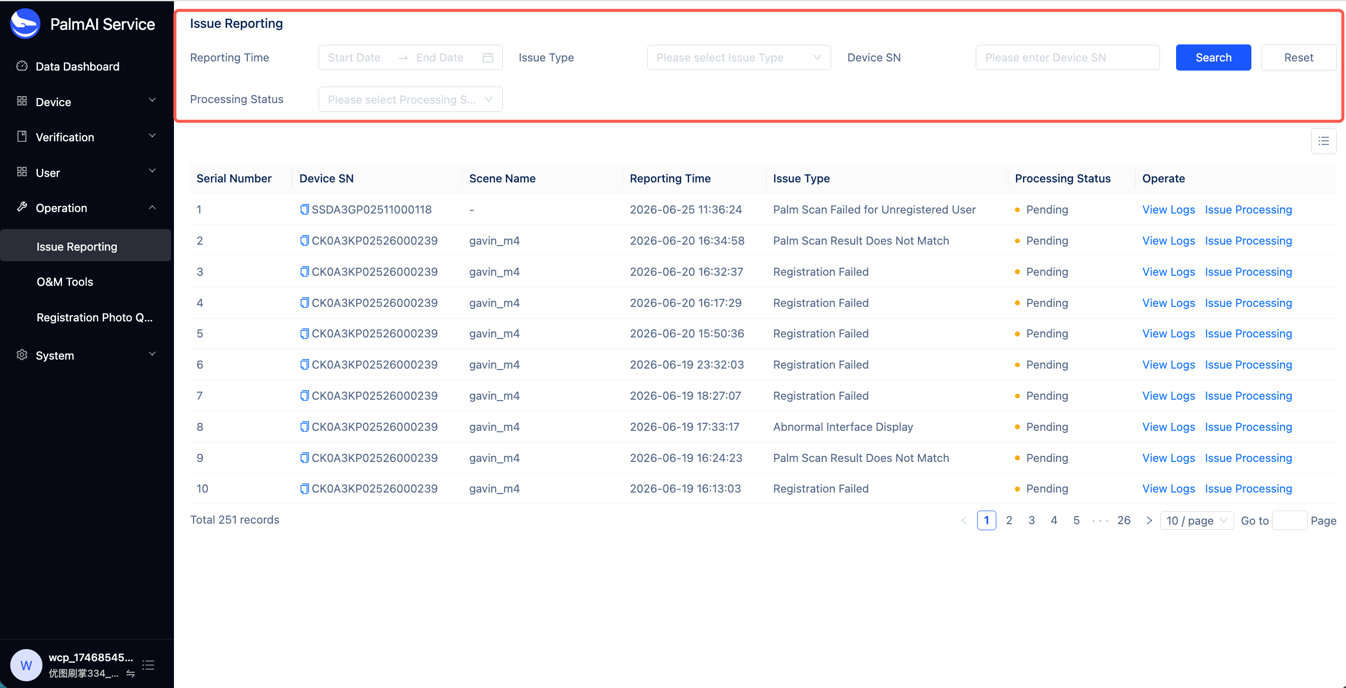
Issue Reporting aggregates exception information submitted by devices. Super Administrators can filter reported issues and record their identified causes and resolution conclusions.
Reporting an Issue
Users can tap Issue Reporting on a device to submit exception information. All reported issues are aggregated on the Operations Management > Issue Reporting page in PalmAI Admin Web.
Viewing and Filtering Issues
- Go to Operations Management > Issue Reporting.
- Filter reported issues by time range, issue type, device, and processing status.
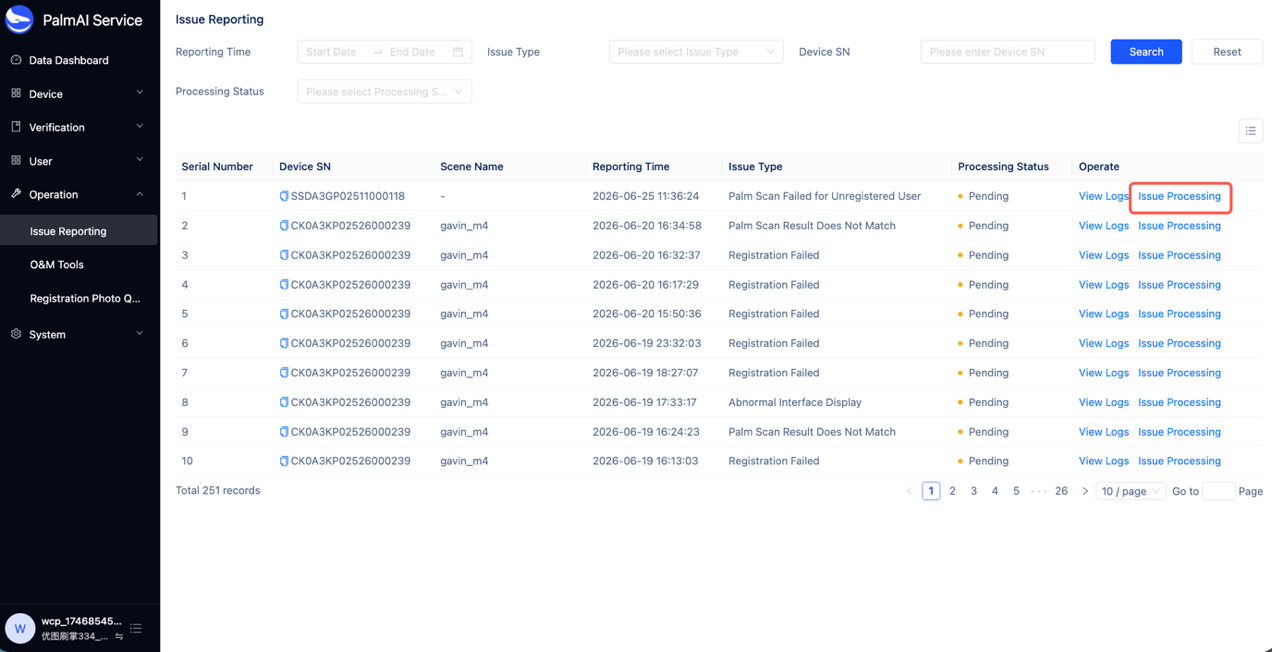
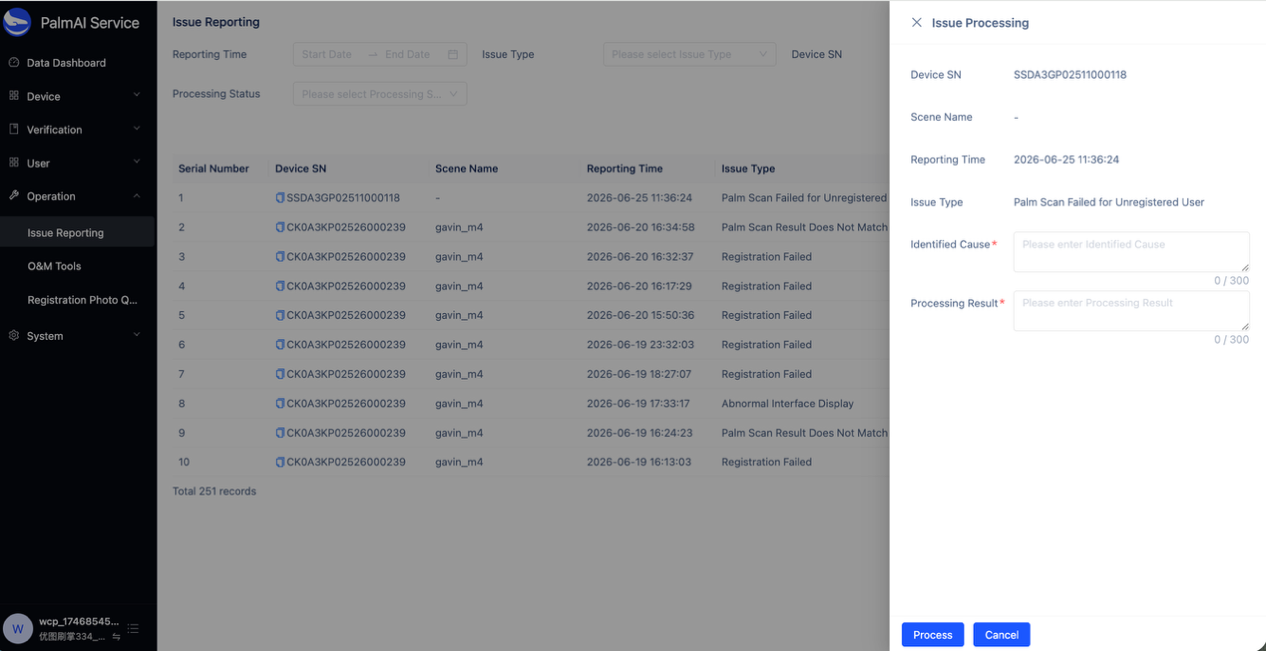
Handling an Issue
- Find the target issue and click Issue Operation.
- Enter the identified cause and resolution conclusion in the dialog.
- Submit the processing result.
3.7.2 Troubleshooting Tools
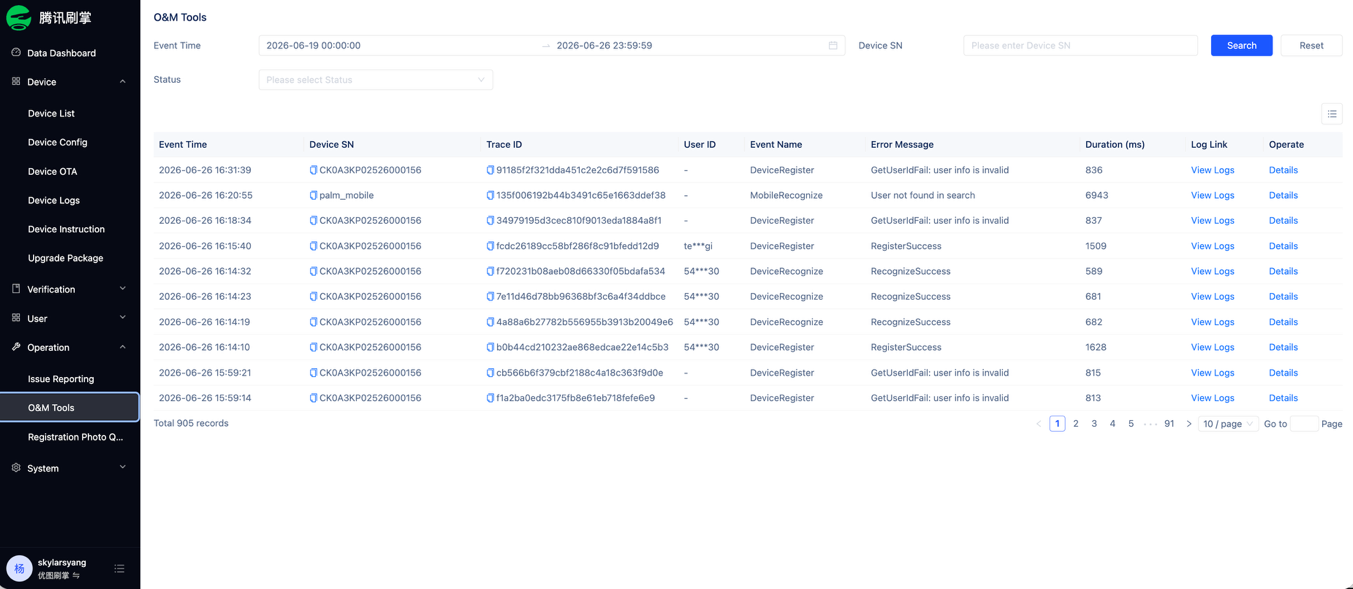
Troubleshooting Tools locate issues and trace the full request chain for Palm Scan-related events, including device registration, device recognition, mobile recognition, and verification, helping administrators quickly discover and analyze abnormal events.
Viewing and Filtering Events
- Filter events by event time, Device SN, status, and other criteria.
- View event time, Device SN, Trace ID, user ID, event name, error information, duration in ms, and log link in the event list.
- To view logs, click View Logs.
- To view event details, click Details.
Viewing Event Details
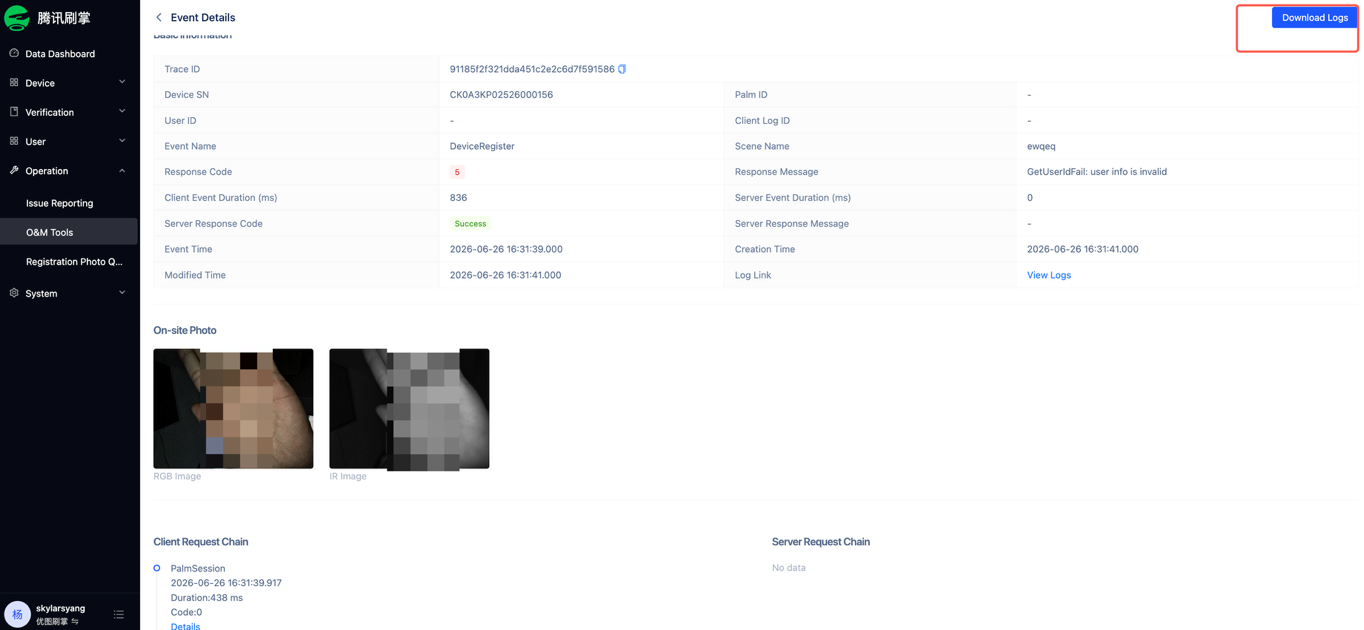
- Find the target event and click Details.
- View basic event information, including Trace ID, Device SN, Palm ID, user ID, scene name, return code, return message, client duration, server duration, and event time.
- View on-site photos, the client request chain, and the server request chain.
- View or download logs as needed to reconstruct the event and locate its cause.
3.8 Data Dashboard
The Data Dashboard is the Data Dashboard homepage of PalmAI Admin Web. It provides a visual overview of platform operating data to help administrators quickly understand business operations.
3.8.1 Data Overview
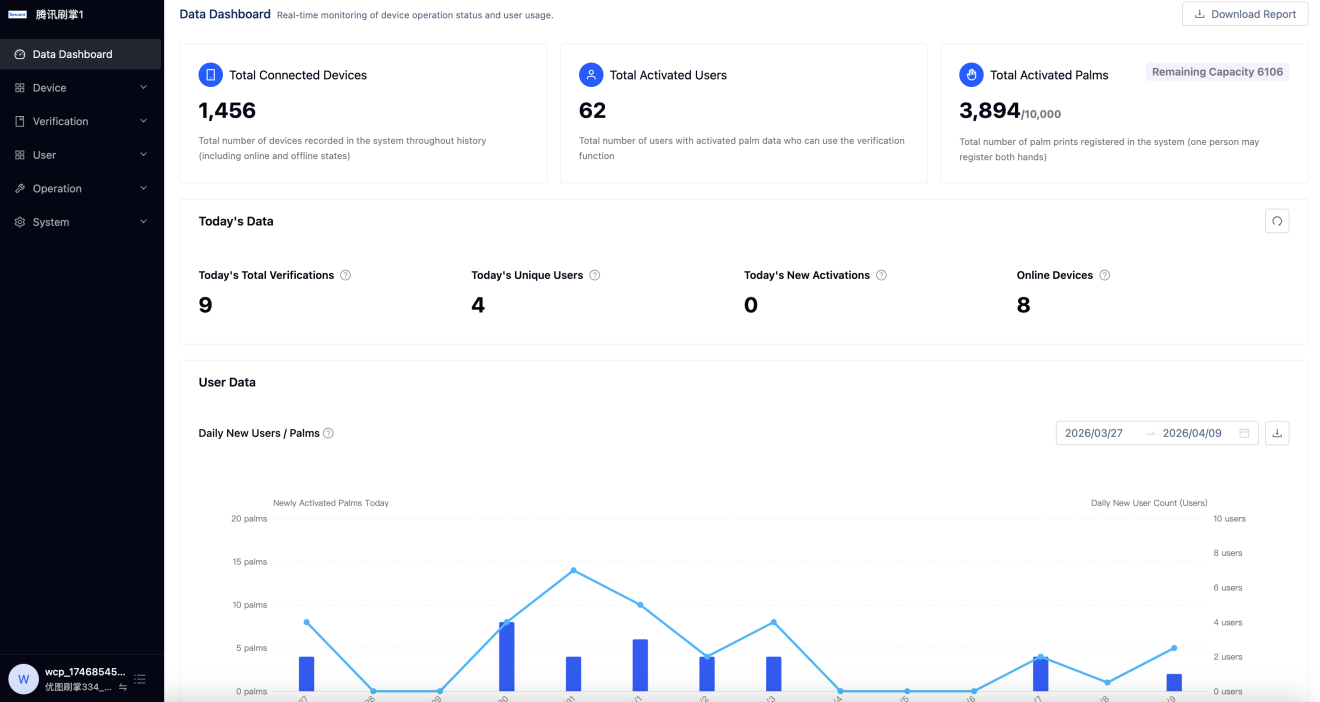
The Data Overview displays core platform metrics, today's business data, and data trends over a specified time range.
Core Metrics
The homepage displays the total number of devices, registered users, palms, and Palm Database Quota usage.
Today's Data
The homepage displays today's Palm Scan count, number of users who performed Palm Scans today, number of users newly activated today, and current number of online devices in real time.
Trends and Distribution
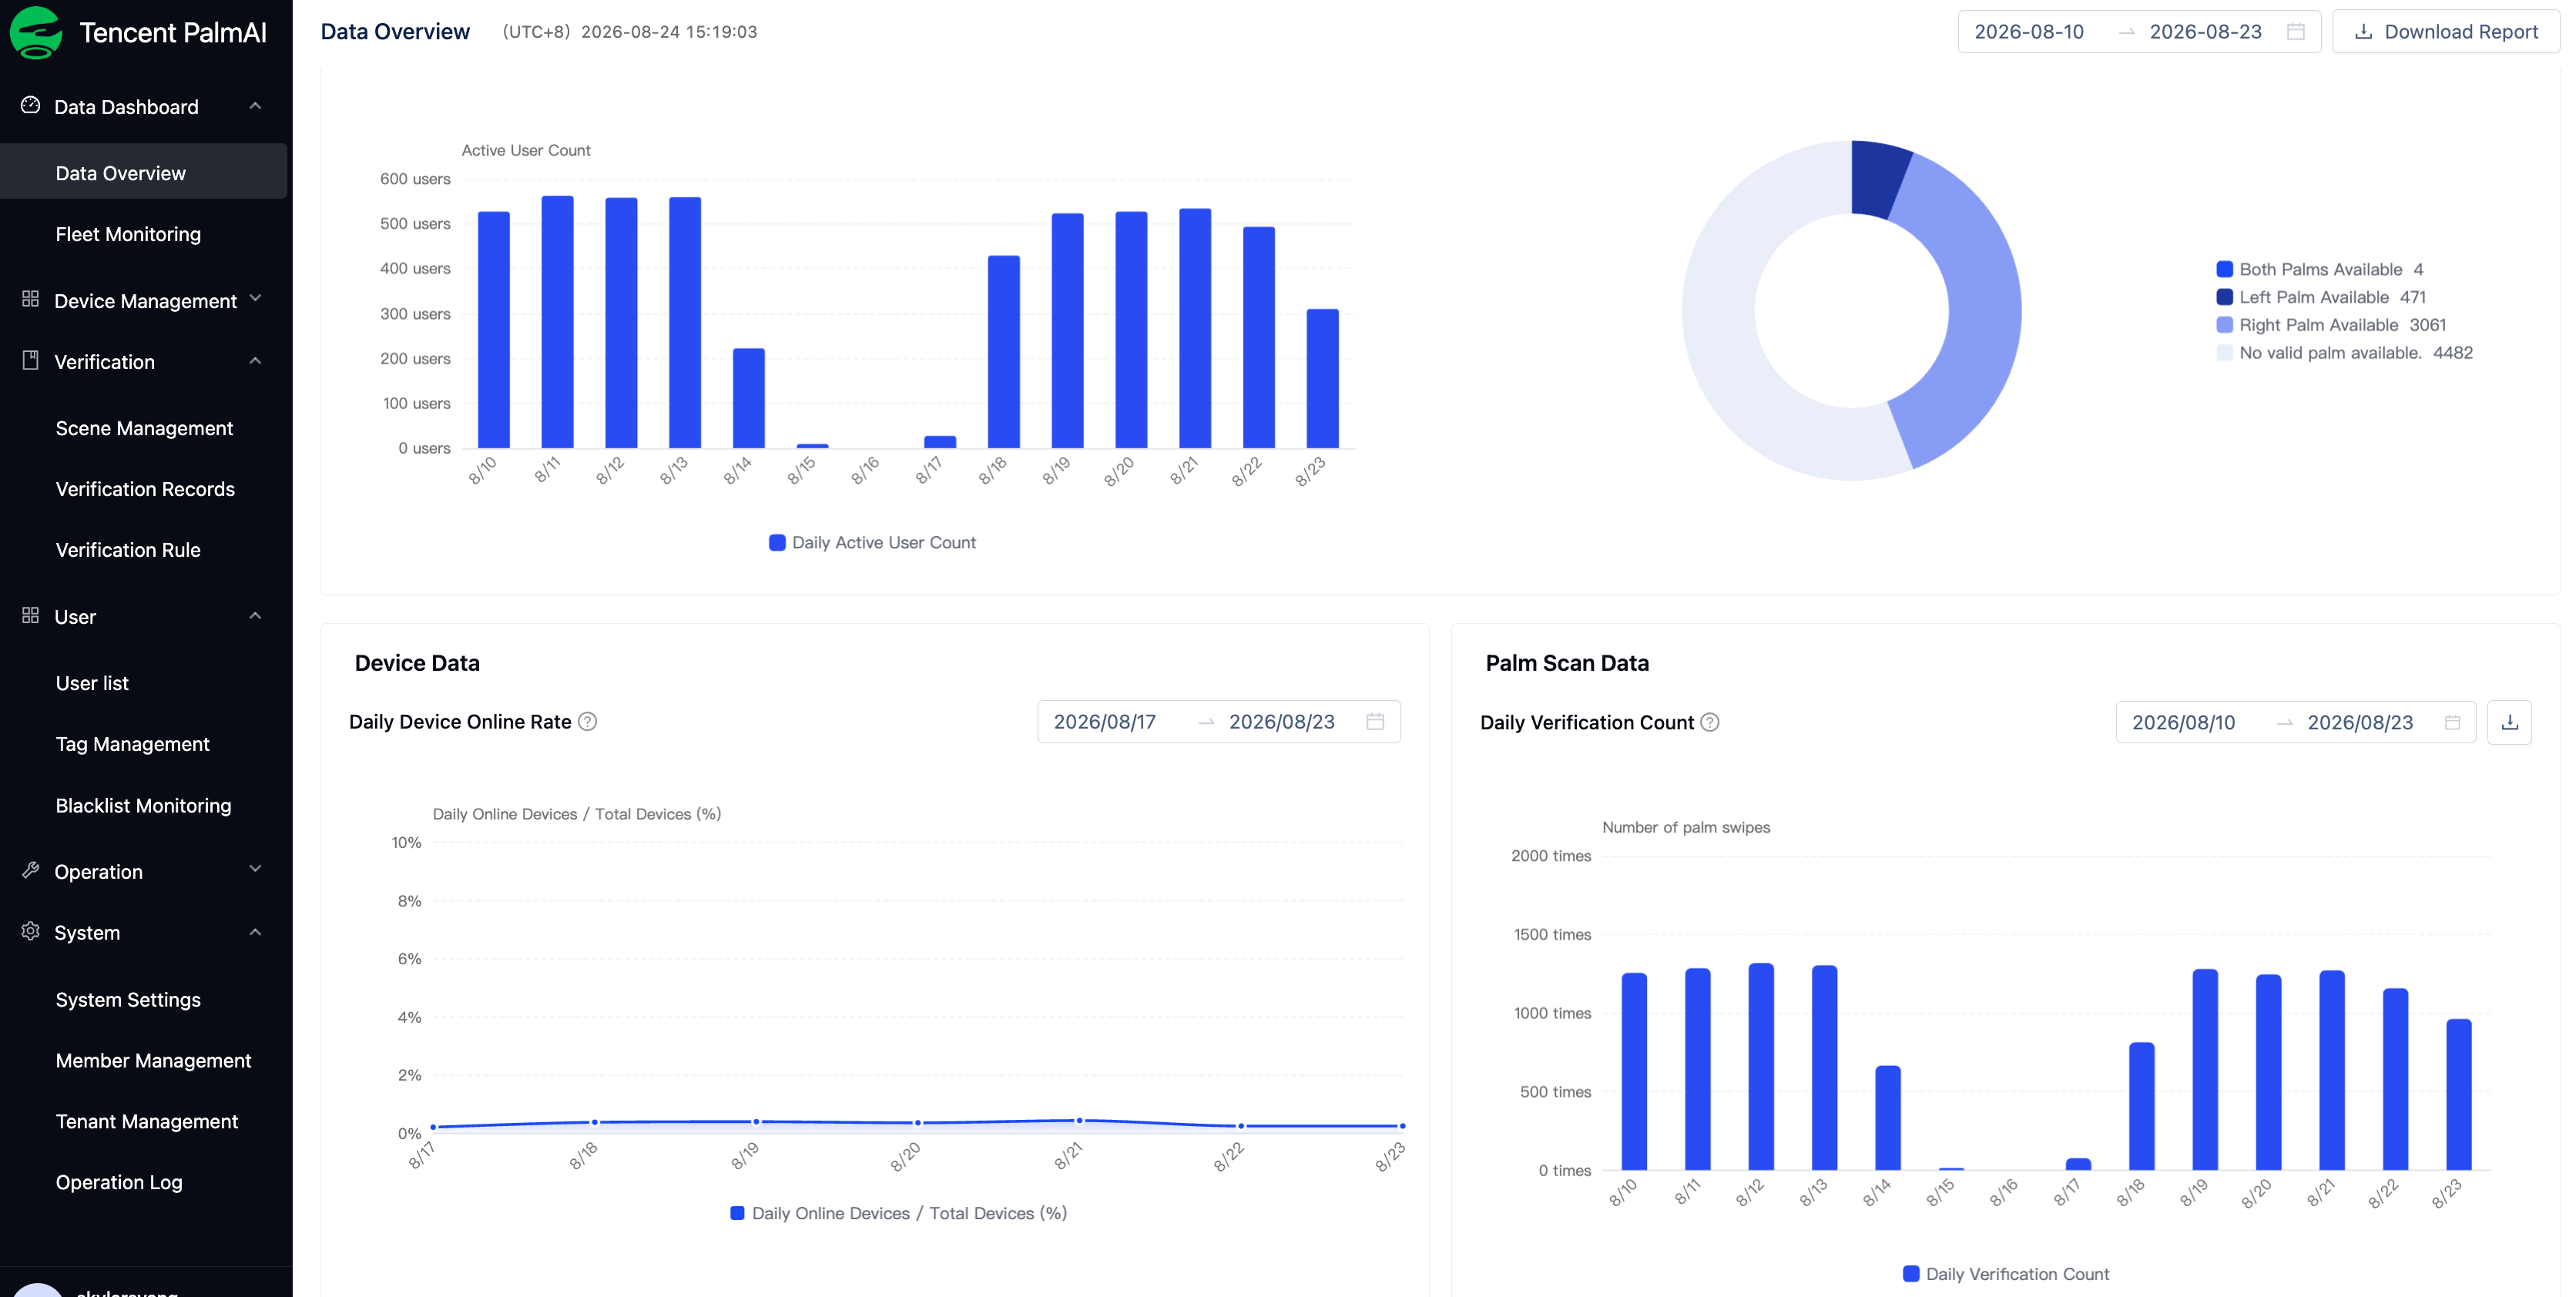
- User data trend chart: Shows the number of users newly activated each day, new palms added each day, daily active users, and User Status distribution.
- Device data trend chart: Shows the device online rate.
- Palm Scan data trend chart: Shows the daily Palm Scan count.
Selecting a Time Range and Exporting Data
You can select a time range of up to 180 days to view trends and export the data.
3.8.2 Device Dashboard
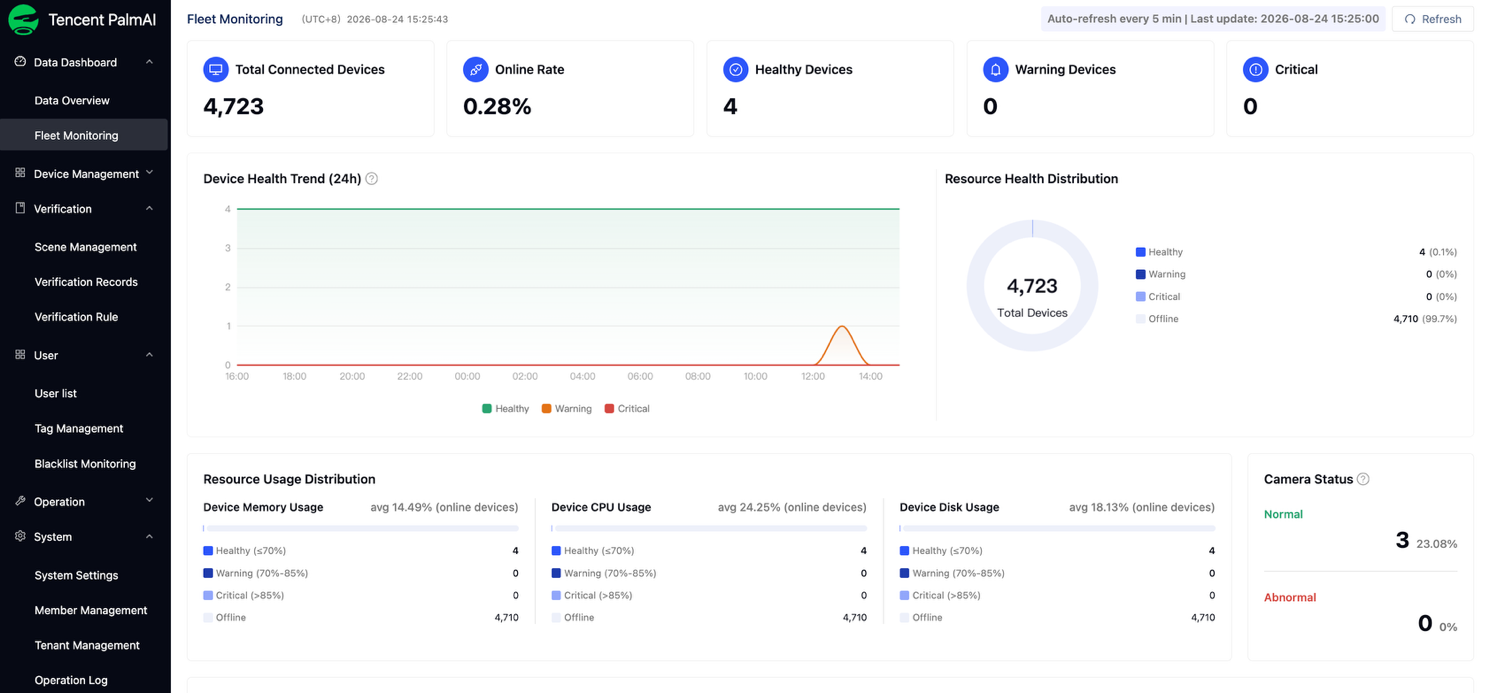
The Device Dashboard centrally displays device operations and resource health, helping administrators quickly understand device online status, resource usage, OTA upgrade results, and high-risk device information.
Device Status and Health Trends
- Device status overview: Shows the total number of devices, online rate, number of healthy devices, number of devices with warnings, and number of devices with critical exceptions.
- Device health trend: Shows changes in the number of healthy devices, devices with warnings, and devices with critical exceptions over the past 24 hours.
Resource and Component Health
- Resource health distribution: Shows overall device resource health, including the number and percentage of healthy, warning, critically abnormal, and offline devices.
- Resource usage distribution: Shows memory, CPU, and disk usage for online devices, with statistics grouped by healthy, warning, critically abnormal, and offline status.
- Camera status: Shows the number and percentage of devices with normal and abnormal cameras.
Upgrade Results and High-Risk Devices
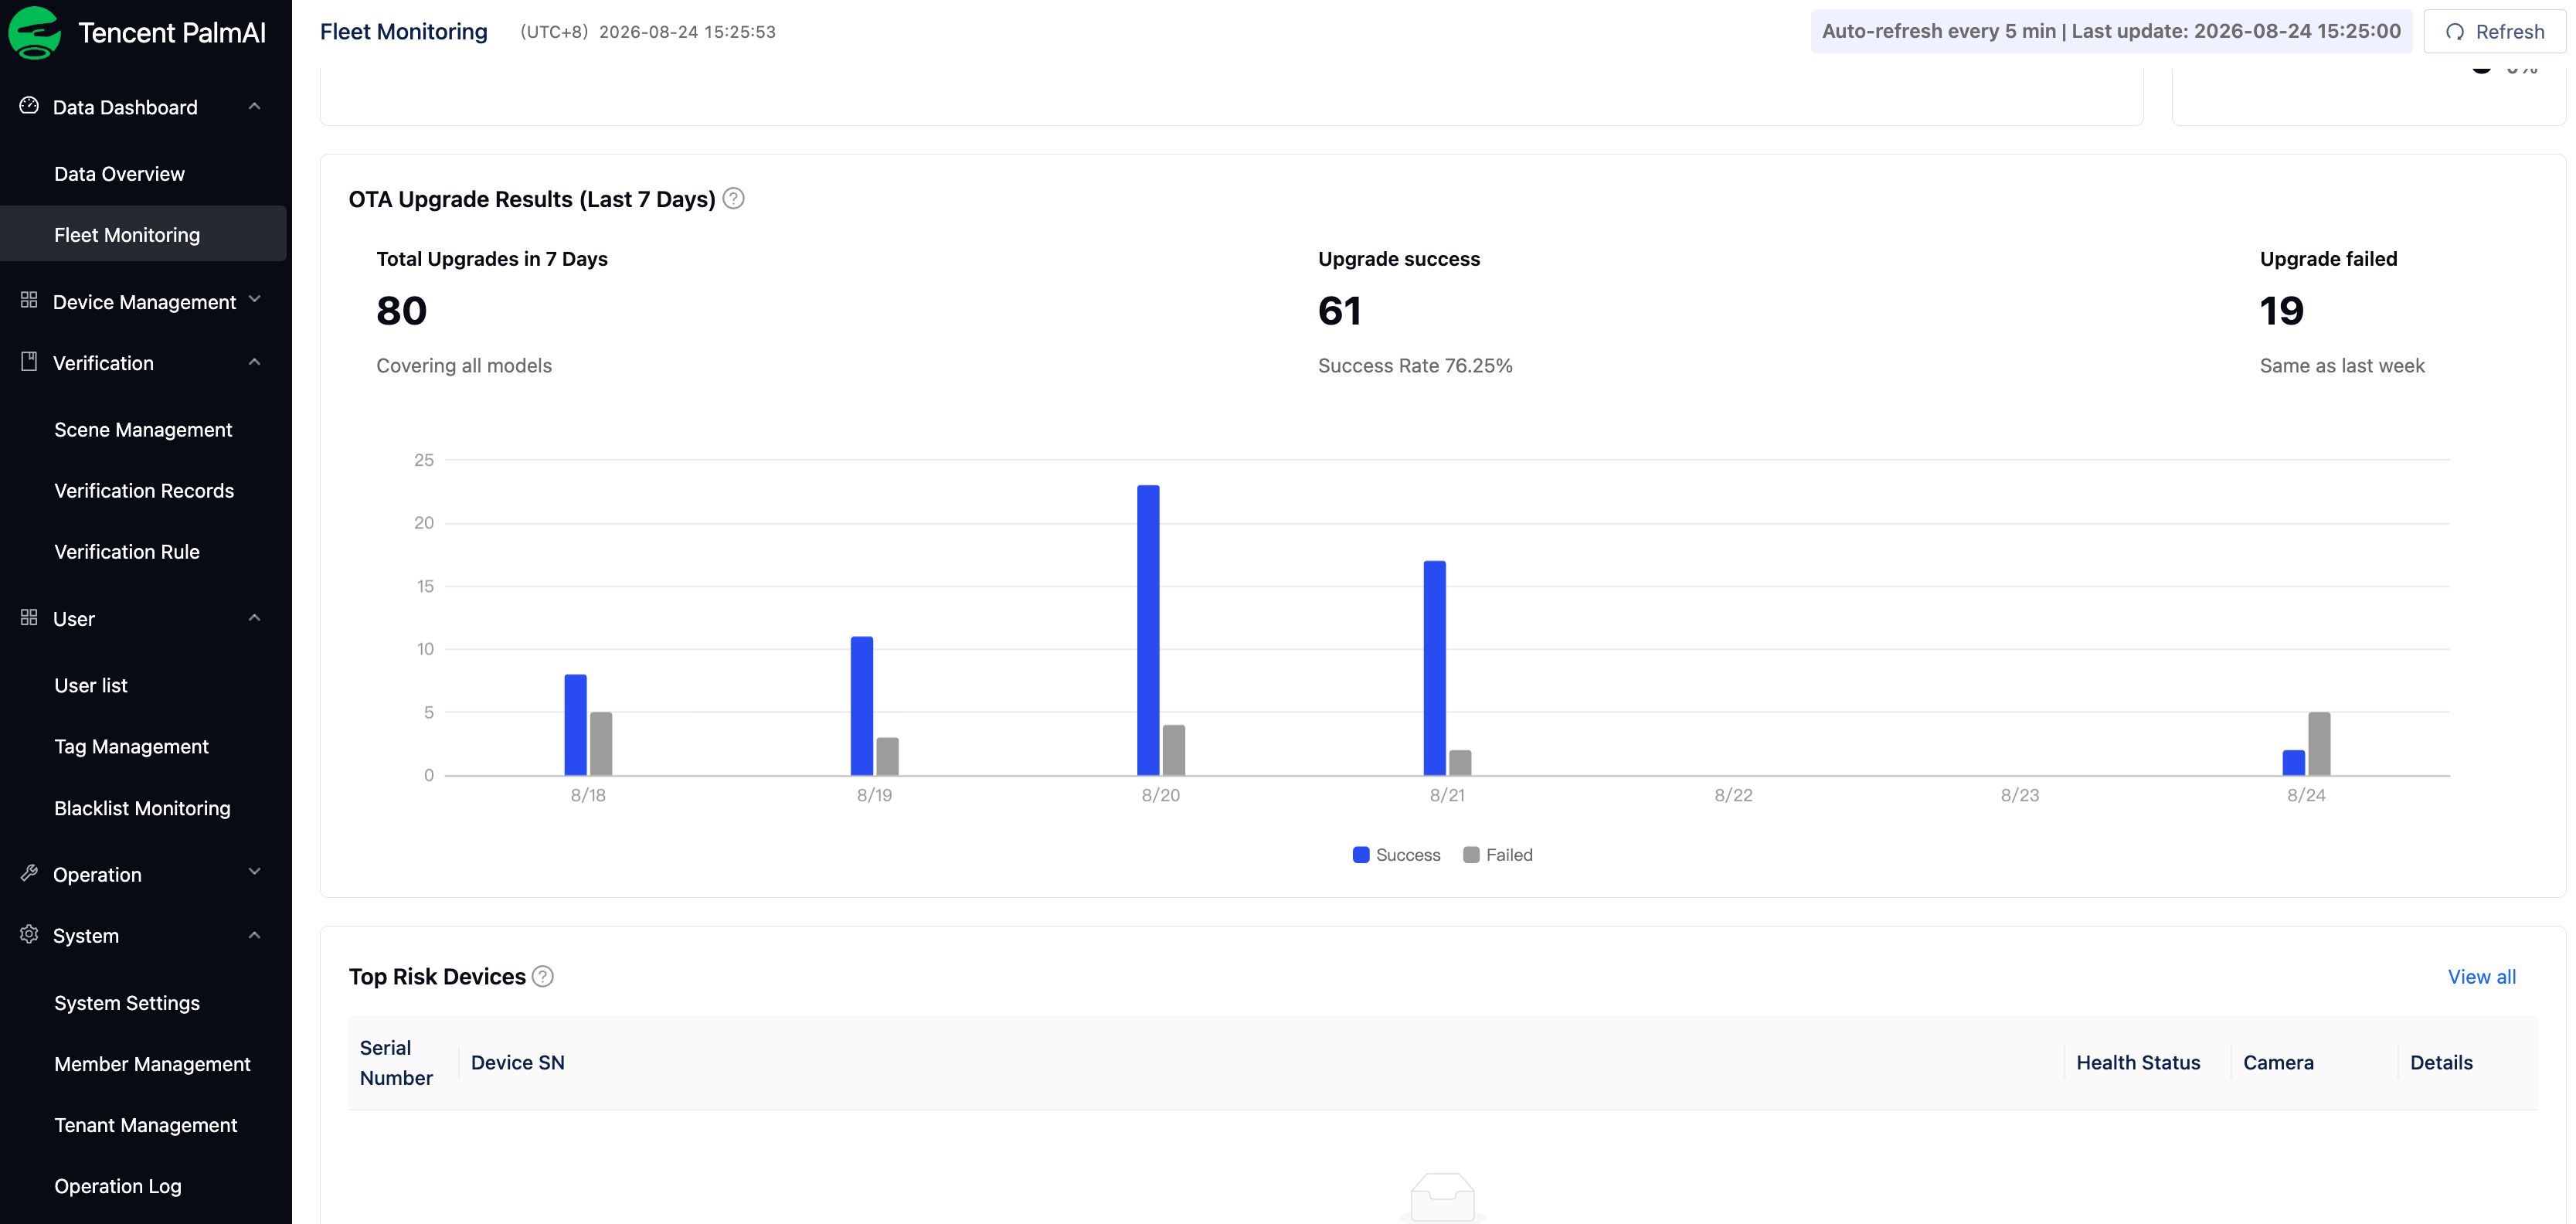
- OTA upgrade results: Shows the total number of device upgrades, successful upgrades, failed upgrades, and upgrade success rate over the past seven days, as well as the upgrade result trend by date.
- High-risk device ranking: Ranks devices from poorest to best health and shows the devices with the highest current risk levels.
Refreshing Data
The Device Dashboard refreshes automatically every five minutes by default. You can also click Refresh to retrieve the latest device status manually.
3.9 Tenant Management
The Tenant Management module supports a multi-tenant architecture. Super Administrators can create and manage multiple tenants, providing data isolation and independent management between tenants.
3.9.1 Creating a Tenant
Only Super Administrators can create tenants. When creating a tenant, you can configure basic tenant information, Palm Database Quota, Additional Verification methods, Scene Mode, registration methods, verification record push settings, and contact information.
- Go to the Tenant Management page.
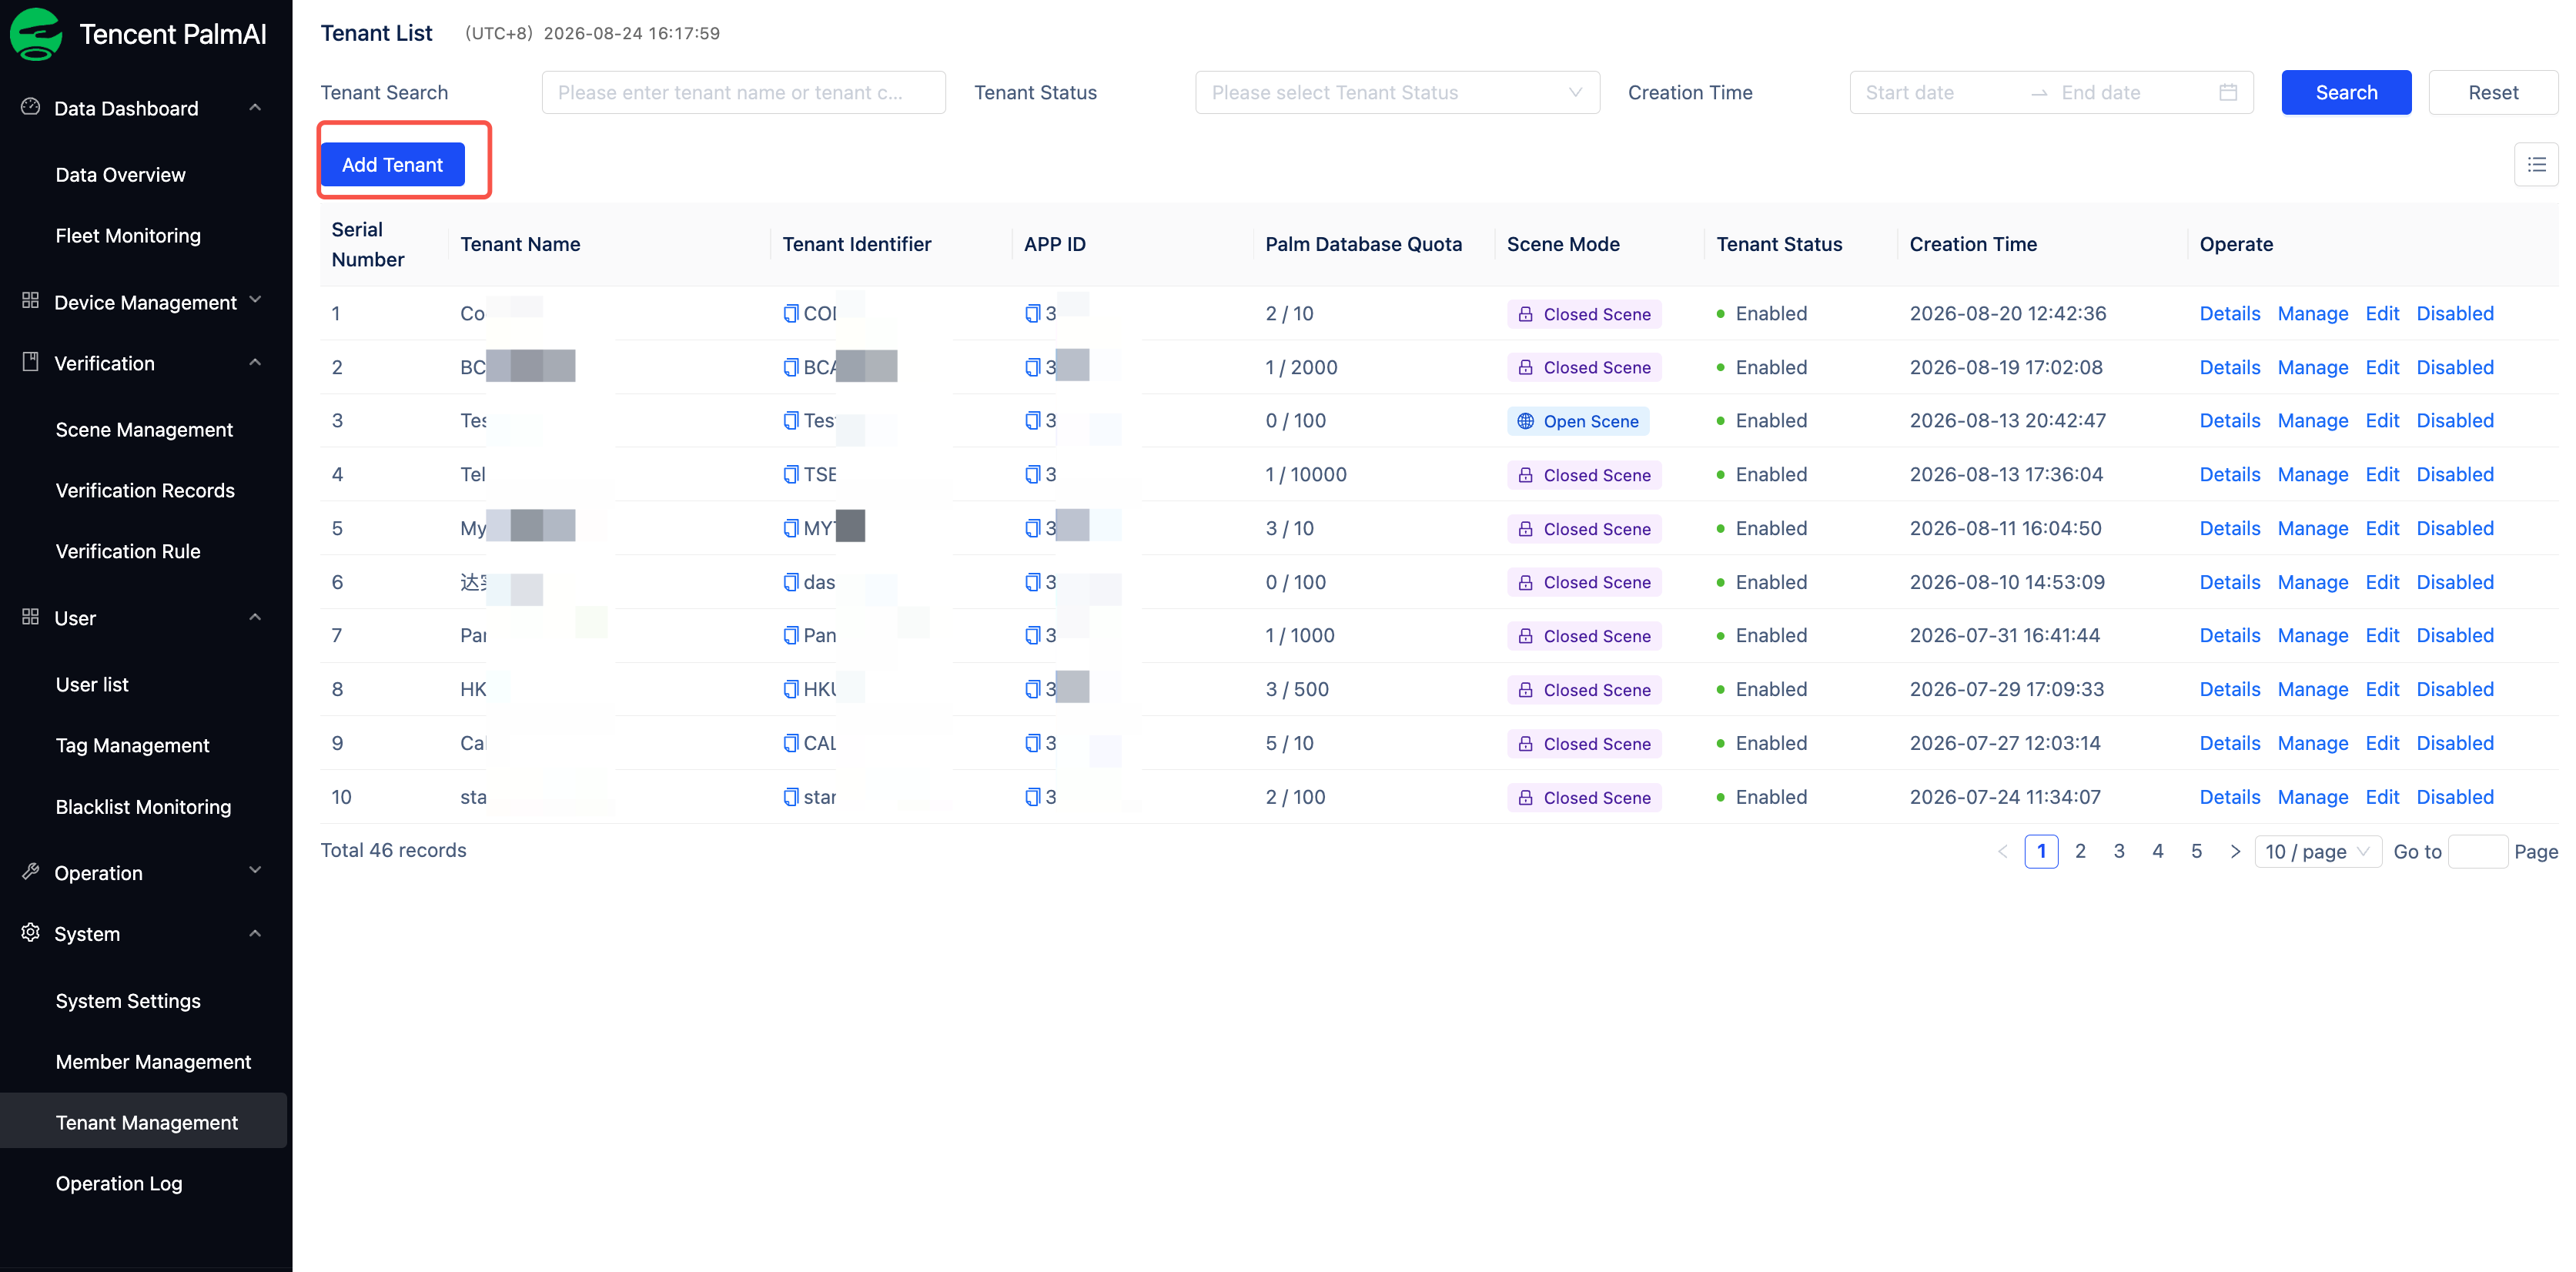
- Click Add Tenant to go to the Add Tenant page.
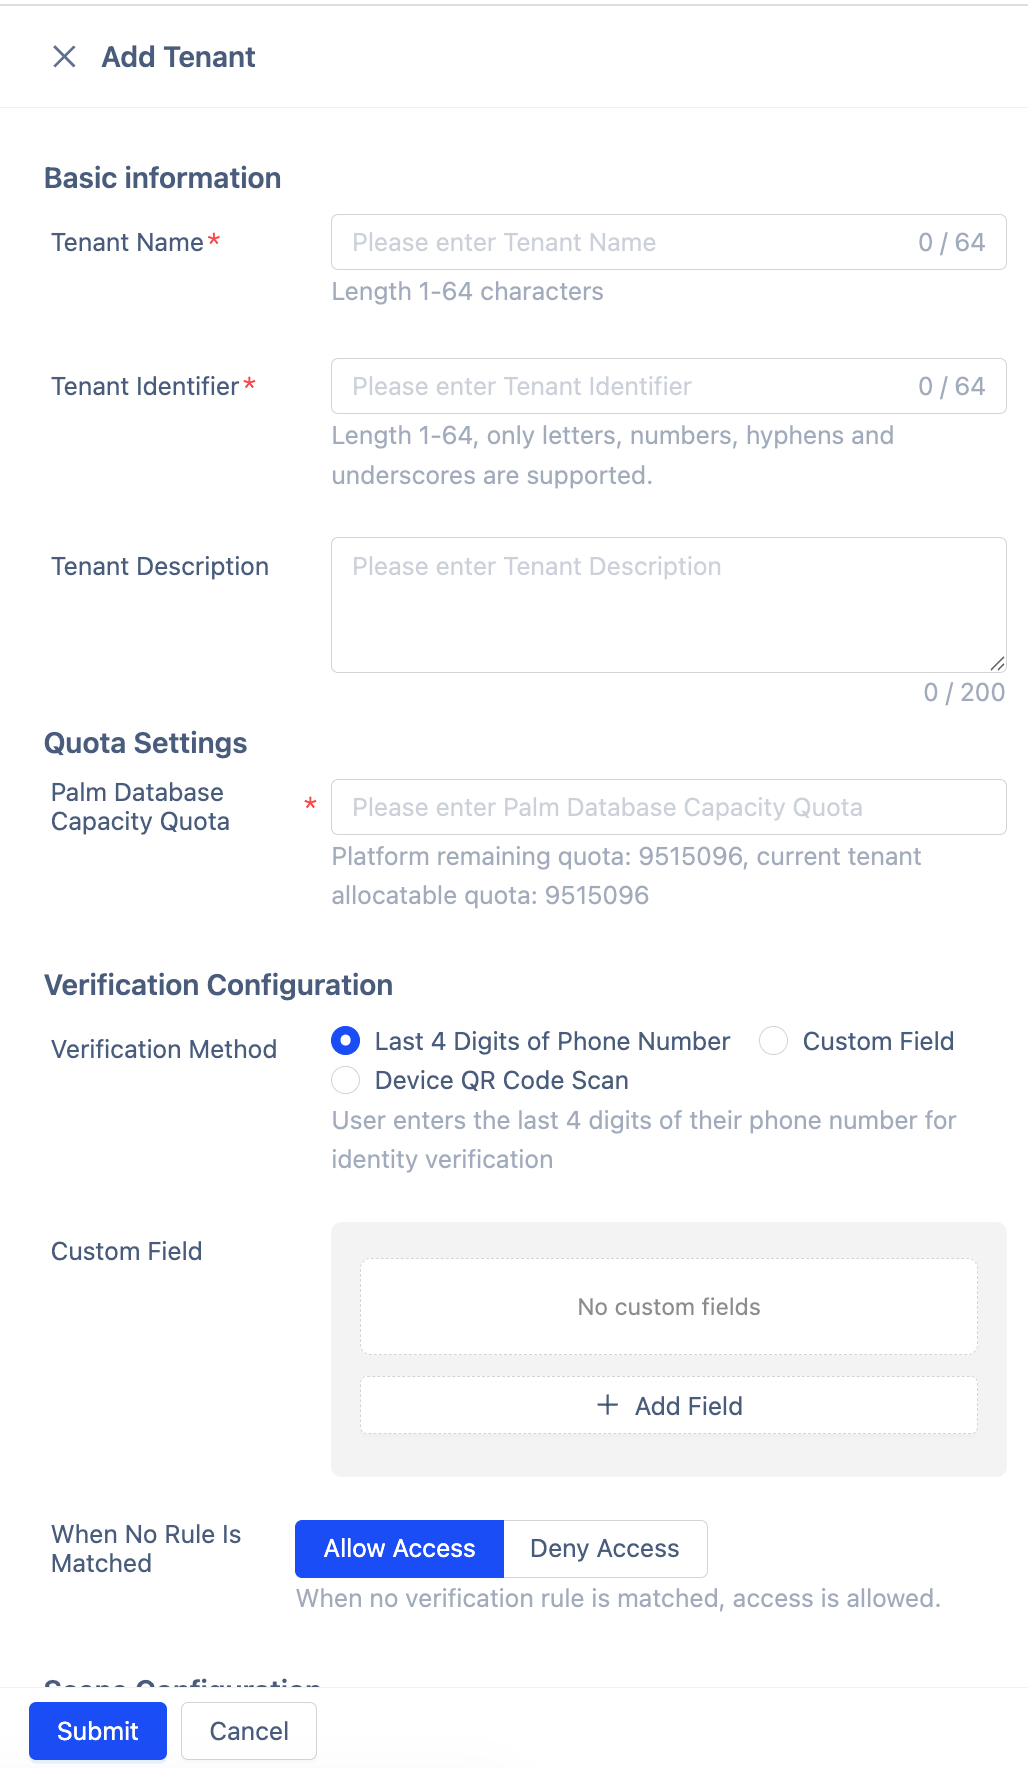
- Configure the tenant information as described below.
- Click Submit to create the tenant.
Basic Information
| Field | Required | Description |
|---|---|---|
| Tenant Name | Required | The tenant display name, from 1 to 64 characters. |
| Tenant Identifier | Required | A unique internal system identifier that cannot be changed after creation. It must contain 4 to 32 characters and may include only lowercase letters, digits, and hyphens (-). |
| Tenant Description | Optional | A description of the tenant's purpose or business, up to 200 characters. |
Quota Settings
| Field | Required | Description |
|---|---|---|
| Palm Database Capacity Quota | Required | Sets the Palm Database Quota allocated to the current tenant. It cannot exceed the platform's currently remaining allocatable quota. When Dual Palm Registration is enabled, each user can consume up to two quota units. |
Additional Verification Configuration
A tenant can configure a unified Additional Verification method and the default action when no Verification Rule is matched.
Verification Method: Select the Additional Verification method used by the current tenant. The following three methods are supported:
| Additional Verification Method | Description |
|---|---|
| Last 4 Digits of Phone Number | After a successful Palm Scan, the user enters the last four digits of their phone number on the device to complete Additional Verification. |
| Custom Field | Uses a tenant-defined numeric field, such as an employee ID or other number, to complete Additional Verification. |
| Device QR Code Scan | The user enters Additional Verification information on the device QR code scan verification H5 page to generate an authentication QR code. The device then scans the QR code to complete Additional Verification. |
Custom Field: After selecting Custom Field, click Add Field to add an Additional Verification field. You can configure the following:
| Field | Description |
|---|---|
| Field Name | A custom field name. After the field is added, it appears in the Additional Verification field list and can be selected as the Additional Verification field. |
| Input Prompt | The input prompt displayed on the device when the user performs verification. |
| Required | When enabled, the field is required. |
| Unique | When enabled, the field value must be unique within the current tenant. |
| Min Length | The minimum permitted input length. |
| Max Length | The maximum permitted input length. |
After adding a custom field, select the field currently used for Additional Verification under Active Verification Field.
QR Code Expiration: When Device QR Code Scan is selected, you can set the authentication QR code's validity period. After the QR code expires, the user must obtain a new authentication QR code.
| Field | Description |
|---|---|
| When No Rule Is Matched | Sets the default action when a user does not match any Verification Rule. |
| Allow Access | Allows the user to pass when no Verification Rule is matched. |
| Deny Access | Denies the user access when no Verification Rule is matched. |
Scene Configuration
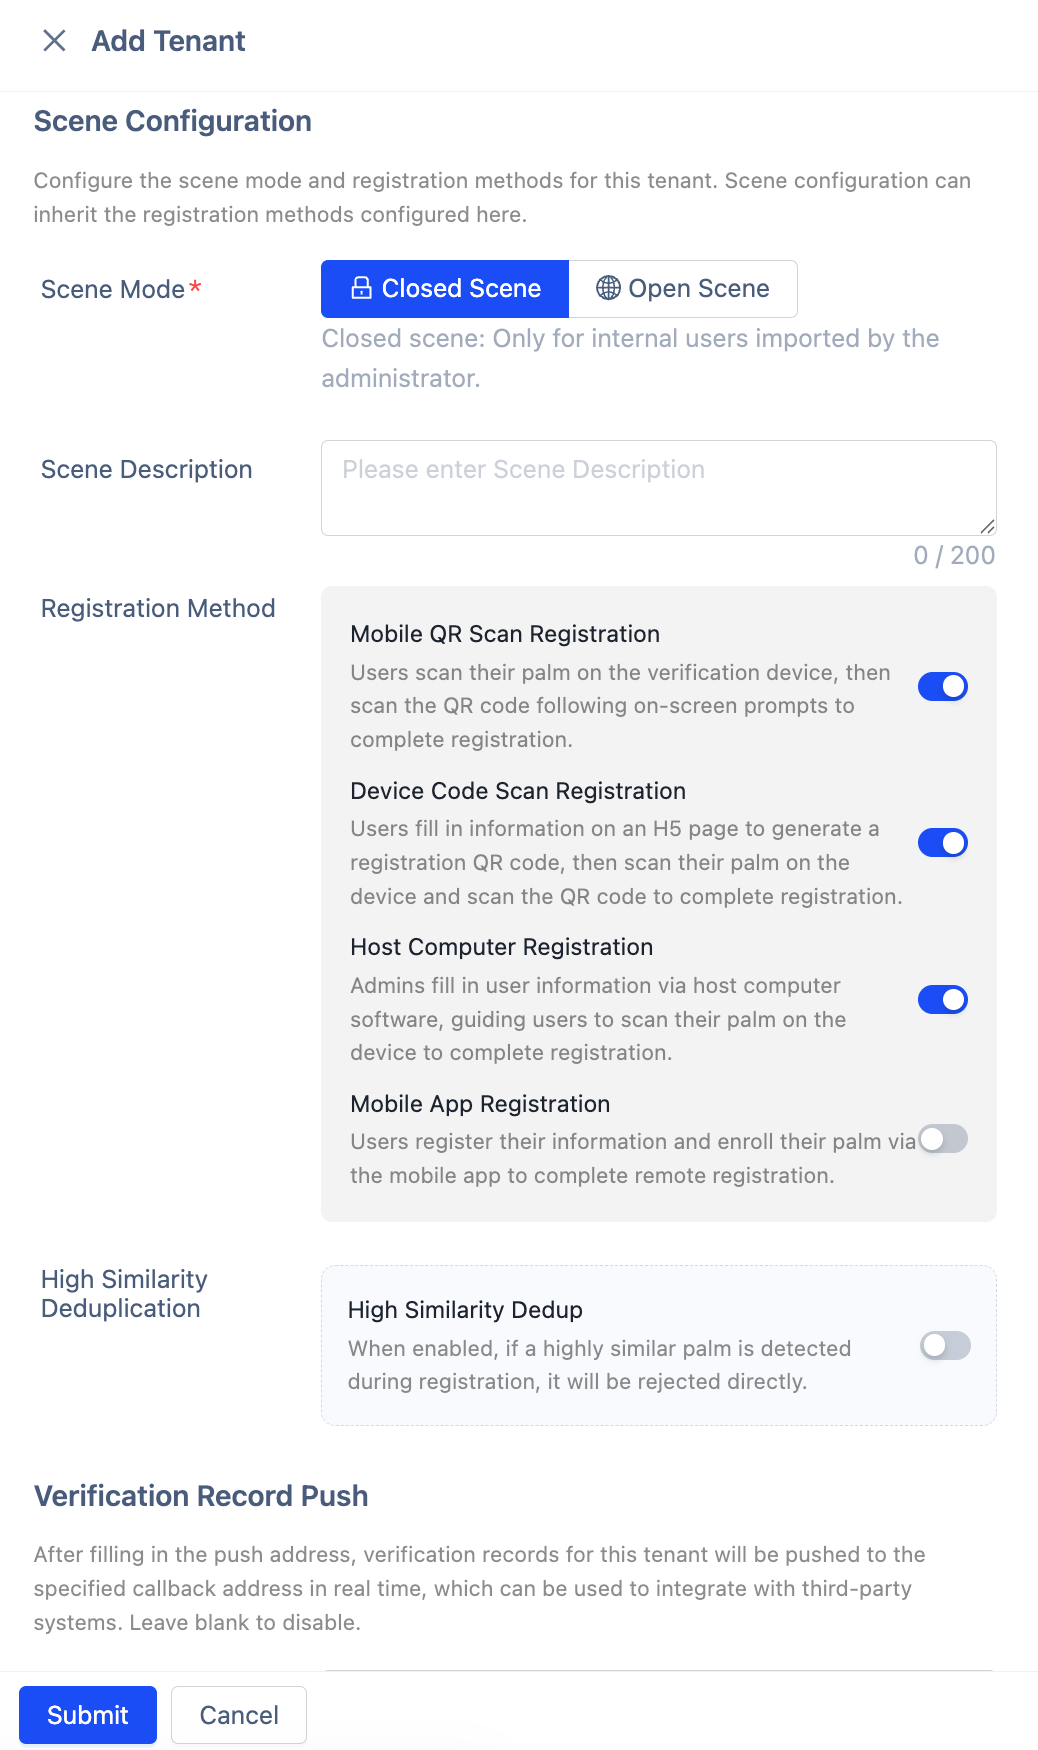
Scene Configuration sets the current tenant's default Scene Mode and permitted registration methods. Scenes created later can inherit the registration methods configured for the tenant.
Scene Mode: Supports Closed Scene and Open Scene.
| Scene Mode | Description |
|---|---|
| Closed Scene | A Closed Scene permits only internal users added in advance by an administrator. Users must be added by an administrator before they can complete registration and pass verification. |
| Open Scene | An Open Scene allows users to register by themselves through enabled registration methods without being added by an administrator in advance. |
Scene Description: Enter supplementary information about the current tenant's Scene Mode, up to 200 characters.
Registration Methods
Registration Method controls which registration methods are enabled for the current tenant.
The following registration methods are controlled by tenant switches:
| Registration Method | Description |
|---|---|
| Mobile QR Scan Registration | Phone Scan QR Registration. The user performs a Palm Scan on a verification device, then scans a QR code with a phone as prompted on the device screen to complete palm registration. |
| Device Code Scan Registration | Device Scan QR Registration. The user enters registration information on an H5 page to generate a registration QR code, then performs a Palm Scan and scans the QR code on the device to complete registration. |
| Host Computer Registration | Host Input. An administrator enters user information in the Host software and guides the user through a Palm Scan on the device to complete registration. |
| Mobile App Registration | Mobile Palm Registration. The user preregisters a palm through a mobile App or the Mobile Palm Registration H5 page, then performs the first Palm Scan and completes activation on an on-site device. |
Administrators can use the switch beside each registration method to enable or disable it.
Note
Device Input Registration is available by default and is not controlled by the tenant registration method switches.
High Similarity Deduplication During Registration
High Similarity Deduplication controls whether High Similarity palm detection is enabled during registration.
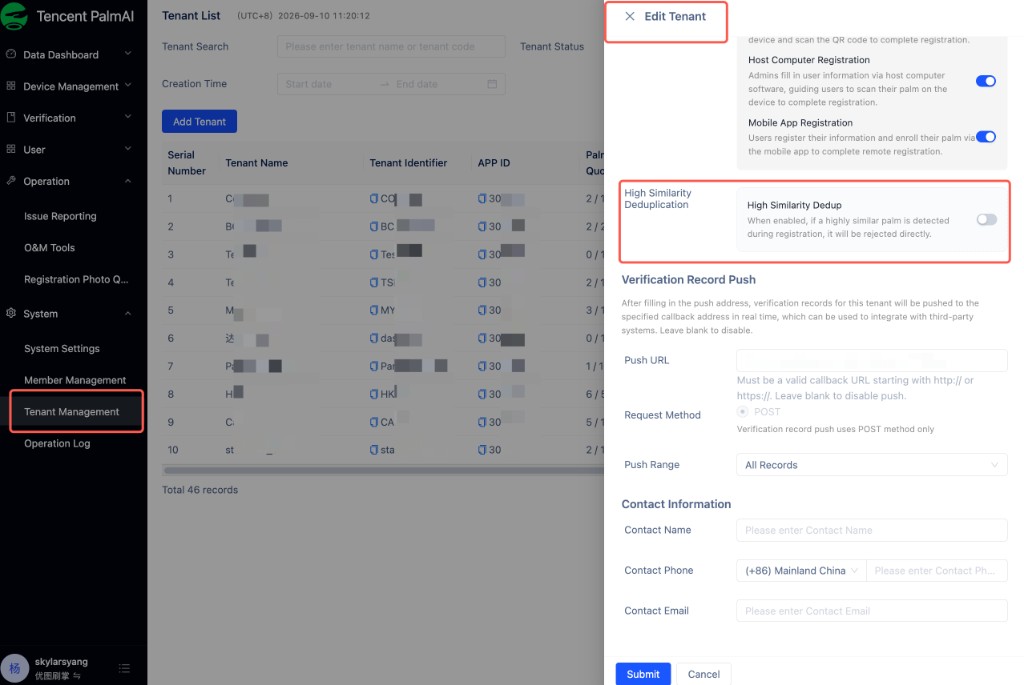
Enabling High Similarity Dedup
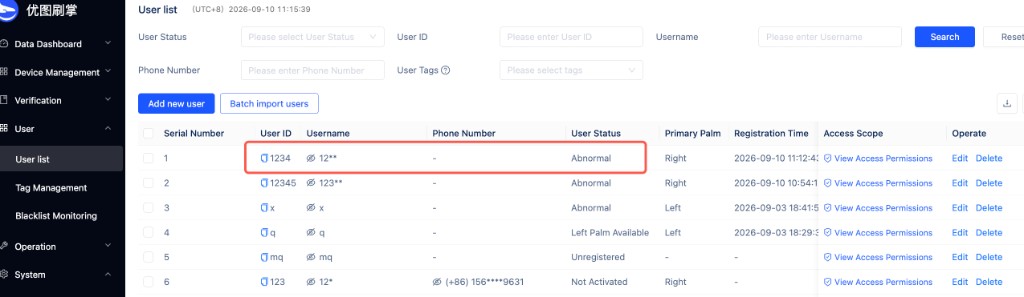
If a palm highly similar to an existing palm is detected during Palm Registration, the system immediately rejects the registration. The device displays Palm Already Registered, and the User Status in PalmAI Admin Web is Unregistered.
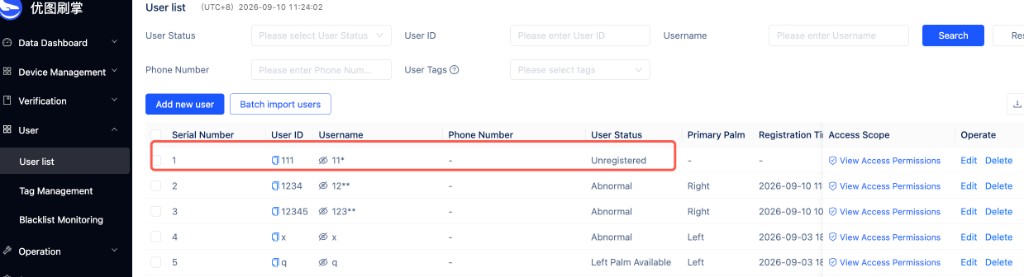
Disabling High Similarity Dedup
If a High Similarity palm is registered, the device still indicates that registration succeeded, but the User Status in PalmAI Admin Web is Abnormal.
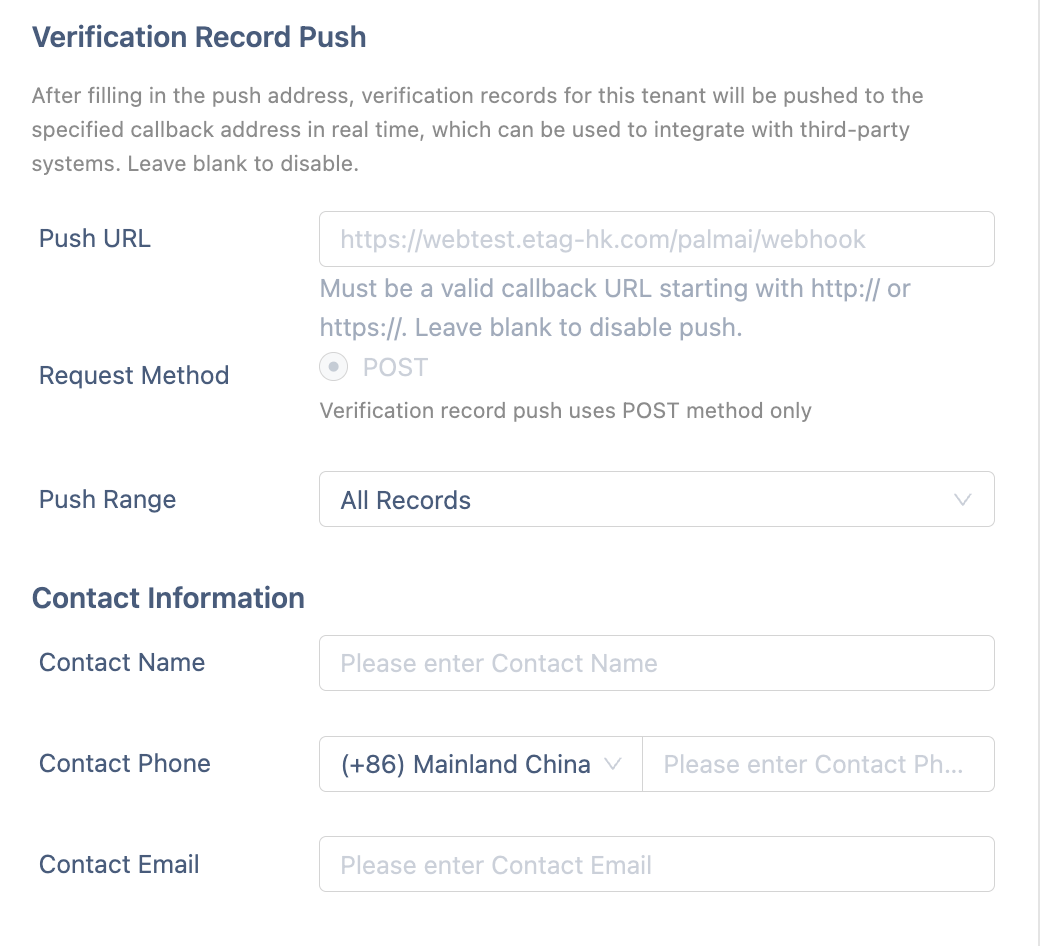
Verification Record Push
Verification Record Push pushes verification records generated under the current tenant to a specified business system in real time and can be used to integrate with third-party business systems.
Tenant Administrators can view and configure the push address for their tenant. Super Administrators can view and manage push configurations for all tenants.
| Field | Description |
|---|---|
| Push Address | Enter the business callback address that receives verification records. It must be a valid address beginning with http:// or https://. If left blank, verification record push is not enabled. |
| Request Method | Verification records are pushed using the fixed POST request method. |
| Push Scope | Sets the scope of verification records to push. |
Contact Information
Enter tenant contact information as needed, including:
| Field | Description |
|---|---|
| Contact Name | Contact name. |
| Contact Phone | Contact phone number. |
| Contact Email | Contact email address. |
3.9.2 Viewing Tenant Details
After a tenant is created, click Details in the tenant list to view tenant details, including APP ID, API Key, Tenant Status, Palm Database Quota usage, Additional Verification method, and Scene Mode.
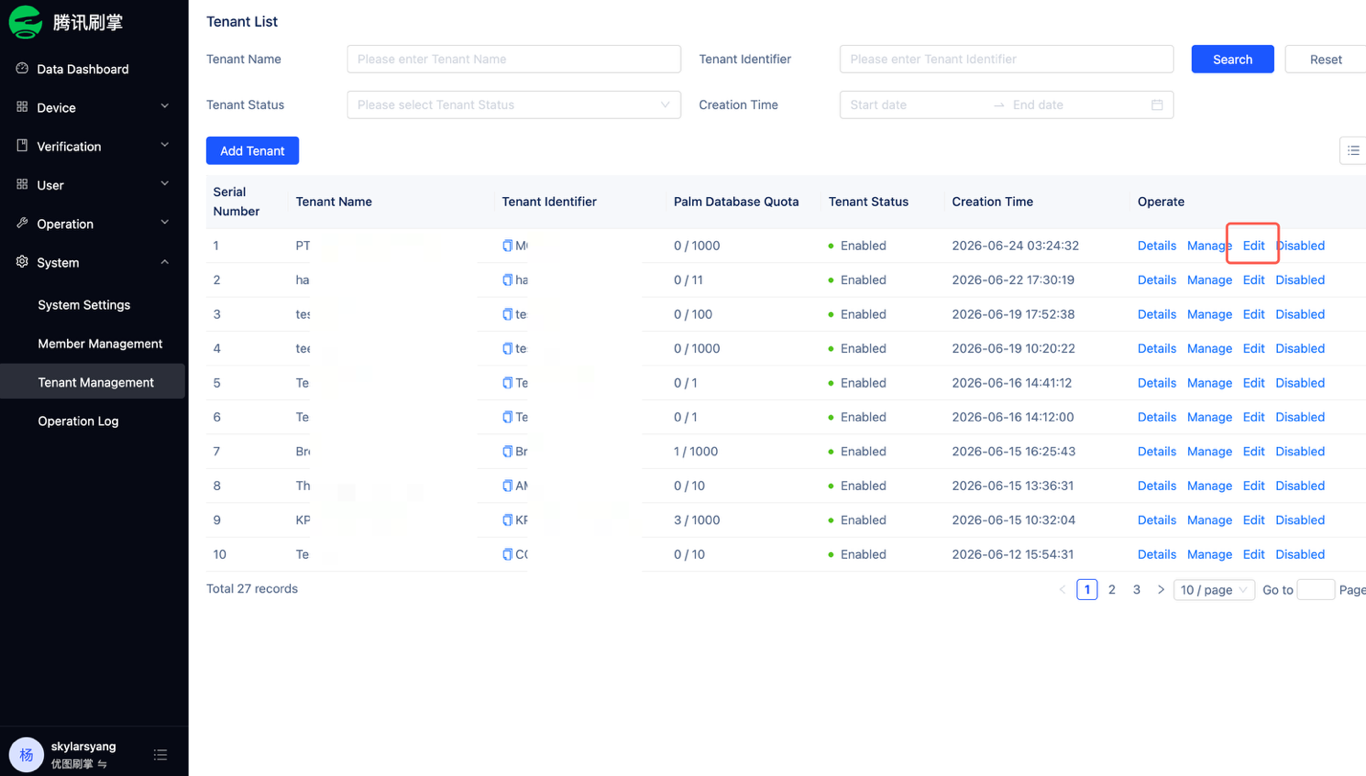
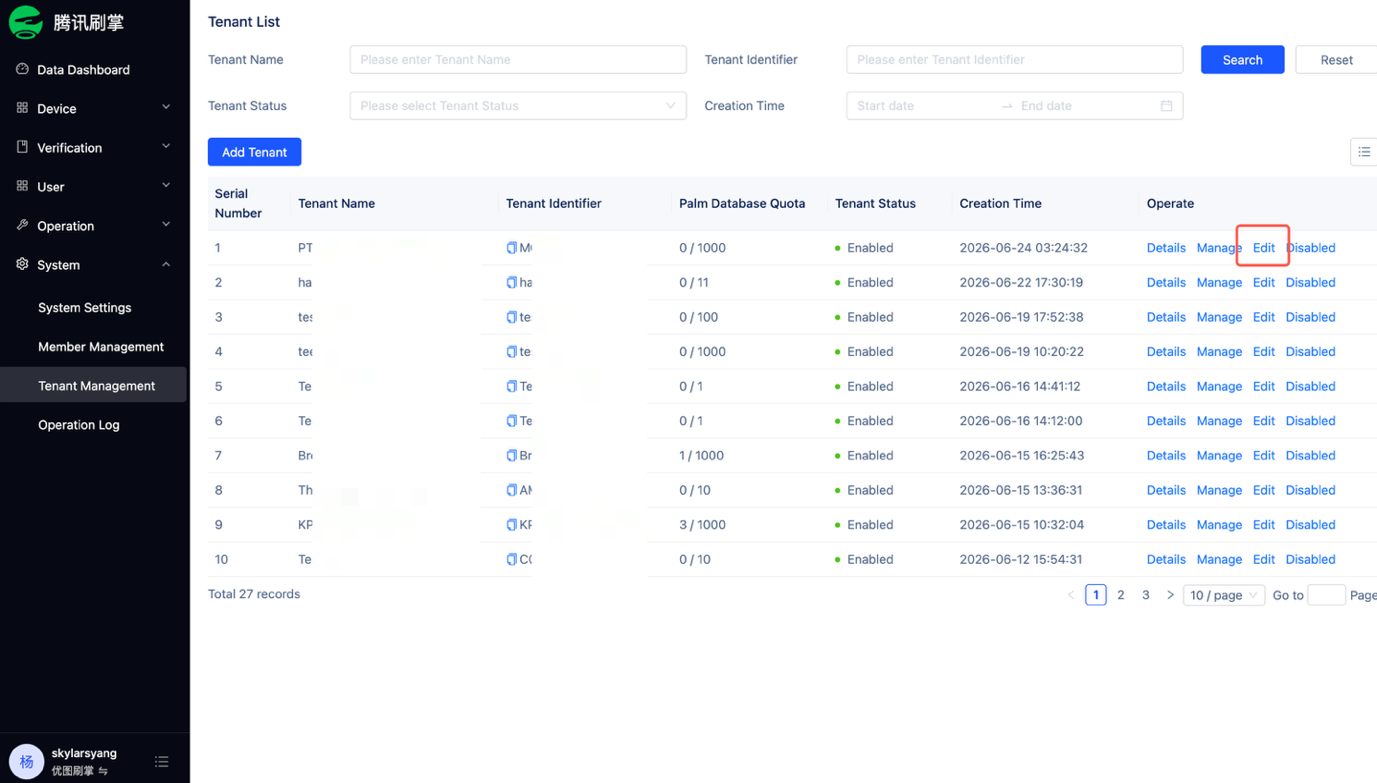
3.9.3 Editing a Tenant
- Find the target tenant and click Edit.
- Modify the Tenant Name, Palm Database Quota, Additional Verification configuration, Scene Configuration, registration methods, High Similarity Deduplication, Verification Record Push, or contact information as needed.
- Click Submit.
The system saves the modified tenant configuration.
3.9.4 Tenant-Level Additional Verification Configuration
An Additional Verification method can be configured independently for each tenant. To change the configuration after a tenant is created, go to the target tenant's Edit page and configure it under Verification Configuration.
The following three Additional Verification methods are supported, and only one can be selected. For field descriptions, see "3.9.1 Creating a Tenant."
| Additional Verification Method | Description |
|---|---|
| Last 4 Digits of Phone Number | After a successful Palm Scan, the user enters the last four digits of their phone number on the device to complete Additional Verification. |
| Custom Field | After a successful Palm Scan, the user enters the custom field configured for the current tenant to complete Additional Verification. After selecting this method, specify the currently active verification field. |
| Device QR Code Scan | After a successful Palm Scan, the user generates an authentication QR code on the device QR code scan verification H5 page, and the device scans the QR code to complete Additional Verification. The QR code validity period can be configured. |
After completing the Additional Verification configuration, click Submit.
The system saves the current tenant's Additional Verification method. Whether Additional Verification is triggered during actual verification is determined by the Verification Strategy of the corresponding scene.
Note
- When Custom Field is selected, make sure that the corresponding custom field values have been maintained for relevant users. Otherwise, users cannot complete this form of Additional Verification.
- When Device QR Code Scan is selected, users must enter Additional Verification information and generate an authentication QR code on the device QR code scan verification H5 page. This URL is for the Indonesia production environment demo. Contact the vendor for the actual URL.
- If the tenant's Additional Verification method is changed, subsequent verification uses the latest saved tenant configuration.
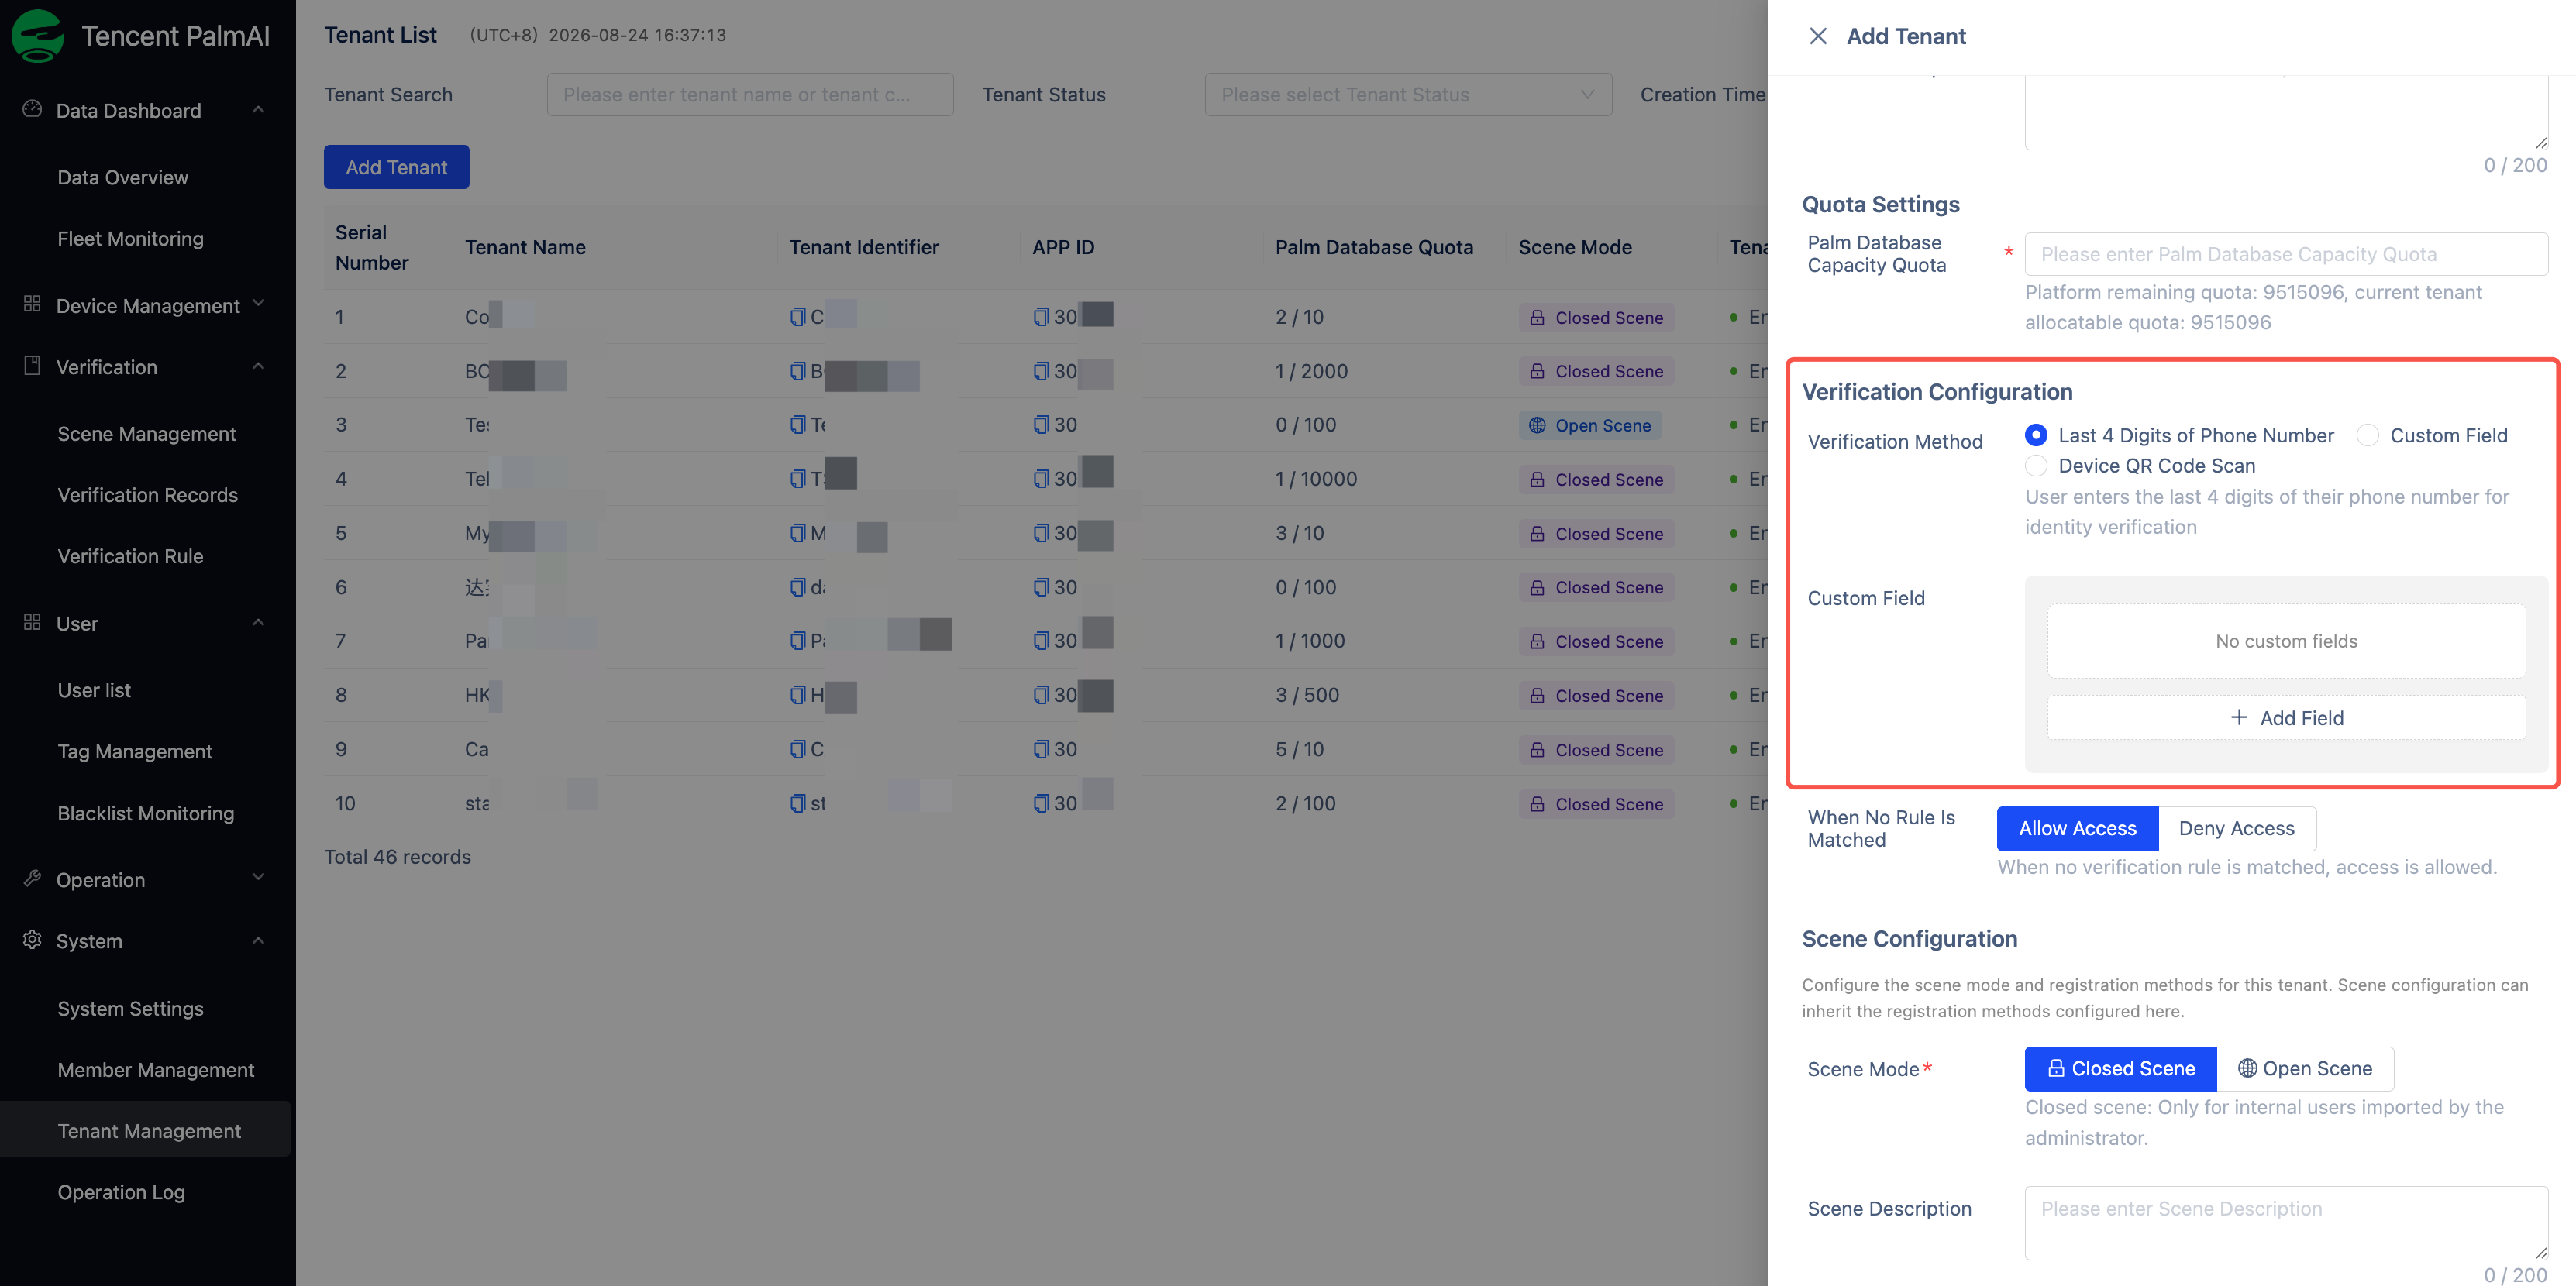
After the configuration is saved, all scenes under the tenant use this Additional Verification method.
Note
- Cloud Recognition or Hybrid Recognition strategies use the last four digits of a phone number for Additional Verification by default.
- After Custom Field Additional Verification is selected, a custom field value must be maintained for every user under User Management. Otherwise, the user cannot complete Additional Verification.
- After Device QR Code Scan Additional Verification is selected, the user must generate an authentication QR code on the device QR code scan verification H5 page, and the device must scan the QR code to complete Additional Verification.
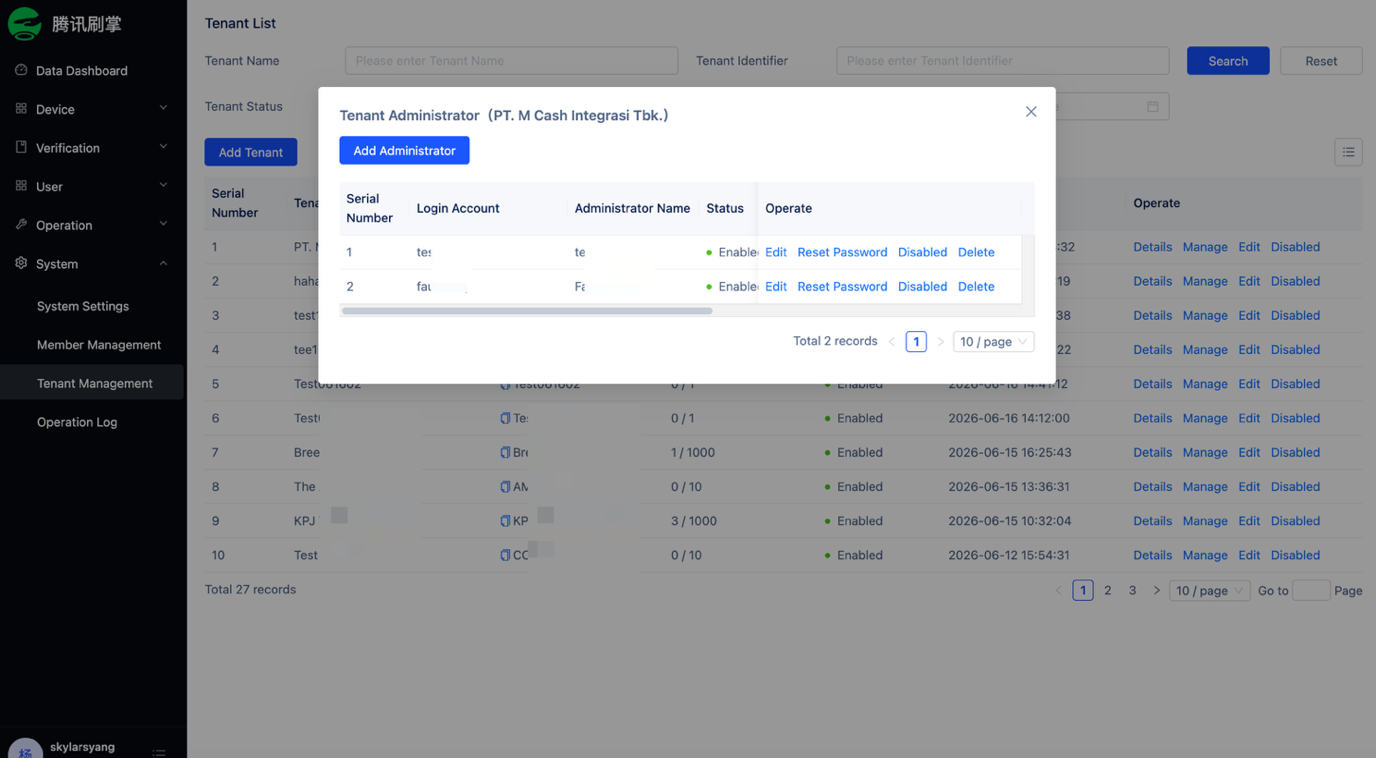
3.9.5 Managing Tenant Administrators
Tenant Administrator management includes opening the administrator list, adding administrators, and resetting passwords, disabling, or deleting existing administrators.
Opening Tenant Administrator Management
- Find the target tenant.
- Click Manage to open the Tenant Administrator list.
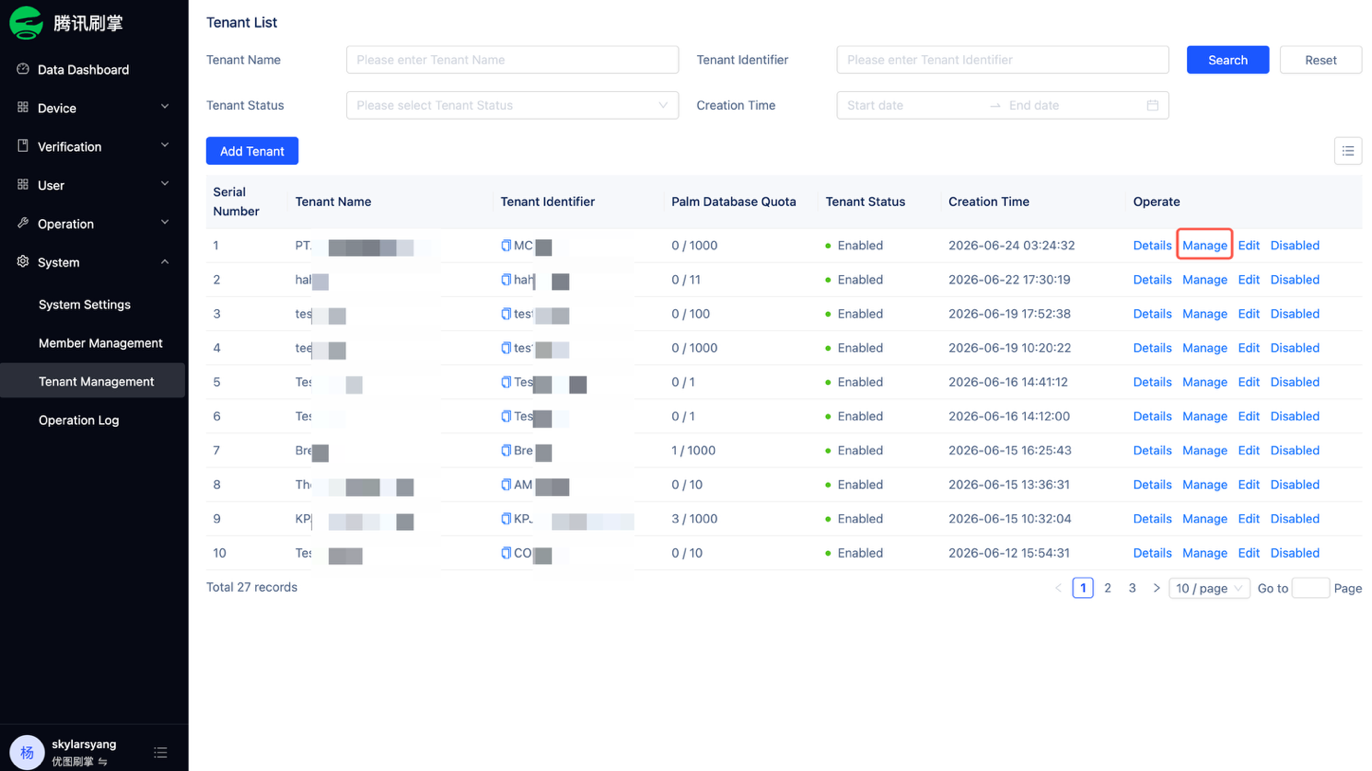
Resetting an Administrator Password
- Find the target administrator in the Tenant Administrator list.
- Select Reset Password and follow the on-screen instructions.
Disabling an Administrator
- Find the target administrator in the Tenant Administrator list.
- Select Disable and follow the on-screen instructions.
Deleting an Administrator
- Find the target administrator in the Tenant Administrator list.
- Select Delete and follow the on-screen instructions.
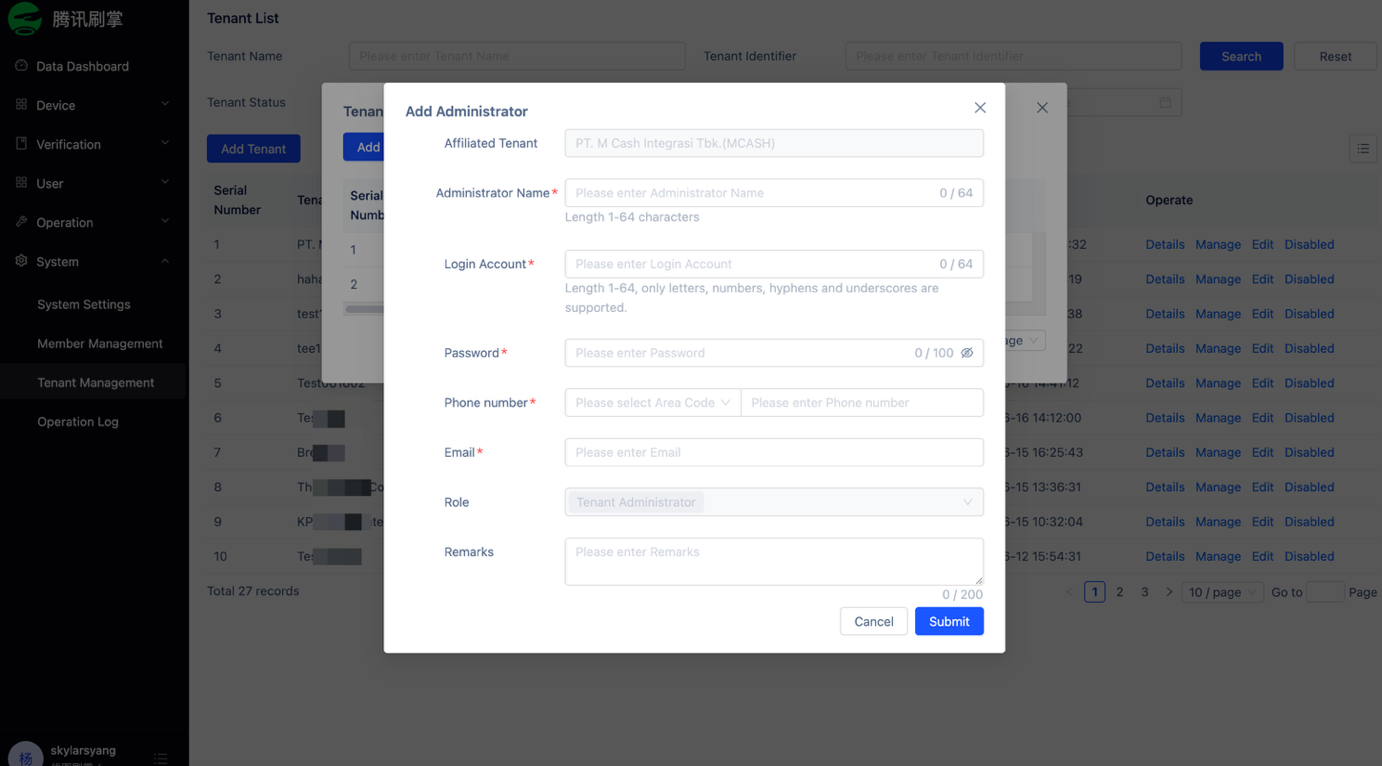
Adding a Tenant Administrator
- Select Add Administrator in the Tenant Administrator list.
- Enter the administrator information and submit.
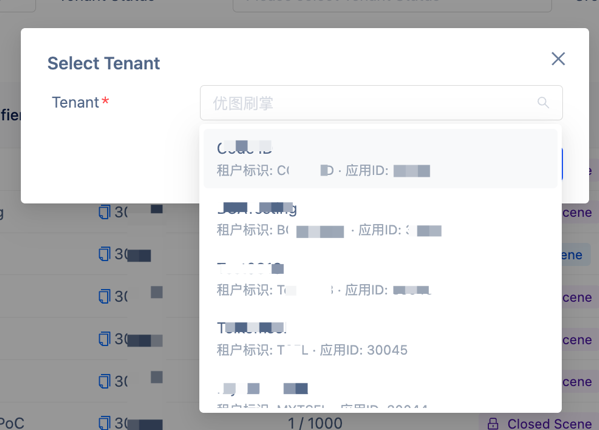
3.9.6 Switching Tenant Views
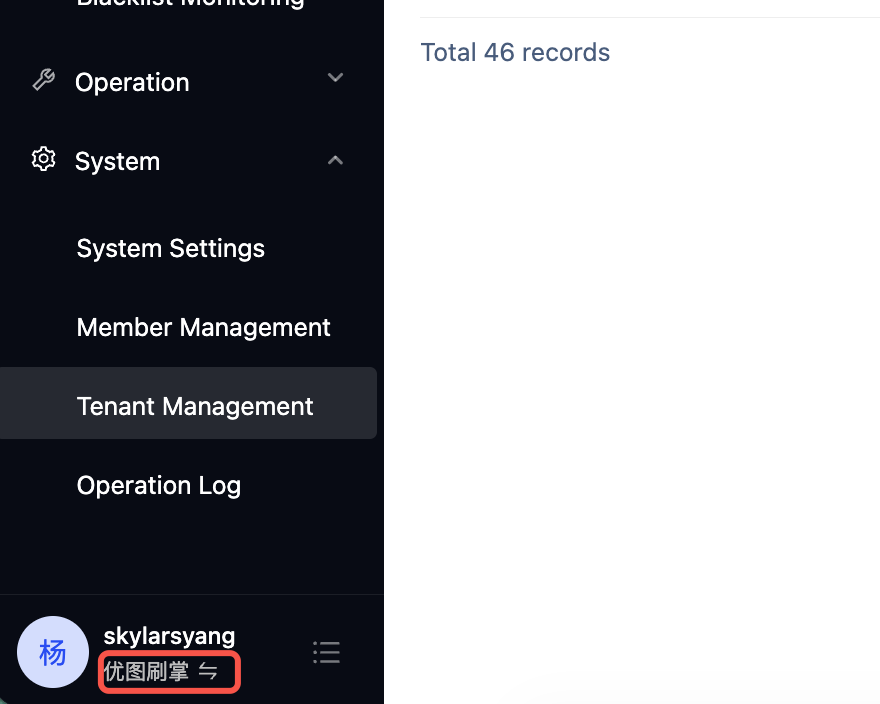
Switching Tenants as a Super Administrator
- Open the tenant selection drop-down list in the lower-left corner of the page.
- Select the target tenant.
The page refreshes automatically and displays only the business data of the selected tenant.
Tenant Administrator View
After a Tenant Administrator logs in, the view for that administrator's tenant opens by default. The current Tenant Name appears at the top of the page, and the Tenant Administrator cannot switch tenants.
3.9.7 Enabling or Disabling a Tenant
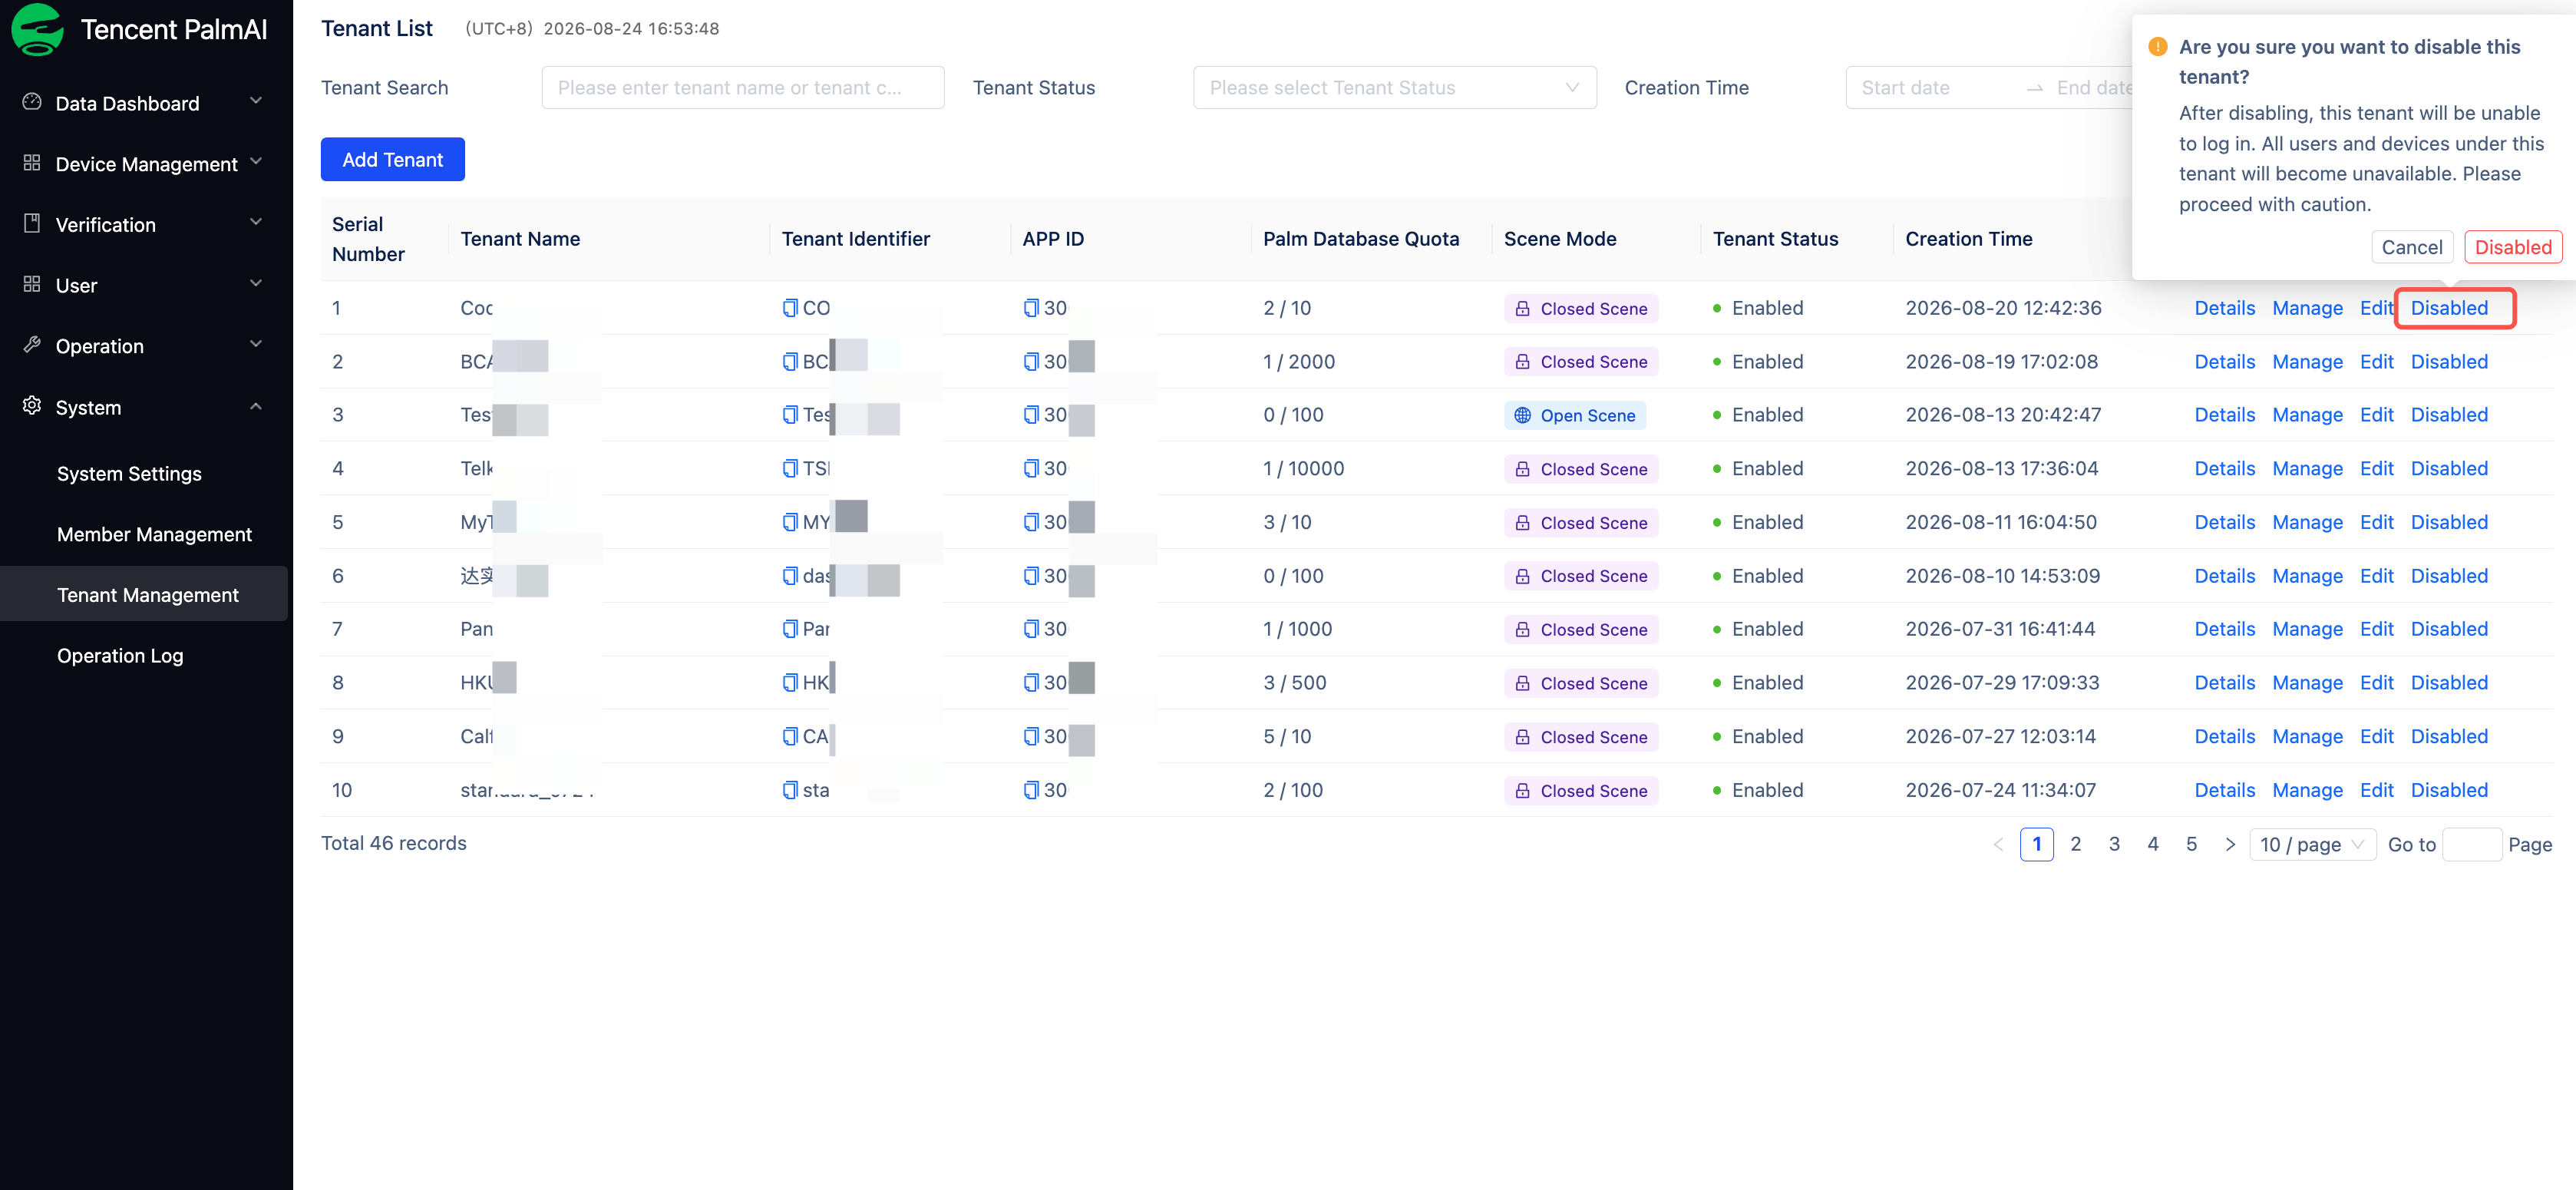
- Find the target tenant.
- Click Enable or Disable.
- Confirm the operation in the confirmation dialog.
Warning
Disabling a tenant has the following effects:
- PalmAI Admin Web: All administrator accounts under the tenant are unable to log in to PalmAI Admin Web.
- Device side: All Palm Verification Devices under the tenant are unable to perform Palm Print Verification.
- Mobile: All users under the tenant are unable to log in to the mobile demo App or use related features.
- Data: Existing data is not deleted. All functionality is restored after the tenant is re-enabled.
3.9.8 Tenant Data Isolation
- User data, device data, verification records, Scene Configurations, and other data are completely isolated between tenants.
- Tenant Administrators, Device Administrators, User Administrators, and Basic Administrators can view and operate only data within their tenant and cannot view or operate any data belonging to other tenants.
- The Super Administrator is a platform-level role that can view and manage data for all tenants across tenant boundaries.
3.10 Audit Logs
The Audit Logs module records administrator operations in the system for security auditing and issue tracing.
3.10.1 Viewing Operation Logs
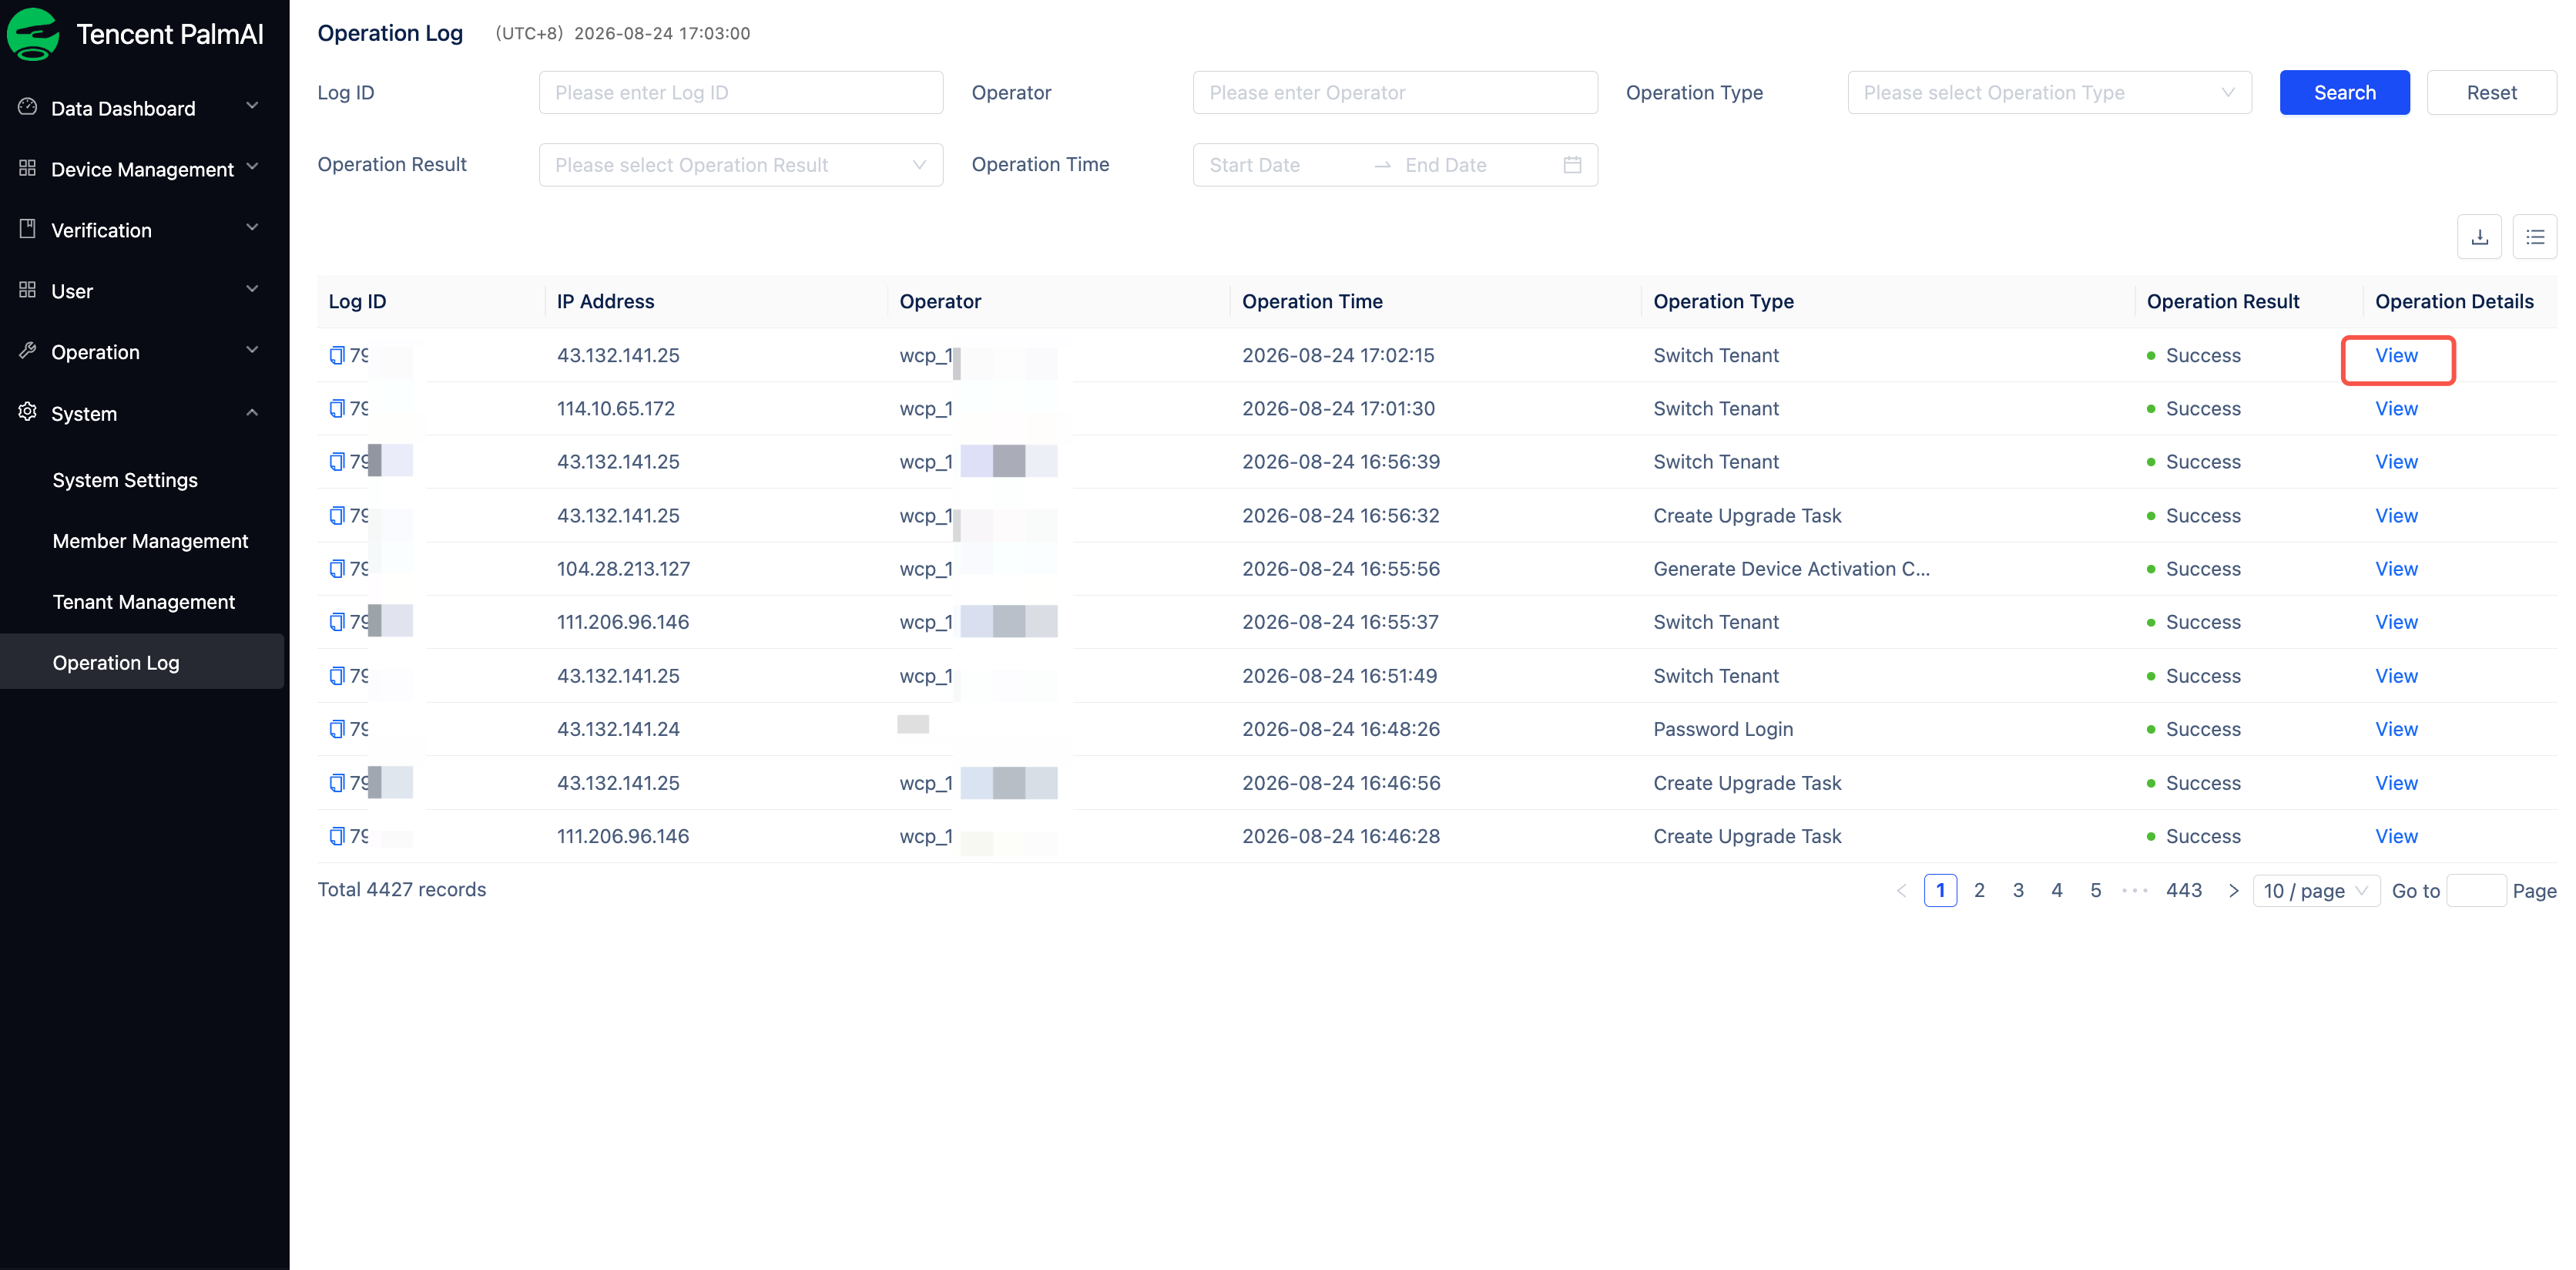
- Click Operation Log to go to the Operation Log page.
- View administrators' system operation records. Each log includes the IP address, operator, operation time, operation type, and operation result.
- Filter logs by operator, operation type, operation result, or operation time range.
- Find the target log and click View to view the operation details.
3.10.2 Log Scope
Audit Logs cover key operations in PalmAI Admin Web, including but not limited to:
| Covered Module | Audited Operation Type |
|---|---|
| Member Management | Create, edit, and delete members. |
| Tenant Management | Create, edit, and delete tenants. |
| Device Management | Register, edit, delete, and batch import devices. |
| Scene Management | Create, edit, and delete scenes. |
| User Management | Create, edit, and delete users, and delete Palm Print data. |
| System Configuration | Modify system configurations. |
| Upgrade Package Management | Add and delete upgrade packages. |
| Upgrade Campaign Management | Create and discard upgrade campaigns. |
| Upgrade Tasks | Add and modify upgrade tasks. |
| Device Log Management | Trigger log uploads and download logs. |
| Remote Commands | Dispatch remote commands, including command type, target device, and execution result. |
All operation logs above include the operator, IP address, operation time, operation type, operation result, and operation details.
3.11 System Settings
The System Settings module allows Super Administrators to view and configure basic platform information, including the Platform Logo, platform name, Service Endpoints, system version information, and platform time zone.
- Click System Settings to go to the System Settings page.
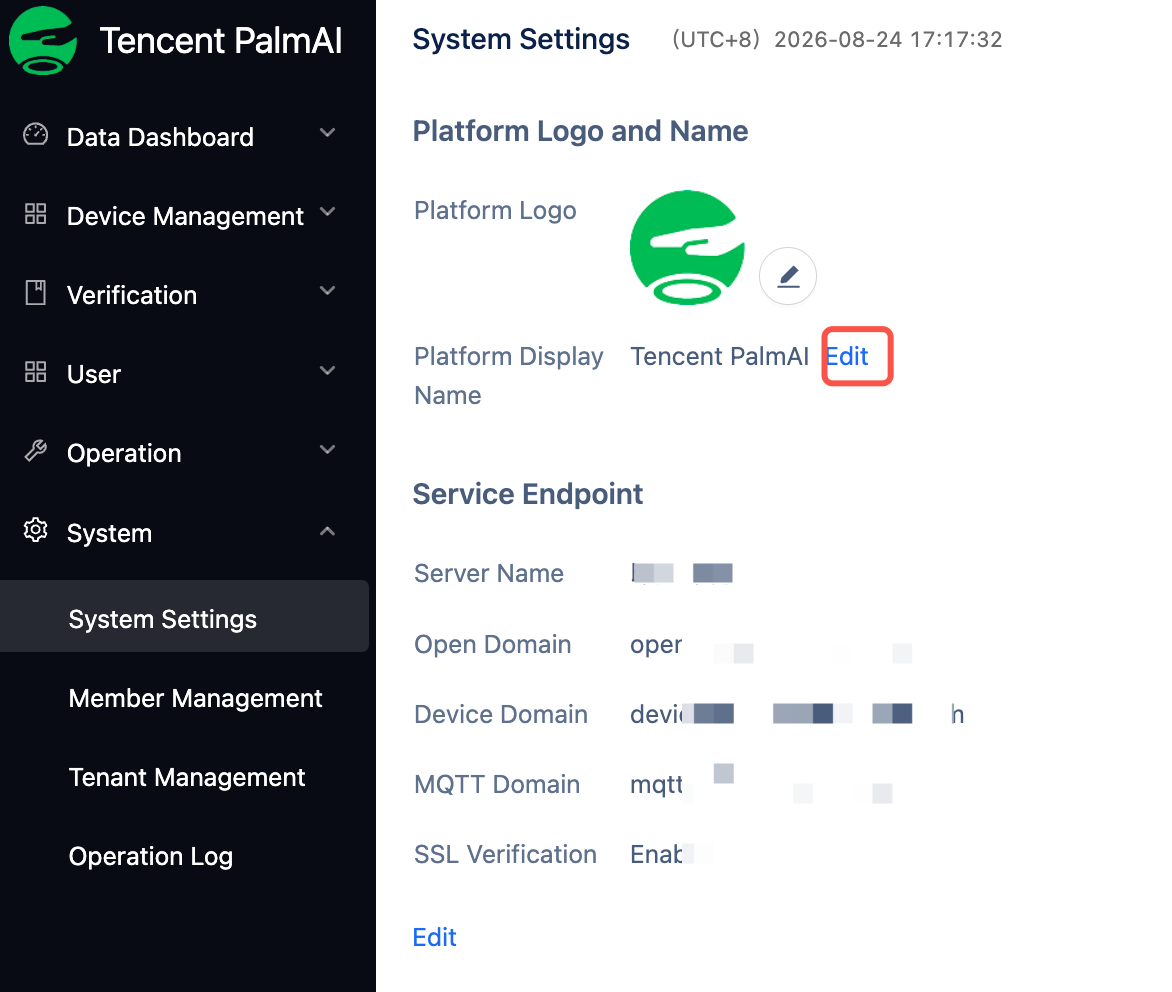
3.11.1 Platform Logo and Name
The page displays the current Platform Logo and platform display name. You can upload or replace the Platform Logo and click Edit to change the Platform Display Name.
3.11.2 Service Endpoints
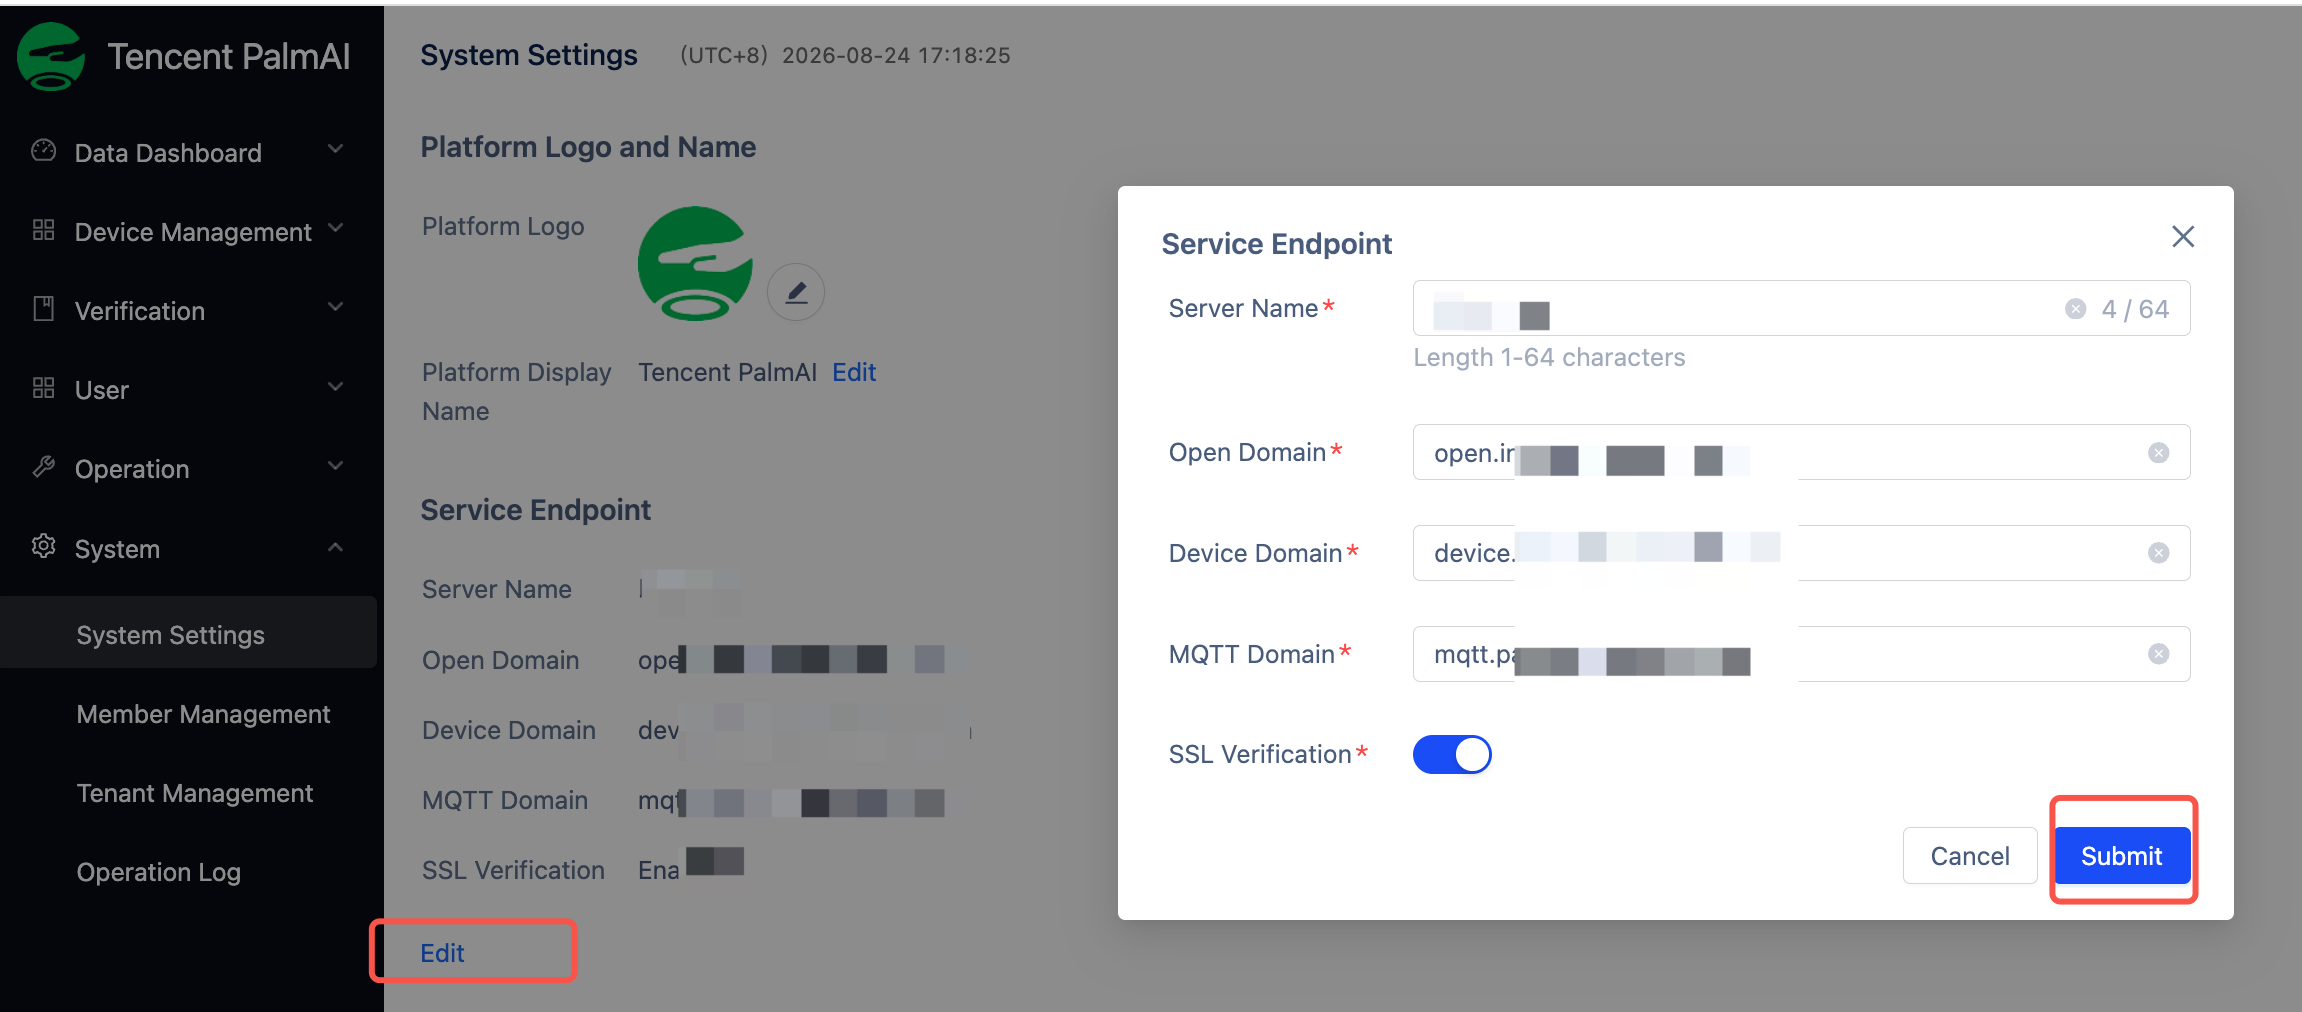
The page displays the current platform's Service Endpoint information, including Server Name, Open Domain, Device Domain, MQTT Domain, and SSL Verification status. Click Edit to modify the relevant Service Endpoint configuration.
3.11.3 System Information
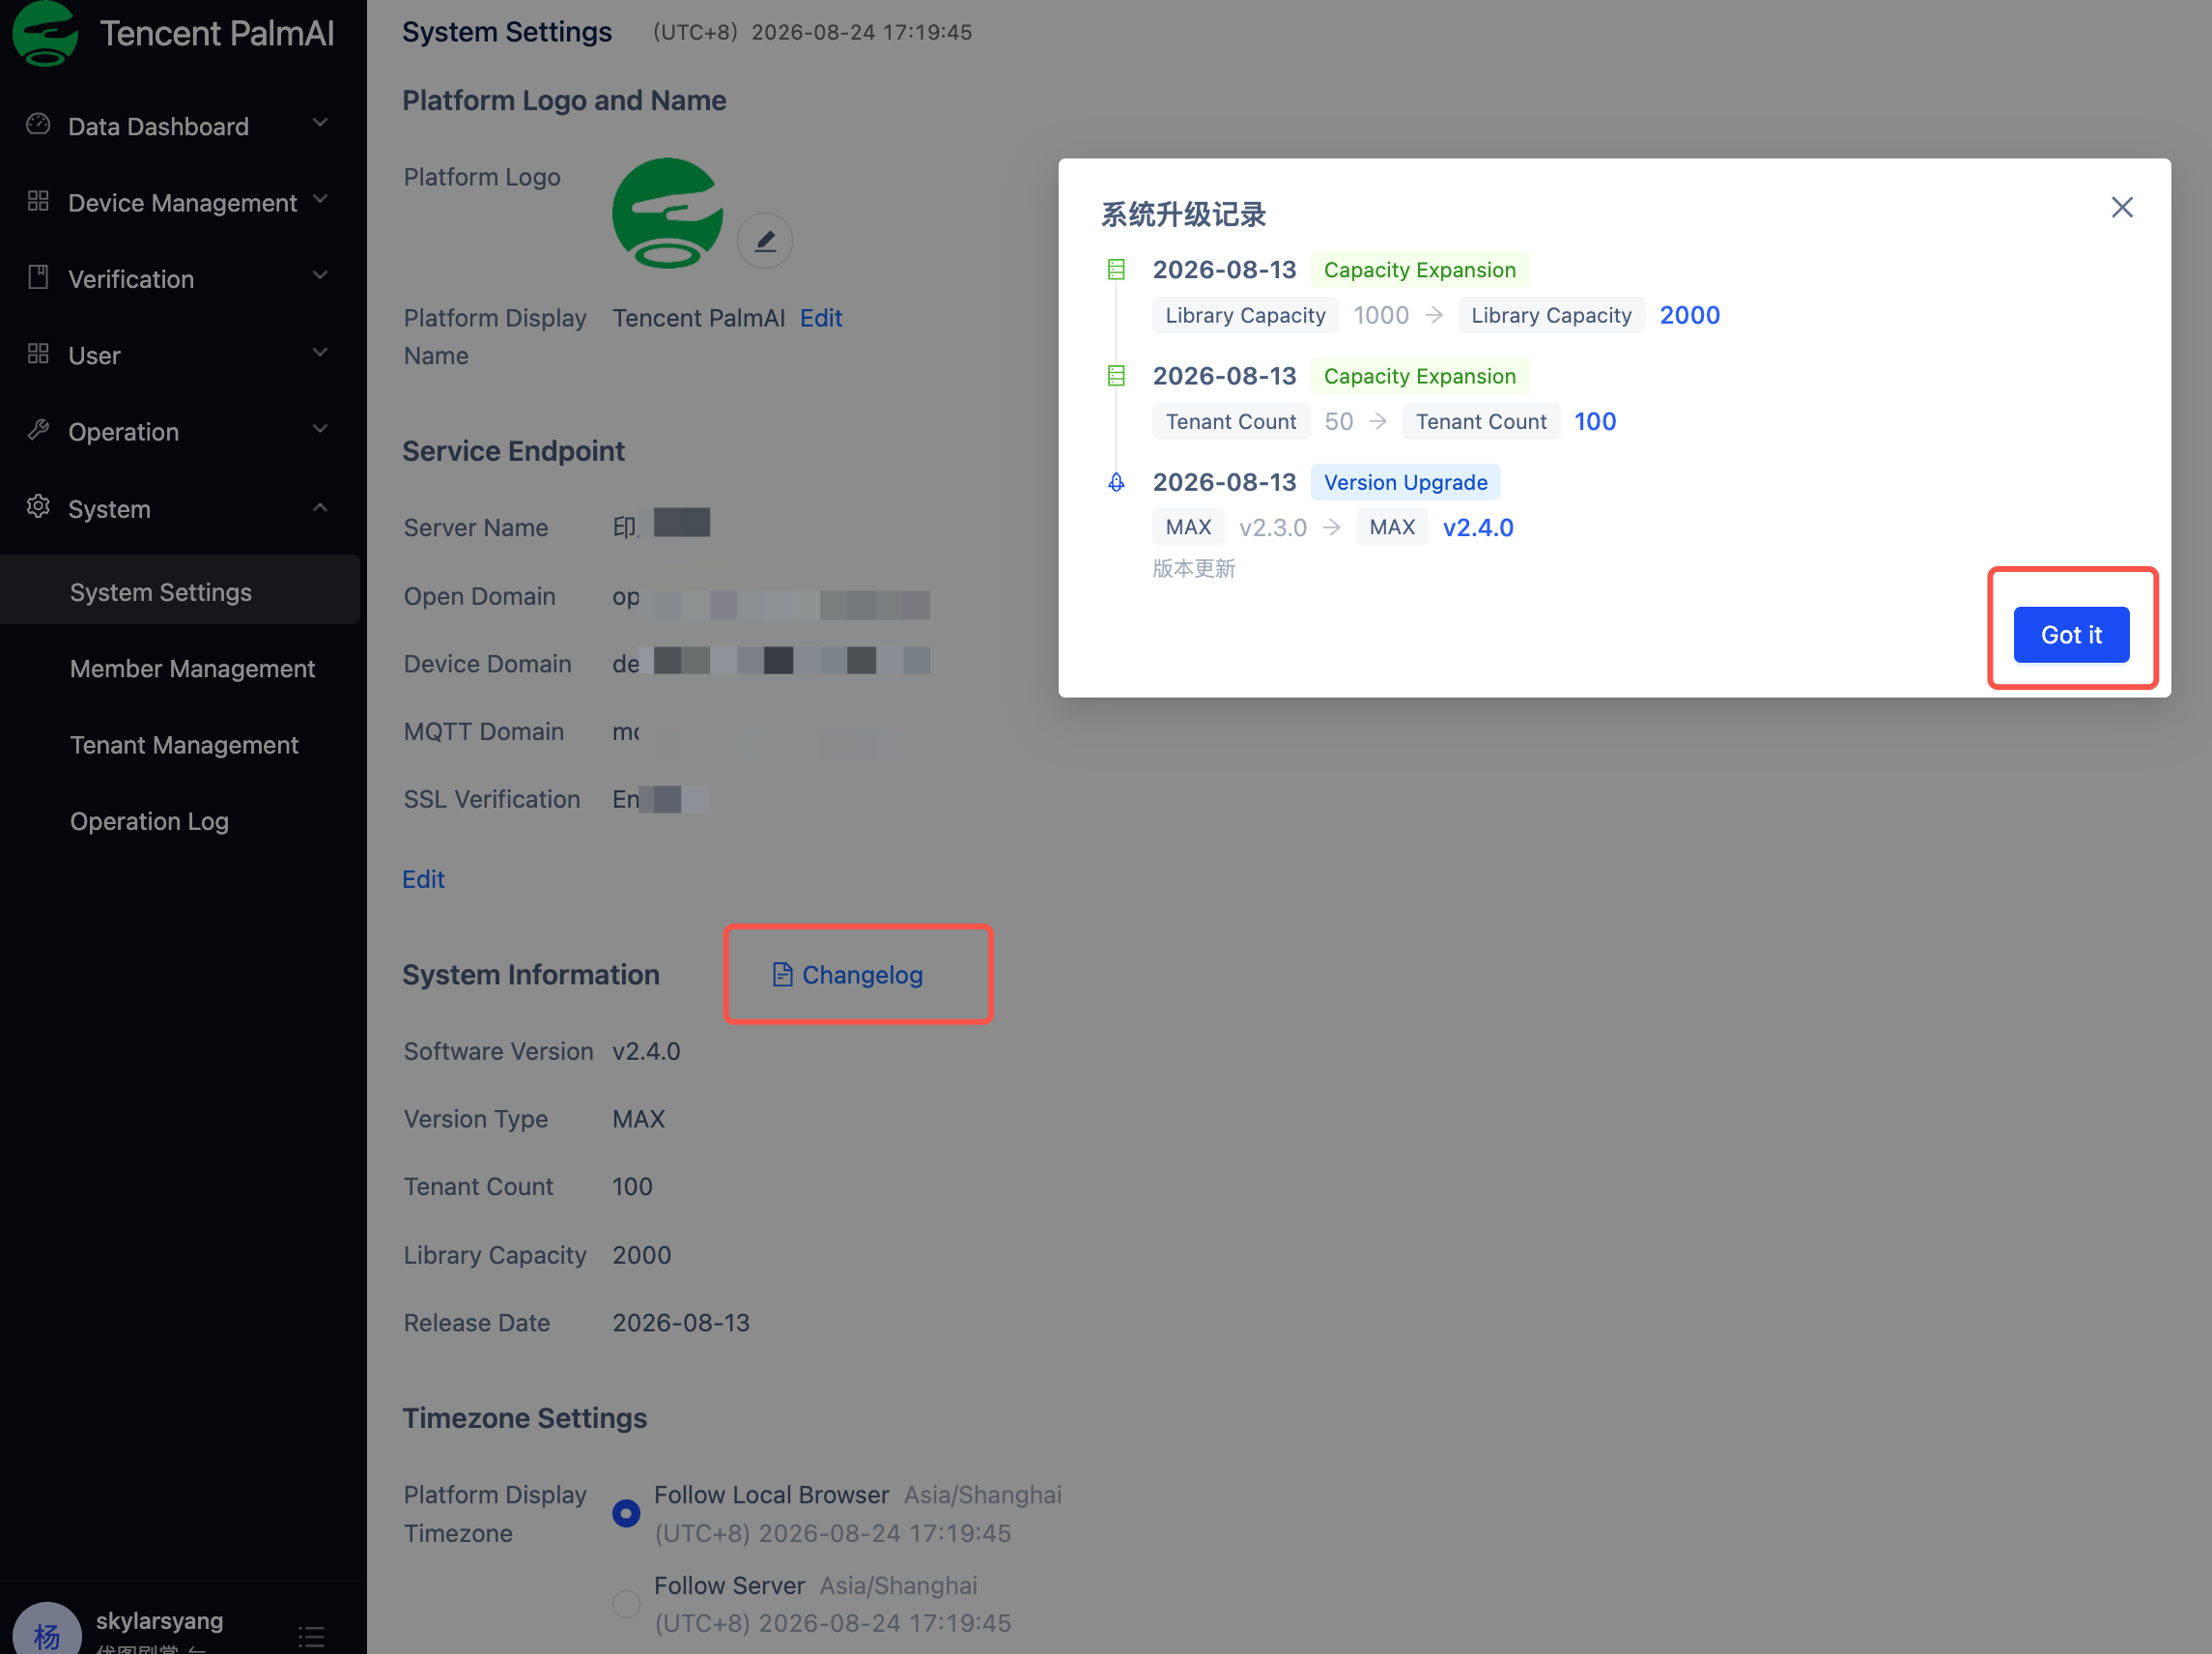
The page displays basic version information for the current system, including Software Version, Version Type, Tenant Count, Library Capacity, and Release Date. Click Changelog to view the current version's update history.
3.11.4 Time Zone Settings
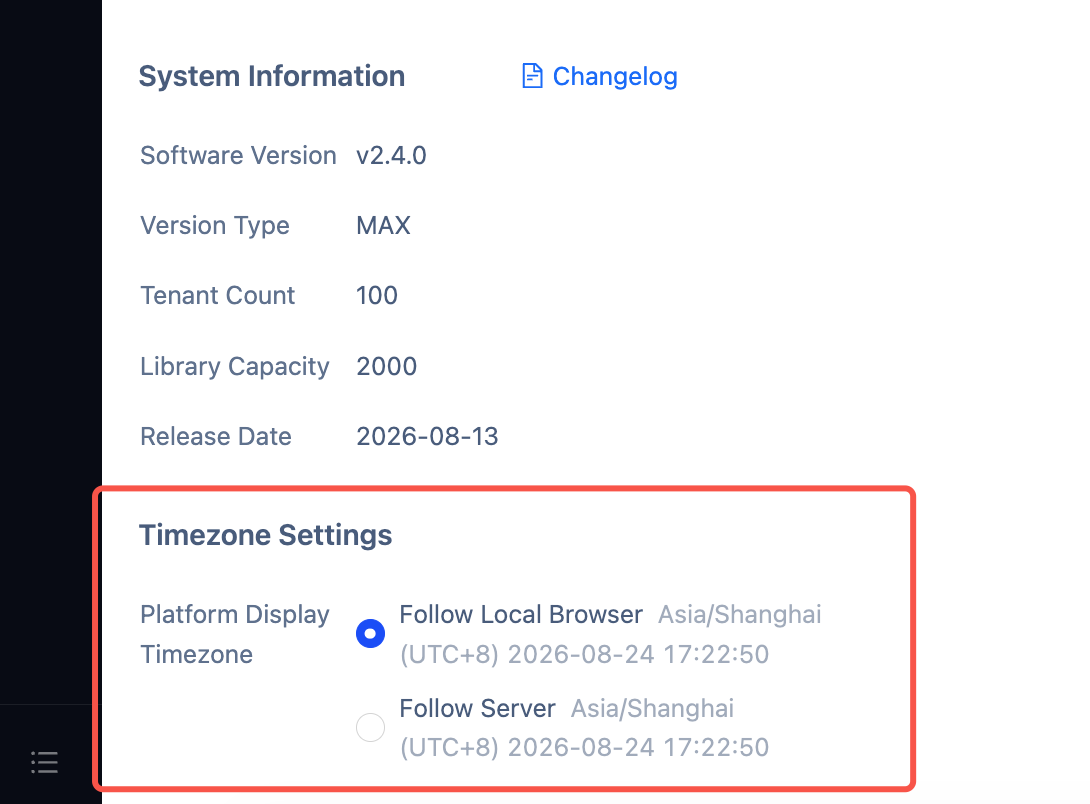
Timezone Settings sets the display time zone for date and time information in PalmAI Admin Web. After a device is activated under the current tenant, it synchronizes the time zone configured in PalmAI Admin Web.
- Go to the System Settings page.
- Find Timezone Settings.
- Under Platform Display Timezone, select how the time zone is displayed:
- Follow Local Browser: Displays time using the local time zone of the device running the current browser. For example, if the browser's local time zone is
Asia/Shanghai, the page displays time usingUTC+8. - Follow Server: Displays time using the time zone currently configured on the server. All administrators using this setting see page times in the server time zone.
- Follow Local Browser: Displays time using the local time zone of the device running the current browser. For example, if the browser's local time zone is
After the time zone is switched, pages in PalmAI Admin Web that display time use the selected time zone for dates and times. The time zone is also synchronized to activated devices under the current tenant.
PalmAI Admin Web is the visual management console provided to customers of the Tencent PalmAI identity verification system. It supports routine administration and operations for enterprise customers, including device access, user registration, scene configuration, verification rule settings, and data viewing.
The platform uses a multi-tenant, multi-role permission architecture, with a tenant serving as the basic unit for organizational and data isolation. Each tenant manages its own devices, users, scenes, and business data, and data is isolated between tenants. Within each tenant, different types of administrator accounts can be configured according to actual job responsibilities, and role permissions control the business scope each account can manage. A tenant represents an enterprise or organization, while an administrator represents a specific management account and its operating permissions. The platform's Super Administrator is responsible for platform-level administration and can centrally maintain different tenants and related system configurations.
Through these mechanisms, the platform supports the hierarchical management requirements of different enterprises while providing business data isolation and granular control over management permissions.
This chapter uses the following terms:
| Term | Description |
|---|---|
| Super Administrator | The role with the highest platform permissions. It can manage all tenants and configure system information, and is maintained by Tencent technical support by default. |
| Tenant Administrator | The role with the highest permissions within a tenant. It manages business data such as devices, users, scenes, and rules for its tenant, but cannot view or operate data belonging to other tenants. |
| Device Administrator | The role responsible for device and scene management within a tenant. It can add, delete, modify, and query scenes and devices in its tenant, but has no user management or permission assignment capabilities. |
| User Administrator | The role responsible for user management within a tenant. It can add, delete, modify, and query user information and palm data in its tenant, but has no device management or permission assignment capabilities. |
| Basic Administrator | A basic view-only role within a tenant. It can view devices, users, scenes, and other data in its tenant, but cannot add, modify, delete, import, or export data. |
| Tenant | The platform's customer entity and the highest-level boundary for data isolation and resource allocation. Each tenant has independent devices, users, scenes, and verification records. |
| Closed Scene | A scene mode that can be configured separately for each tenant in PalmAI Admin Web. Only users on that tenant's preconfigured access list can access it, and an administrator must add users in advance before they can pass verification. |
| Open Scene | A scene mode in which users in the tenant can register by themselves through enabled registration methods without being added by an administrator in advance. |
| Primary Palm | The first palm activated and registered by a user. |
| Secondary Palm | A palm added by the user later. |
| Palm Database Quota | The maximum number of palms that a tenant can register. When Dual Palm Registration is enabled, each user can consume up to two quota units (one per palm). The PalmAI Standard Palm Database Quota is 50,000 per tenant. |
| Remote Command | An operation command dispatched from PalmAI Admin Web to a device to control device behavior remotely without on-site operation. |
3.1 Device Management
After a Palm Verification Device is delivered, it must be registered in PalmAI Admin Web before it can be used. Once registered, the device must also be activated and bound by scanning a QR code on the device and then associated with a business scene before it can upload verification records.
3.1.1 Device List
The Device List page provides centralized functions for viewing, searching, adding, importing, activating, editing, and deleting Palm Verification Devices, as well as monitoring their online status and resource health. The fields are described below:
| Field | Description |
|---|---|
| Device SN | The unique serial number of the device. |
| Associated Device Name | A custom device name. |
| Device Type | The device model, such as M3 or M4. |
| Device Status | Not Activated indicates that the device has not completed environment activation. After activation, the status is either Online or Offline. |
| Resource Health | An assessment of the device's resource health. |
| Module Memory Usage | The percentage of module memory in use. |
| Module CPU Usage | The percentage of module CPU in use. |
| Module Disk Usage | The percentage of module disk space in use. |
| Device Memory Usage | The percentage of overall device memory in use. |
| Device CPU Usage | The percentage of overall device CPU in use. |
| Device Disk Usage | The percentage of overall device disk space in use. |
| Module Type | The model of the module installed in the device. |
| Module SN | The unique serial number of the module. |
| Module Validity Period | The module authorization expiration time. |
| Application Version | The current version number of the device application software. |
| Module Version | The current version number of the module firmware. |
| System Version | The version number of the device operating system. |
| Algorithm Version | The version number of the Palm Print Recognition algorithm currently installed on the device. |
| Associated Scene ID | The unique identifier of the scene bound to the device. |
| Associated Scene Name | The name of the scene currently bound to the device. |
| Scene Group | The name of the scene group to which the device belongs. |
3.1.1.1 Registering Devices
Devices can be registered individually or imported in batches. Register devices individually when adding a small number of devices. Use batch import when adding multiple devices at one time.
Registering a Single Device
- Go to the Device List page.
- Click Add Device.
- Enter the Device SN. You can find this information on the device label.
- Enter a Device Name as needed.
- Click the confirmation button to complete device registration.
Note
The same Device SN cannot be registered more than once.
Importing Devices in Batches
- Click Batch import.
- Download the import template.
- Enter device information as specified in the template.
- Upload the completed template to finish the batch import.
Note
Do not modify the import template or delete its instructions. Device SN is the unique identifier and cannot be changed after import.
Note
When multiple Excel files are uploaded, the system displays a confirmation dialog with the message
Files are already pending upload. Overwrite the original files?
3.1.1.2 Device Activation and Environment Binding
After the device information is registered in PalmAI Admin Web, scan a QR code on the device to activate it and connect it to the current backend environment. A device that has not been activated on the device side may be unable to upload verification records properly.
- Go to the Device List page.
- Click Device Activation to generate a device activation QR code.
- Scan the QR code with the device to complete device activation and environment binding.
3.1.1.3 Editing a Device
- Find the target device.
- Click Edit.
- Change the device name and save.
3.1.1.4 Deleting a Device
Prerequisites
- The device has been disassociated from its scene. A device cannot be deleted while it remains associated with a scene.
If the device is still associated with a scene, the system displays: Failed to delete the device. Remove the associated scene before deleting the device.
Procedure
- Find the target device.
- Click Delete.
- Confirm the deletion in the confirmation dialog.
Warning
After a device is deleted, its Palm Feature Database and rules are also deleted, and the device can no longer perform Palm Scans. Existing verification records are not affected.
3.1.2 Device Configuration
3.1.2.1 Adding a Device Template
Template configuration lets administrators customize the UI of M3 and M4 devices. Administrators can add device templates, configure the Device Homepage, Success Page, and Failure Page separately, and delete templates that are no longer used. After configuration, the system dispatches the UI assets and display text to the devices.
- Click Add Device Template.
- Enter a template name and select an associated device model.
- Set the effective scope by scene or device number:
- By scene: Click the add button and select one or more scenes in the dialog. Devices subsequently added under the selected scenes or scene groups automatically use this template and do not need to be added to it again.
- By device number: Select one or more devices by device name or device number. Devices added later must be added to the template manually before it can take effect.
Configuring the Device Homepage
Click Device Homepage to configure the title text, image, and Logo on the device homepage (the default page after the device starts). If it is not configured, the device uses the system default template.
Configuring the Verification Success Page
Click Success Page to configure the content and audio shown on the verification success page. When verification succeeds and the user has permission to access the device, the device displays this page and plays the corresponding audio. If it is not configured, the device uses the system default template.
Configuring the Verification Failure Page
Click Failure Page to configure the content and audio shown on the verification failure page. When verification fails, the device displays this page and plays the corresponding audio. If it is not configured, the device uses the system default template.
- After completing all configurations, click the submit button.
- Confirm submission in the confirmation dialog.
The system creates the template and dispatches the configuration to the devices.
3.1.2.2 Deleting a Device Template
- Find the target template and click Delete.
- Confirm the deletion in the confirmation dialog.
After the template is deleted, the devices resume using the system default template.
3.1.2.3 Adding a General Configuration
General configurations can be added and deleted. When adding a configuration, you can set the countdown duration after successful and failed device verification and define its effective scope by scene or Device SN. After the configuration is created, the system dispatches it to the corresponding devices.
- Click Add Config.
- Enter a configuration name and select the device type.
- Set the recognition success and recognition failure countdowns.
- Select the effective type and set the effective scope using By Scene or By Device SN.
- Click OK to save the configuration.
3.1.2.4 Deleting a General Configuration
- Find the target configuration.
- Click Delete.
- Click OK in the confirmation dialog.
After the configuration is deleted, associated devices resume using the default configuration.
3.1.3 Device OTA
Device OTA supports searching for upgrade campaigns by upgrade task name, type, status, and associated upgrade package, and supports upgrading devices in batches.
3.1.3.1 Creating an Upgrade Campaign
- Click Add Upgrade Campaign.
- Enter the task name, type, model, version, and task expiration time.
- Submit the upgrade campaign.
The new upgrade campaign appears on the page.
Configuring an Upgrade Campaign by Package
When creating an upgrade campaign, you can separately select the packages to upgrade, such as an application package, algorithm package, or system firmware package. Binding to a complete version is no longer mandatory.
- Algorithm and application versions can be upgraded independently. A module firmware upgrade can include the latest algorithm package.
- An algorithm version field has been added to upgrade task details. It shows the algorithm version currently installed on the device and supports batch export.
3.1.3.2 Adding a Device Upgrade Task
After an upgrade campaign enters the Active state, you can add a device upgrade task. When adding a task, select the associated device scope and validate the devices. After submission, you can view the dispatch status and, for a non-silent upgrade, perform the operation on the device.
- Find the target upgrade campaign and click Details.
- On the upgrade campaign details page, click Add Task.
- Enter the task name and select an upgrade method.
- Choose whether to enable Silent Upgrade.
- Select associated devices.
When Silent Upgrade is enabled, devices upgrade automatically. When Silent Upgrade is disabled, the upgrade must be performed manually on each device. For manual upgrade instructions, see "5.5.7 OTA Upgrade and Version Maintenance" in the user manual for the M3 model or "6.5.7 OTA Upgrade and Version Maintenance" in the user manual for the M4 model.
Selecting the Associated Device Scope
The associated device scope provides the following options:
- All devices: Devices registered later do not receive push messages and can only initiate an upgrade themselves.
- Specified devices: The upgrade task applies only to the devices specified for this task. After selecting this option, you can download the import template and import Device SNs in batches.
When specifying devices, enter Device SNs in either of the following ways:
-
Excel Upload: Download the specified template, enter the device information, upload the template, and click Submit.
-
Enter Device SN:
- Enter a Device SN directly.
- Click Check Device to verify that the device number is correct.
- After validation succeeds, click Submit.
If the input is incorrect, the system displays a message.
Validating and Submitting Devices
- After entering the devices, click Check Device.
- Process the devices based on the validation result:
- If a device has not been registered in PalmAI Admin Web, the system displays
Devices are not recordedin the Check Result dialog. Click Clear Invalid Devices to remove invalid devices. - If all devices meet the upgrade requirements, the system displays
All devices meet the upgrade requirements. You can submit directly..
- If a device has not been registered in PalmAI Admin Web, the system displays
- After validation succeeds, click OK.
- Click Submit to submit the upgrade task.
Viewing Task Dispatch Status
After a task is submitted, the system begins dispatching the upgrade task to devices. During dispatch, the task is in the pending push or pushing state. When dispatch is complete, the task status is Dispatch Finished, and Task Publishing Progress shows the push progress. After devices complete the upgrade, the Upgrade success count under Statistics Overview is updated.
Device-Side Operations for Non-Silent Upgrades
When Silent Upgrade is disabled, the device does not upgrade automatically after PalmAI Admin Web dispatches the task. A red dot appears beside any component with an available upgrade on the device's Setting page.
To view device component versions, return to the Setting page and scroll down:
| Entry | Displayed Content |
|---|---|
| System update | System version. |
| App update | Application version. |
| Module update | Module version. |
| Algo update | Algorithm version. |
- Tap the upgrade entry marked with a red dot.
- Review the target version and upgrade details.
- Tap Upgrade to start the upgrade.
3.1.3.3 Viewing and Exporting Task Details
- Find the target task and click Details.
- View the data overview at the top of the page and the task data summarized by status.
- View task details, including Device SN, current version, task status, push failure count, and last failure reason.
- To export task details, click Export.
3.1.3.4 Discarding an Upgrade Campaign
- Find the target upgrade campaign and click Details.
- On the upgrade campaign details page, click Discard Campaign.
3.1.4 Device Logs
The Device Logs page supports viewing and filtering uploaded logs, downloading log files, and actively triggering a device to upload logs for a specified date.
3.1.4.1 Viewing and Filtering Device Logs
- Click Device Logs.
- Filter logs by Log ID, Log Date, Device, and Status.
Note
The Device Logs feature requires the cloud platform's log service. You can click the link to use the log platform.
3.1.4.2 Downloading Device Logs
- Find the target log.
- Click Download Logs to download it.
3.1.4.3 Triggering a Device Log Upload
- Click Retrieve Logs.
- Enter the Device SN and date.
- Submit the log retrieval request.
The system triggers the device to upload logs for the specified date.
3.1.5 Remote Commands
PalmAI Admin Web supports dispatching remote operation commands to devices without operating them on site.
Supported remote command types:
| Command Type | Description |
|---|---|
| Device Restart | Remotely restarts the device. |
| Application Restart | Restarts the application. |
| Restore Factory Settings | Remotely restores the device to factory settings. |
| Reset Palm Print Features | Remotely resets the device's palm print features. |
| Reset Blocklist Data | Remotely resets the device's Blocklist data. |
| Remote Door Unlock | Remotely unlocks a door using an M3 device. |
| Clear Palm Feature Database | Remotely clears the local Palm Feature Database on the device. |
| Wi-Fi Settings | Remotely dispatches Wi-Fi settings, including the Wi-Fi name and password. |
Procedure
-
Go to Device Instruction and click Send Instruction.
-
Find the target device. In the dialog, select the command type, enter the required parameters, and click Submit to send it.
-
View the command dispatch status, including
Sending,Succeeded, andFailed.
Warning
Remote command operations cannot be undone. Use them with caution.
3.1.6 Upgrade Package Management
The manufacturer's technical support team provides configuration files for device-side upgrade packages to control version dependencies and upgrade order. Upgrade Package Management supports adding upgrade packages, viewing their details, and deleting them.
3.1.6.1 Adding an Upgrade Package
- Click Add Package.
- Select and upload the upgrade package.
- Enter the release notes and submit.
Note
After an upgrade package is created successfully, you can view its details but cannot modify it.
3.1.6.2 Viewing Upgrade Package Details
- Find the target upgrade package.
- Click Details.
3.1.6.3 Deleting an Upgrade Package
- Find the target upgrade package and click Delete.
The system checks for any upgrade campaigns that use this package and have a status of Draft or Active:
- If an associated active upgrade campaign exists, the system indicates that the package cannot be deleted and returns the upgrade campaign ID. Discard the corresponding upgrade campaign first.
- If no associated active upgrade campaign exists, the system displays a confirmation dialog. Confirm to complete the deletion.
3.2 Scene Management
A device must be bound to a scene before Palm Scans can upload verification records. Verification records can be viewed by scene.
- Scene group: Represents an area. For example, "Tencent Building—31st Floor of Tencent Building" or "Peking University—Peking University Library" can be created as scene groups. Scene groups support multiple nesting levels. For example, "Tencent Building—31st Floor" can be created under "Tencent Building."
- Scene: Represents an actual business location, such as "31st Floor Entrance Turnstile." A scene must belong to a scene group.
Multiple child scene groups or scenes can be created under one scene group, enabling hierarchical area-based management.
3.2.1 Scene Group Management
After members log in to PalmAI Admin Web, they can view only the scene group data within the scope of their roles and can create, edit, and delete managed scene groups and view the scenes under them.
3.2.1.1 Creating a Scene Group
- Go to the Scene Management page.
- Find the target scene group and click its settings button.
- Select the option to create a scene group.
- Enter the scene group name and submit.
The new scene group becomes a child of the current scene group. You can create multiple levels of scene groups according to actual management requirements.
Note
Scene groups with duplicate names cannot be added under the same scene group. If a scene with the same name already exists under the current scene group, the system displays
A scene with the same name already exists in the current scene group. Change the name and try again.
3.2.1.2 Editing a Scene Group
- Find the target scene group and click its settings button.
- Select the option to edit the scene group.
- Change the scene group name and save.
3.2.1.3 Deleting a Scene Group
- Find the target scene group.
- Click Delete scene group.
- Confirm the deletion in the confirmation dialog.
Note
The delete button appears only when the scene group contains no scenes.
3.2.1.4 Querying Scene Groups
You can search for scene groups by Scene Group Name and Scene Group ID. Members can search only the scene groups within the scope managed by their roles.
3.2.2 Scene Management
3.2.2.1 Creating a Scene
Scenes can be created individually or imported in batches. Select the appropriate method based on the number of scenes you need to create.
Creating a Single Scene
- Select the target scene group.
- Click Add scene on the right side of the page.
- Enter the scene name and select associated devices.
- Choose whether to associate a verification rule.
- Select the Scene Strategy and Verification Mode.
- Submit the scene.
After the scene is created, the system dispatches the selected Scene Strategy to all devices in the scene. The devices automatically retrieve the latest configuration data and restart. The new strategy takes effect after restart.
- Verification Rule selection: When creating or editing a scene, users can choose whether to associate a Verification Rule. Enter a rule ID or rule name to search for a rule. Clicking Add Verification Rule opens the page for adding a Verification Rule.
- Scene Strategy selection: When creating or editing a scene, users can select the corresponding Scene Strategy. After submission, the system automatically dispatches the strategy configuration to devices in the scene. The devices retrieve the latest configuration data and restart, after which the new strategy takes effect. The scene list also displays the Scene Strategy.
- The currently available Scene Strategies are listed below:
| Scene Strategy Name | Use Case | Core Capabilities |
|---|---|---|
| 100 User Demo On-device Recognition | Product demonstrations, experience showcases, or small-scale trials | 1. Uses a fully On-device Recognition mode 2. Supports a Palm Feature Database of up to 100 users 3. Provides fast recognition and the shortest Palm Scan duration 4. Is suitable for demonstration scenarios with lower security requirements. |
| 10k User Access Control and Attendance On-device Recognition | Routine enterprise Access Control and office attendance scenarios | 1. Uses a fully On-device Recognition mode 2. Supports a Palm Feature Database of up to 50,000 users 3. Provides fast recognition while balancing efficiency and security. |
Creating Scenes in Batches
- Click Batch import.
- Select Batch new to go to the batch import page.
- Download the import template.
- Enter scene information as specified in the template and upload the template.
- Click Submit.
After submission, the success and failure results appear at the top of the page. If the failure count is greater than 0, a button for downloading failure information appears.
Note
Do not modify the import template or delete its instructions. Scene Name must be unique within a scene group; duplicates cause an error. Clicking Submit starts the upload and displays the successful and failed results at the top. If the failure count is greater than 0, a button for downloading failure information appears. The upload fails in any of the following cases:
-
The device cannot be found under the current entity.
-
The device is registered under the current entity but is already bound to another scene.
-
A scene with the same name already exists in the current scene group.
3.2.2.2 Editing a Scene
Scenes can be edited individually or in batches. The editable scope differs between the two methods. Select the method appropriate for your needs.
Editing a Single Scene
- Select the target scene.
- Click Edit.
- Change the scene name, associated devices, Verification Rule, or Scene Strategy as needed.
- Save the changes.
After the Scene Strategy is updated, the system dispatches the new strategy configuration to devices in the scene. The devices automatically retrieve the latest configuration data and restart. The new strategy takes effect after restart.
Note
After an associated device is replaced, the original device can no longer upload verification records. Make sure the physical device has already been replaced on site. Scene Name cannot exceed 32 characters.
Editing Scenes in Batches
The batch editing template contains the following fields:
| Field | Required | Editing Instructions |
|---|---|---|
| Scene ID | Required | The unique identifier of an existing scene. It cannot be changed and does not need to be created again. |
| Scene Name | Required | The scene name can be changed. |
| Associated Device SN | Optional | Batch modification is not supported. To change it, use the scene editing page. |
| Associated Scene Strategy | Required | Enter the Scene Strategy number. 1 indicates DemoDeviceRecognition100, and 2 indicates AccessOnDeviceRecognition50k. You can also change it later on the scene editing page. |
- Click Batch import to go to the batch editing page.
- Select Batch editing.
- Download the import template.
- Enter scene information as specified in the template and upload the template.
- Click Submit.
After submission, the success and failure results appear at the top of the page. If the failure count is greater than 0, a button for downloading failure information appears.
Note
Do not modify the import template or delete its instructions. The upload fails in any of the following cases:
- The Scene ID does not exist.
- The scene is already associated with a device.
- The scene has no associated device, but the specified device is not registered under the current entity.
- The scene has no associated device, but the specified device is already associated with another scene.
3.2.2.3 Deleting a Scene
- Find the target scene and click Delete.
- Confirm the deletion in the confirmation dialog.
Warning
After a scene is deleted, associated devices can no longer upload verification records. Historical verification records are retained. If the scene associated with a record has been deleted,
(Deleted)is appended to the scene name.
3.2.2.4 Querying Scenes
- Fuzzy search is supported by scene (Scene Name and Scene ID) and associated device (Device SN and Device Name). You can search only scenes you have permission to manage.
3.3 Verification Records
- Click Verification Records to open the Verification Records page.
- Search verification records by record ID, scene group, scene, user ID, username, verification status, or source.
- View verification records on the page or export them to an Excel file.
Members can view and export only the verification records under the scene groups they manage.
Note
The verification record push address can be configured in the tenant settings. For details, see "3.9.1 Creating a Tenant."
3.4 Verification Rules
Verification Rules can be added and edited. When adding a rule, you can configure time rules, eligible users, and external system verification.
3.4.1 Adding a Verification Rule
- Click Add Verification Rule.
- Enter the Rule Name. This field is required.
- Configure Time Rules as needed. This field is optional and lets you set available dates, restricted dates, and verification time slots.
- Select Eligible Users. This field is required.
- Configure External System Verification as needed.
- Submit the Verification Rule.
Configuring Time Rules
- Click the Time Rules button.
- Set the effective date range of the Verification Rule:
- When All Dates is selected, the rule applies to all dates. You can still configure dates on which verification is unavailable under Restricted Dates.
- When the rule is effective only within a specified date range, select Date Range and set the effective date range. You can also configure Restricted Dates.
- Under Weekly Available Days, select the days of the week on which verification is available.
- Under Time Slots, set the effective periods on available verification dates. Multiple periods can be configured.
Restricted Dates and Weekly Available Days apply together. For example, after Monday and Wednesday are selected under Weekly Available Days, verification is available only on Mondays and Wednesdays within the effective date range. If a Monday is also configured under Restricted Dates, the Verification Rule does not apply on that date.
Restricted dates take precedence over available dates.
Configuring Eligible Users
Eligible users can include all users or specified users only. When specifying users, you can select all users under a tag in batches or select individual users directly.
Configuring External System Verification
After external system verification is enabled, Palm Print Verification follows this process:
- Pass the local Verification Rule.
- Receive the final verification result from the external system.
Verification succeeds only when both the local Verification Rule and external system verification succeed. The external system returns the result through the configured verification record notification address. If no address is configured, contact the administrator.
3.4.2 Editing a Verification Rule
- Find the target Verification Rule.
- Click the edit button.
- Modify the rule configuration.
- Submit the changes.
3.5 User Management
A tenant's Scene Mode is either Open Scene or Closed Scene. You can view the current tenant's Scene Mode under System Management > Tenant Management in PalmAI Admin Web:
- Open Scene: User information does not need to be added before users register their palms. The system automatically creates a user after Palm Registration succeeds.
- Closed Scene: A user must be created in PalmAI Admin Web before registering a palm. Users can be created individually or imported in batches.
After a user is created, palm registration and user binding can be completed in the following ways:
| Registration Method | Description |
|---|---|
| Mobile Palm Registration | The user preregisters a palm through a mobile App or the Mobile Palm Registration H5 page, then performs the first Palm Scan and completes activation on an on-site device. |
| Device Input Registration | The user performs a Palm Scan on a verification device, then enters user information as prompted on the screen to complete registration. |
| Phone Scan QR Registration | The user performs a Palm Scan on a verification device, then scans a QR code with a phone as prompted on the screen to complete registration. |
| Device Scan QR Registration | The user enters registration information on an H5 page to generate a registration QR code, then performs a Palm Scan and scans the QR code on the device to complete registration. |
| Host Input | An administrator enters user information in the Host software and guides the user through a Palm Scan on the device to complete registration. |
3.5.1 Creating a User
Users can be created individually or imported in batches. Select the appropriate method based on the number of users you need to create.
Creating a Single User
- Click Add new user.
- Enter the user information:
- User ID: Required.
- Username: Required.
- Phone number: Optional.
- User Tags: Optional.
- Physical card number: Optional. This field is required when an M3 device uses Wiegand mode.
- Submit the user information.
Creating Users in Batches
- Click Import users in batches to go to the batch import page.
- Select Batch new.
- Download the import template.
- Enter user information as specified in the template and upload the template.
- Click Submit.
After submission, the success and failure results appear at the top of the page. If the failure count is greater than 0, a button for downloading failure information appears.
Note
Do not modify the import template or delete its instructions. User ID is the user's unique identifier and cannot be changed after import. The upload fails in any of the following cases:
-
The User ID is already registered in the system.
-
The User ID does not meet the format requirements.
-
The phone number does not meet the format requirements.
-
The Physical Card Number does not meet the format requirements.
3.5.2 Editing a User
User information can be edited individually or in batches. Select the appropriate method as needed.
Editing a Single User
- Find the target user and click Edit.
- Change Username, Phone number, or Physical card number as needed. User ID cannot be changed.
- Save the changes.
Note
When the user's Registration Status is
Registered, the Verification module appears on the editing page. You can set the user's Access Status, whose default value isnormal. This module does not appear if the user's palm has not been registered.
Editing Users in Batches
- Click Import users in batches to go to the batch editing page.
- Select Batch editing.
- Download the import template.
- Enter user information as specified in the template and upload the template.
Note
Do not modify the import template or delete its instructions. User ID is the user's unique identifier and cannot be changed after import.
3.5.3 Deleting a User
- Find the target user and click Delete.
- Confirm the deletion in the confirmation dialog.
Warning
When a user is deleted, the system also deletes the user's Palm Print information. The palm must be registered again after the user is recreated. Deletion does not affect existing verification records, and the deleted user no longer appears in Verification Rules.
3.5.4 User Tag Management
User Tag Management supports creating, renaming, and deleting User Tags and binding them to users by organization or department hierarchy, up to three levels. This enables isolated group management for large user populations, such as dividing permission and visibility scopes by department or region.
Selecting a Tag for a User
- Go to the User List page.
- Find the target user and click the edit button.
- Click the tag field and select a tag from the tag list.
- Submit and save.
Creating a Tag
- Go to the Tag Management page, or access Tag Management from any user's editing page.
- Select the option to create a tag.
- Select a parent tag as needed.
- Enter the tag name.
- Submit and save.
Renaming a Tag
- Find the target tag.
- Click Rename.
- Change the tag name and save.
Creating a Sub-Tag
- Find the target parent tag.
- Click Sub-tag.
- Enter the sub-tag name and submit.
Deleting a Tag
- Find the target tag.
- Click Delete.
- Confirm the deletion.
3.5.5 Blocklist Alerts
The Palm Algorithm Platform identifies Blocklist users. If a user is involved in a malicious attack or similar activity, the system marks the user as Blocklist, and the user cannot pass Palm Scan verification. An administrator can also set the user's Access Status to blocklist in the user list.
- Go to the Blacklist Monitoring page.
- Search for Blocklist users by User ID or Username.
- To export in batches, click the download icon. The exported fields are the same as the fields displayed on the page.
3.5.6 Viewing a User's Access Scope
A user's access scope is configured in "3.2.2 Scene Management." This feature lets you view the scene groups, scenes, associated devices, Verification Rules, and other information that the current user can access.
- View a user's access scope: Go to the User List page, find the target user, and click View Access Permissions. The scene groups, scenes, devices, and Verification Rules currently accessible to the user appear on the right.
- The top of the page summarizes the number of scene groups, scenes, and devices accessible to the user. Scene details are listed below by scene group and can be expanded to show the Scene ID, associated devices, and Verification Rules. Click a Verification Rule to view its details.
3.6 Member Management
Member Management is used to manage administrator accounts and their role permissions under a tenant. The platform uses a multi-tenant, multi-role permission system. Each tenant can create multiple administrator accounts based on its actual division of management responsibilities and assign appropriate roles to different administrators. Different roles provide different functional permissions and data visibility scopes. Administrators can view and operate only data within their permission scope.
| Role | Description |
|---|---|
| Super Administrator | The role with the highest platform permissions. It is responsible for overall platform operations, maintenance, and settings and has all platform functional permissions. |
| Tenant Administrator | Has all permissions within one tenant and can create tenant members and assign roles to them. |
| Device Administrator | Has scene and device management permissions within one tenant, including add, delete, modify, and query operations, but no user management permissions. |
| User Administrator | Has user management permissions within one tenant, including add, delete, modify, and query operations, but no scene or device management permissions. |
| Basic Administrator | Can view basic data under its tenant, but cannot add, delete, modify, import, or export data. |
3.6.1 Viewing and Searching for Members
- Click Member Management to go to the Member Management page.
- View the member list or search for members by Role Name, Login Account, and Administrator Name.
3.6.2 Creating a Member
Super Administrators and Tenant Administrators can create administrator accounts and assign roles and data permissions to them. Members can be created individually or imported in batches.
Creating a Single Member
- Click Add Member to go to the Add Member page.
- Enter the Login Account, Administrator Name, Password, Phone number, Email, and Remarks.
- Under Role Selection, select roles. Multiple selections are supported, and the member's permissions are the union of the selected role permissions.
- Configure the Data Scope. When configuring it by scene, select by scene group. Devices that are not bound to a scene group are placed in the default group and are visible by default.
- Submit the member information.
Note
Login Account must be unique. The system displays a message if it is duplicated. After the member is created successfully, send the initial password to the corresponding administrator through a secure channel in accordance with your organization's credential delivery policy.
Creating Members in Batches
- Click Batch Import Members to go to the batch import page.
- Select Batch new.
- Download the import template.
- Enter member information as specified in the template and upload the template.
Note
Do not modify the import template or delete its instructions. Login Account is the administrator's unique identifier and cannot be changed after import. If the import fails, click Download Failure Information to download the error information.
3.6.3 Editing a Member
This section describes how to edit a member's basic information, change the Data Scope and password, and edit members in batches.
Editing Basic Member Information
- Find the target member and click Edit.
- Change Admin Name, Phone number, Email, Role Selection, or Data Scope as needed.
- Save the changes.
Changing the Data Scope
Under Data Scope, the Data Scope for Device Administrators, User Administrators, and Basic Administrators can be configured by scene or user:
- Select by Scene: Multiple scene tags can be selected.
- Select by User: All users or specified users can be selected, and users can also be selected by User Tag.
Tenant Administrators and Super Administrators can view all tenant data and system data by default.
Changing a Member Password
- Click the Change Password button.
- Enter a new password in the dialog.
- Submit the new password.
Editing Members in Batches
- Click Batch Import Members to go to the batch editing page.
- Select Batch editing.
- Download the import template.
- Enter member information as specified in the template and upload the template.
Note
Do not modify the import template or delete its instructions. Login Account is the administrator's unique identifier and cannot be changed after import. If the import fails, click Download Failure Information to download the error information.
3.6.4 Deleting a Member
- Find the target member and click Delete.
- Confirm the deletion in the confirmation dialog.
Warning
A deleted member can no longer log in. If a member who is currently logged in is deleted, the system automatically clears the member's login session when the member performs another operation or sends another request to the backend.
3.7 Operations Management
Operations Management provides centralized viewing and handling of issues reported by devices. Its troubleshooting tools query events and request chains to help Super Administrators locate and resolve business exceptions.
3.7.1 Issue Reporting
Issue Reporting aggregates exception information submitted by devices. Super Administrators can filter reported issues and record their identified causes and resolution conclusions.
Reporting an Issue
Users can tap Issue Reporting on a device to submit exception information. All reported issues are aggregated on the Operations Management > Issue Reporting page in PalmAI Admin Web.
Viewing and Filtering Issues
- Go to Operations Management > Issue Reporting.
- Filter reported issues by time range, issue type, device, and processing status.
Handling an Issue
- Find the target issue and click Issue Operation.
- Enter the identified cause and resolution conclusion in the dialog.
- Submit the processing result.
3.7.2 Troubleshooting Tools
Troubleshooting Tools locate issues and trace the full request chain for Palm Scan-related events, including device registration, device recognition, mobile recognition, and verification, helping administrators quickly discover and analyze abnormal events.
Viewing and Filtering Events
- Filter events by event time, Device SN, status, and other criteria.
- View event time, Device SN, Trace ID, user ID, event name, error information, duration in ms, and log link in the event list.
- To view logs, click View Logs.
- To view event details, click Details.
Viewing Event Details
- Find the target event and click Details.
- View basic event information, including Trace ID, Device SN, Palm ID, user ID, scene name, return code, return message, client duration, server duration, and event time.
- View on-site photos, the client request chain, and the server request chain.
- View or download logs as needed to reconstruct the event and locate its cause.
3.8 Data Dashboard
The Data Dashboard is the Data Dashboard homepage of PalmAI Admin Web. It provides a visual overview of platform operating data to help administrators quickly understand business operations.
3.8.1 Data Overview
The Data Overview displays core platform metrics, today's business data, and data trends over a specified time range.
Core Metrics
The homepage displays the total number of devices, registered users, palms, and Palm Database Quota usage.
Today's Data
The homepage displays today's Palm Scan count, number of users who performed Palm Scans today, number of users newly activated today, and current number of online devices in real time.
Trends and Distribution
- User data trend chart: Shows the number of users newly activated each day, new palms added each day, daily active users, and User Status distribution.
- Device data trend chart: Shows the device online rate.
- Palm Scan data trend chart: Shows the daily Palm Scan count.
Selecting a Time Range and Exporting Data
You can select a time range of up to 180 days to view trends and export the data.
3.8.2 Device Dashboard
The Device Dashboard centrally displays device operations and resource health, helping administrators quickly understand device online status, resource usage, OTA upgrade results, and high-risk device information.
Device Status and Health Trends
- Device status overview: Shows the total number of devices, online rate, number of healthy devices, number of devices with warnings, and number of devices with critical exceptions.
- Device health trend: Shows changes in the number of healthy devices, devices with warnings, and devices with critical exceptions over the past 24 hours.
Resource and Component Health
- Resource health distribution: Shows overall device resource health, including the number and percentage of healthy, warning, critically abnormal, and offline devices.
- Resource usage distribution: Shows memory, CPU, and disk usage for online devices, with statistics grouped by healthy, warning, critically abnormal, and offline status.
- Camera status: Shows the number and percentage of devices with normal and abnormal cameras.
Upgrade Results and High-Risk Devices
- OTA upgrade results: Shows the total number of device upgrades, successful upgrades, failed upgrades, and upgrade success rate over the past seven days, as well as the upgrade result trend by date.
- High-risk device ranking: Ranks devices from poorest to best health and shows the devices with the highest current risk levels.
Refreshing Data
The Device Dashboard refreshes automatically every five minutes by default. You can also click Refresh to retrieve the latest device status manually.
3.9 Tenant Management
The Tenant Management module supports a multi-tenant architecture. Super Administrators can create and manage multiple tenants, providing data isolation and independent management between tenants.
3.9.1 Creating a Tenant
Only Super Administrators can create tenants. When creating a tenant, you can configure basic tenant information, Palm Database Quota, Scene Mode, registration methods, verification record push settings, and contact information.
- Go to the Tenant Management page.
- Click Add Tenant to go to the Add Tenant page.
- Configure the tenant information as described below.
- Click Submit to create the tenant.
Basic Information
| Field | Required | Description |
|---|---|---|
| Tenant Name | Required | The tenant display name, from 1 to 64 characters. |
| Tenant Identifier | Required | A unique internal system identifier that cannot be changed after creation. It must contain 4 to 32 characters and may include only lowercase letters, digits, and hyphens (-). |
| Tenant Description | Optional | A description of the tenant's purpose or business, up to 200 characters. |
Quota Settings
| Field | Required | Description |
|---|---|---|
| Palm Database Capacity Quota | Required | Sets the Palm Database Quota allocated to the current tenant. The maximum is 50,000, and it cannot exceed the platform's currently remaining allocatable quota. When Dual Palm Registration is enabled, each user can consume up to two quota units. |
Scene Configuration
Scene Configuration sets the current tenant's default Scene Mode and permitted registration methods. Scenes created later can inherit the registration methods configured for the tenant.
Scene Mode: Supports Closed Scene and Open Scene.
| Scene Mode | Description |
|---|---|
| Closed Scene | A Closed Scene permits only internal users added in advance by an administrator. Users must be added by an administrator before they can complete registration and pass verification. |
| Open Scene | An Open Scene allows users to register by themselves through enabled registration methods without being added by an administrator in advance. |
Scene Description: Enter supplementary information about the current tenant's Scene Mode, up to 200 characters.
Registration Methods
Registration Method controls which registration methods are enabled for the current tenant.
The following registration methods are controlled by tenant switches:
| Registration Method | Description |
|---|---|
| Mobile QR Scan Registration | Phone Scan QR Registration. The user performs a Palm Scan on a verification device, then scans a QR code with a phone as prompted on the device screen to complete palm registration. |
| Device Code Scan Registration | Device Scan QR Registration. The user enters registration information on an H5 page to generate a registration QR code, then performs a Palm Scan and scans the QR code on the device to complete registration. |
| Host Computer Registration | Host Input. An administrator enters user information in the Host software and guides the user through a Palm Scan on the device to complete registration. |
| Mobile App Registration | Mobile Palm Registration. The user preregisters a palm through a mobile App or the Mobile Palm Registration H5 page, then performs the first Palm Scan and completes activation on an on-site device. |
Administrators can use the switch beside each registration method to enable or disable it.
Note
Device Input Registration is available by default and is not controlled by the tenant registration method switches.
PalmAI Standard rejects registration when a High Similarity palm is detected. It also directly rejects recognition when a High Similarity palm is detected.
Verification Record Push
Verification Record Push pushes verification records generated under the current tenant to a specified business system in real time and can be used to integrate with third-party business systems.
Tenant Administrators can view and configure the push address for their tenant. Super Administrators can view and manage push configurations for all tenants.
| Field | Description |
|---|---|
| Push Address | Enter the business callback address that receives verification records. It must be a valid address beginning with http:// or https://. If left blank, verification record push is not enabled. |
| Request Method | Verification records are pushed using the fixed POST request method. |
| Push Scope | Sets the scope of verification records to push. |
Contact Information
Enter tenant contact information as needed, including:
| Field | Description |
|---|---|
| Contact Name | Contact name. |
| Contact Phone | Contact phone number. |
| Contact Email | Contact email address. |
3.9.2 Viewing Tenant Details
After a tenant is created, click Details in the tenant list to view tenant details, including APP ID, API Key, Tenant Status, Palm Database Quota usage, and Scene Mode.
3.9.3 Editing a Tenant
- Find the target tenant and click Edit.
- Modify the Tenant Name, Palm Database Quota, Scene Configuration, registration methods, Verification Record Push, or contact information as needed.
- Click Submit.
The system saves the modified tenant configuration.
3.9.4 Managing Tenant Administrators
Tenant Administrator management includes opening the administrator list, adding administrators, and resetting passwords, disabling, or deleting existing administrators.
Opening Tenant Administrator Management
- Find the target tenant.
- Click Manage to open the Tenant Administrator list.
Resetting an Administrator Password
- Find the target administrator in the Tenant Administrator list.
- Select Reset Password and follow the on-screen instructions.
Disabling an Administrator
- Find the target administrator in the Tenant Administrator list.
- Select Disable and follow the on-screen instructions.
Deleting an Administrator
- Find the target administrator in the Tenant Administrator list.
- Select Delete and follow the on-screen instructions.
Adding a Tenant Administrator
- Select Add Administrator in the Tenant Administrator list.
- Enter the administrator information and submit.
3.9.5 Switching Tenant Views
Switching Tenants as a Super Administrator
- Open the tenant selection drop-down list in the lower-left corner of the page.
- Select the target tenant.
The page refreshes automatically and displays only the business data of the selected tenant.
Tenant Administrator View
After a Tenant Administrator logs in, the view for that administrator's tenant opens by default. The current Tenant Name appears at the top of the page, and the Tenant Administrator cannot switch tenants.
3.9.6 Enabling or Disabling a Tenant
- Find the target tenant.
- Click Enable or Disable.
- Confirm the operation in the confirmation dialog.
Warning
Disabling a tenant has the following effects:
- PalmAI Admin Web: All administrator accounts under the tenant are unable to log in to PalmAI Admin Web.
- Device side: All Palm Verification Devices under the tenant are unable to perform Palm Print Verification.
- Mobile: All users under the tenant are unable to log in to the mobile demo App or use related features.
- Data: Existing data is not deleted. All functionality is restored after the tenant is re-enabled.
3.9.7 Tenant Data Isolation
- User data, device data, verification records, Scene Configurations, and other data are completely isolated between tenants.
- Tenant Administrators, Device Administrators, User Administrators, and Basic Administrators can view and operate only data within their tenant and cannot view or operate any data belonging to other tenants.
- The Super Administrator is a platform-level role that can view and manage data for all tenants across tenant boundaries.
3.10 Audit Logs
The Audit Logs module records administrator operations in the system for security auditing and issue tracing.
3.10.1 Viewing Operation Logs
- Click Operation Log to go to the Operation Log page.
- View administrators' system operation records. Each log includes the IP address, operator, operation time, operation type, and operation result.
- Filter logs by operator, operation type, operation result, or operation time range.
- Find the target log and click View to view the operation details.
3.10.2 Log Scope
Audit Logs cover key operations in PalmAI Admin Web, including but not limited to:
| Covered Module | Audited Operation Type |
|---|---|
| Member Management | Create, edit, and delete members. |
| Tenant Management | Create, edit, and delete tenants. |
| Device Management | Register, edit, delete, and batch import devices. |
| Scene Management | Create, edit, and delete scenes. |
| User Management | Create, edit, and delete users, and delete Palm Print data. |
| System Configuration | Modify system configurations. |
| Upgrade Package Management | Add and delete upgrade packages. |
| Upgrade Campaign Management | Create and discard upgrade campaigns. |
| Upgrade Tasks | Add and modify upgrade tasks. |
| Device Log Management | Trigger log uploads and download logs. |
| Remote Commands | Dispatch remote commands, including command type, target device, and execution result. |
All operation logs above include the operator, IP address, operation time, operation type, operation result, and operation details.
3.11 System Settings
The System Settings module allows Super Administrators to view and configure basic platform information, including the Platform Logo, platform name, Service Endpoints, system version information, and platform time zone.
- Click System Settings to go to the System Settings page.
3.11.1 Platform Logo and Name
The page displays the current Platform Logo and platform display name. You can upload or replace the Platform Logo and click Edit to change the Platform Display Name.
3.11.2 Service Endpoints
The page displays the current platform's Service Endpoint information, including Server Name, Open Domain, Device Domain, MQTT Domain, and SSL Verification status. Click Edit to modify the relevant Service Endpoint configuration.
3.11.3 System Information
The page displays basic version information for the current system, including Software Version, Version Type, Tenant Count, Library Capacity, and Release Date. Click Changelog to view the current version's update history.
3.11.4 Time Zone Settings
Timezone Settings sets the display time zone for date and time information in PalmAI Admin Web. After a device is activated under the current tenant, it synchronizes the time zone configured in PalmAI Admin Web.
- Go to the System Settings page.
- Find Timezone Settings.
- Under Platform Display Timezone, select how the time zone is displayed:
- Follow Local Browser: Displays time using the local time zone of the device running the current browser. For example, if the browser's local time zone is
Asia/Shanghai, the page displays time usingUTC+8. - Follow Server: Displays time using the time zone currently configured on the server. All administrators using this setting see page times in the server time zone.
- Follow Local Browser: Displays time using the local time zone of the device running the current browser. For example, if the browser's local time zone is
After the time zone is switched, pages in PalmAI Admin Web that display time use the selected time zone for dates and times. The time zone is also synchronized to activated devices under the current tenant.