4 Mobile Application User Manual
The User Manual is available for Max and Standard. Use the tabs below to switch between editions.
- Max
- Standard
4.1 Chapter Overview
4.1.1 Scope
This chapter describes how to use the PalmMa demo App, the Air Enrollment H5 page, the Device Code Scan Registration H5 page, and the Device QR Code Scan Verification H5 page.
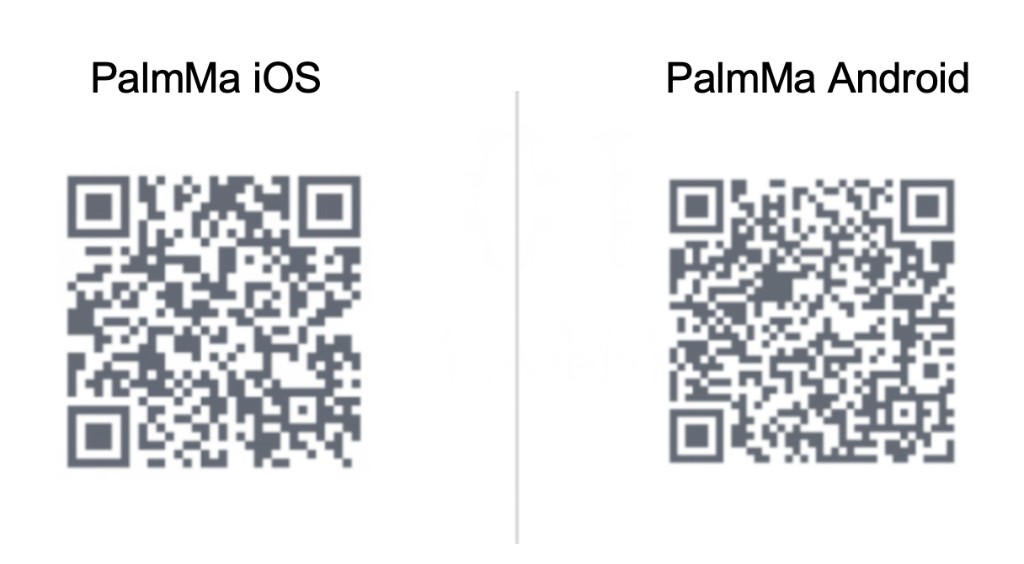
- PalmMa demo App: A feature demonstration App connected to the Indonesia production environment. It supports Air Enrollment, palm management, palm recognition, and palm verification, and is intended only for evaluation and integration reference. For Air Enrollment, customers can integrate the Air Enrollment App SDK or H5 SDK according to the Palm Developer documentation and develop the corresponding features. Actual operations are subject to the customer's integration and usage instructions. See the following image for the download entry point.
- Air Enrollment H5: Used to preregister a palm in a mobile browser. The trial URL is https://app.intl.palm.tencent.com/palm_h5. After preregistration, the user must still perform their first Palm Scan on an on-site device to activate the palm.
- Device Code Scan Registration H5 page: Used to enter registration information and generate a registration QR Code. The trial URL is https://app.intl.palm.tencent.com/local_h5/register. The user first scans their palm on the device and then presents the registration QR Code to the device to complete registration.
- Device QR Code Scan Verification H5 page: Used to enter Additional Verification information and generate an authentication QR Code after Device QR Code Scan Verification is triggered. The trial URL is https://app.intl.palm.tencent.com/local_h5/login. This QR Code is not generated by the PalmMa demo App.
The PalmMa demo App supports multiple languages. Its interface language follows the device system language.
4.1.2 Feature Overview
| Feature | Description |
|---|---|
| Air Enrollment | The user uses the phone camera to prerecord their palm. After preregistration, the user must perform their first Palm Scan on an on-site device to activate the palm. |
| Palm Management | View the status and Main indicator of the left and right palms, and delete an individual palm. |
| Palm Recognition | Scan a palm to identify the user and display the username, recognition time, and left- or right-hand information. |
| Palm Verification | Query a user by User ID or Username and perform 1:1 identity verification. |
| Device Code Scan Registration | The user generates a registration QR Code on the H5 page, scans their palm on the device, and then scans the QR Code to complete registration. |
| Device QR Code Scan Verification | The user generates an authentication QR Code on the Device QR Code Scan Verification H5 page, and the device scans the QR Code to complete Additional Verification. |
4.2 Glossary of Terms
| Term | English | Description |
|---|---|---|
| Air Enrollment | Air Enrollment | The user uses a phone camera to capture palm data online and complete preregistration. After preregistration, the user must perform their first Palm Scan on an on-site device to activate the palm. |
| Preregistered Palm | Pre-enrollment | An intermediate status after palm capture is completed on a mobile device. The palm data has been uploaded but has not been activated on an on-site device, so it cannot be used for Palm Scan verification. |
| Activation | Activation | After the user performs their first Palm Scan on an on-site device, the palm status changes from Not Activated to Activated. The palm can then be used for verification. |
| Additional Verification | Secondary Verification | An additional identity confirmation step after a successful Palm Scan. Supported methods include the last four digits of a phone number, a custom numeric field, and device QR Code scanning. |
| Primary Palm | Primary Palm | The user's first palm to be activated. |
| Secondary Palm | Secondary Palm | The user's second palm, activated later. When both palms are activated, either activated palm can be used for verification. |
| Device Code Scan Registration | Device Code Scan Registration | The user enters registration information on the H5 page and generates a registration QR Code, scans their palm on the device, and then scans the QR Code to complete registration. |
| Device QR Code Scan Verification | Device QR Code Scan Verification | The user generates an authentication QR Code on the Device QR Code Scan Verification H5 page, and the device scans it to complete Additional Verification. The QR Code validity period is configured in PalmAI Admin Web. |
| Palm Status | Palm State | The current palm status, including Unregistered, Not Activated, Activated, and Abnormal. |
| User Status | User State | A status derived from the states of both palms, including No Valid Palm, Left Palm Available, Right Palm Available, and Both Palms Available. |
4.3 Before You Begin
4.3.1 Get the PalmMa demo App
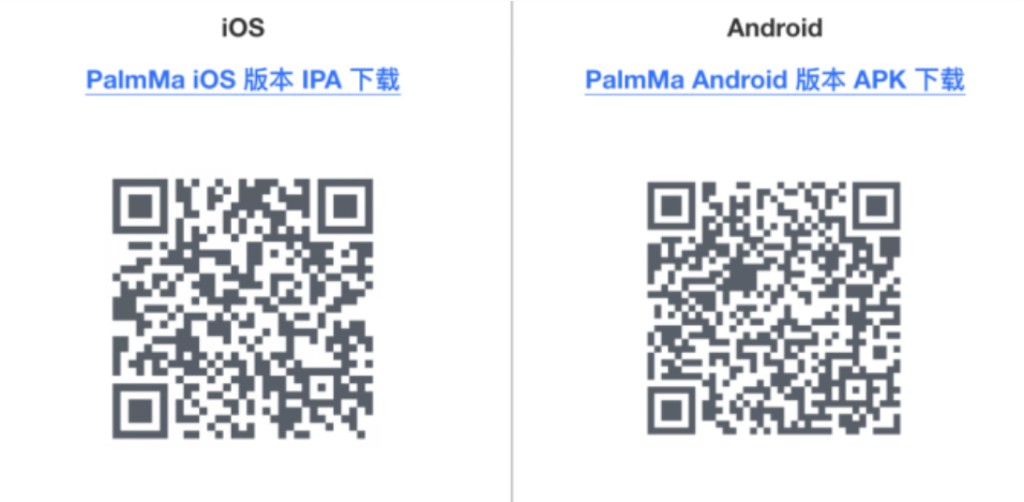
The PalmMa demo App download page provides installation options for iOS and Android. The current installation packages are intended only for feature demonstration and reference in the Indonesia production environment.
4.3.2 Scene Modes and Registration Requirements
A tenant can use either an open scene or a closed scene. You can check whether the current tenant uses an open scene or a closed scene in PalmAI Admin Web under System Management > Tenant Management. For details, see "3.5 User Management" in the Admin Console User Manual.
- Open scene: An administrator does not need to create the user in PalmAI Admin Web before registration. The system creates the user automatically after the user submits their registration information.
- Closed scene: An administrator must create the user in PalmAI Admin Web before registration.
Device Input is available by default and is not controlled by the tenant's registration method switches. The availability of Phone Scan QR Registration, Device Scan QR Registration, Host Input, and Mobile Palm Registration depends on the current tenant's registration method configuration.
4.3.3 H5 Trial Pages
- Air Enrollment H5: Air Enrollment page. This URL connects to the Indonesia production environment and is intended only for evaluation and integration reference.
- Device Code Scan Registration H5 page: Device Code Scan Registration page. This URL connects to the Indonesia production environment. The actual URL is subject to the one provided by the vendor.
- Device QR Code Scan Verification H5 page: Device QR Code Scan Verification page. This URL connects to the Indonesia production environment. Contact the vendor for the actual URL.
4.4 Log In to the PalmMa demo App or Air Enrollment H5
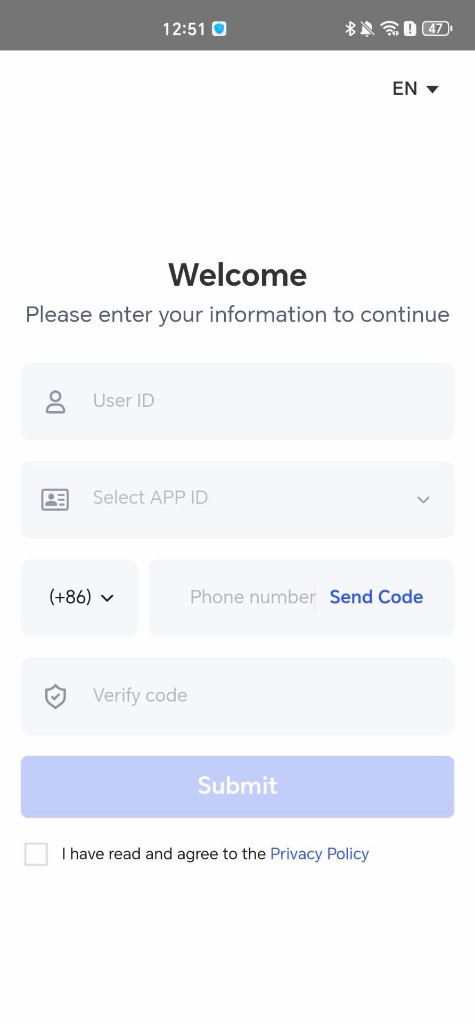
You can log in with the PalmMa demo App or the Air Enrollment H5 page. The flow is the same for both.
- Open the PalmMa demo App, or open the Air Enrollment H5 page.
- Enter the User ID.
- Select a tenant name. Available tenants include open tenants and closed tenants that already contain this User ID. You can check whether a tenant uses an open scene or a closed scene in PalmAI Admin Web under System Management > Tenant Management.
- Read and agree to the Privacy Policy.
- Tap Submit.
After validation succeeds, the system logs you in and opens the feature home page.
Note
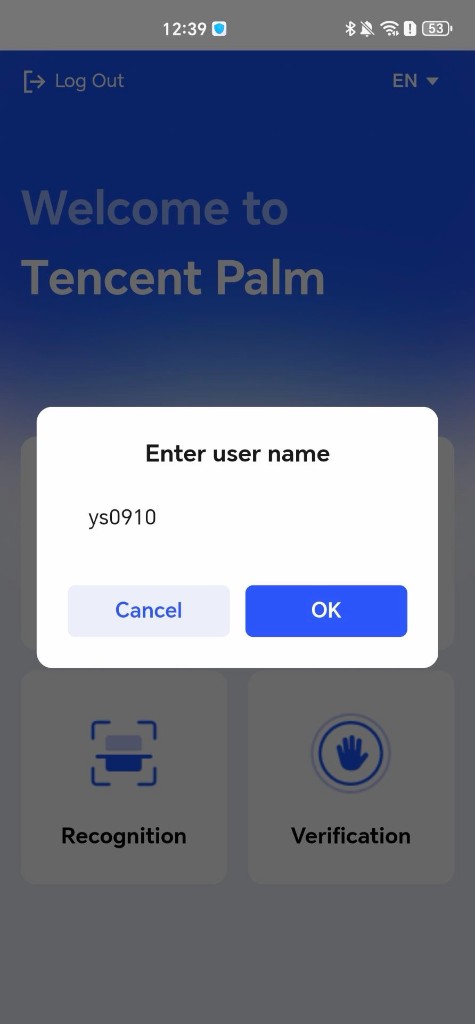
- In an open scene, an administrator does not need to create the user in advance. After logging in and opening the feature home page, tap Registration, enter a username in the Enter user name dialog, and tap OK. The system then creates the user and opens the palm preregistration page.
- In a closed scene, an administrator must first create the user in PalmAI Admin Web. The user information entered during login and registration must match the information in PalmAI Admin Web.
4.5 Mobile Palm Registration and Palm Management
Users can preregister a palm through the PalmMa demo App or the Air Enrollment H5 page. Both entry points use the same process: preregister the palm on a mobile device, then perform the first Palm Scan on an on-site device to activate it. The following instructions use the PalmMa demo App as an example.
4.5.1 Preregister the First Palm
- Log in to the PalmMa demo App or Air Enrollment H5.
- On the feature home page, tap Registration.
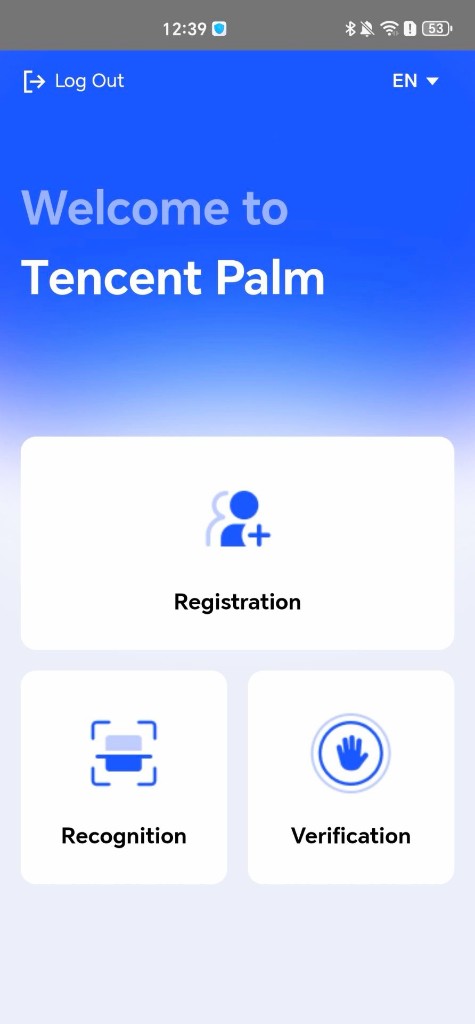
- In an open scene, enter a username in the Enter user name dialog during the first registration, and then tap OK. The system creates the user and opens the Palm Registration page. In a closed scene, the system uses the user information already created in PalmAI Admin Web.
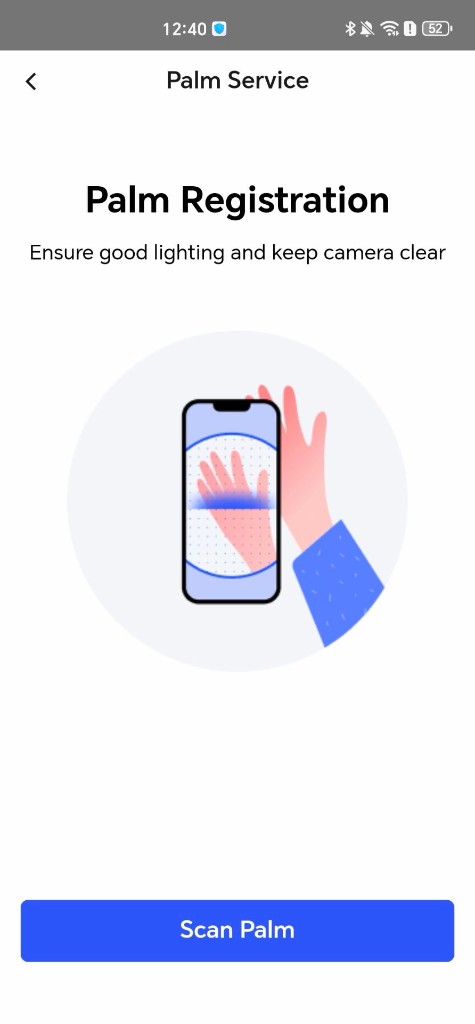
- On the Palm Registration page, ensure that the area is well lit and the camera is clean, and then tap Scan Palm.
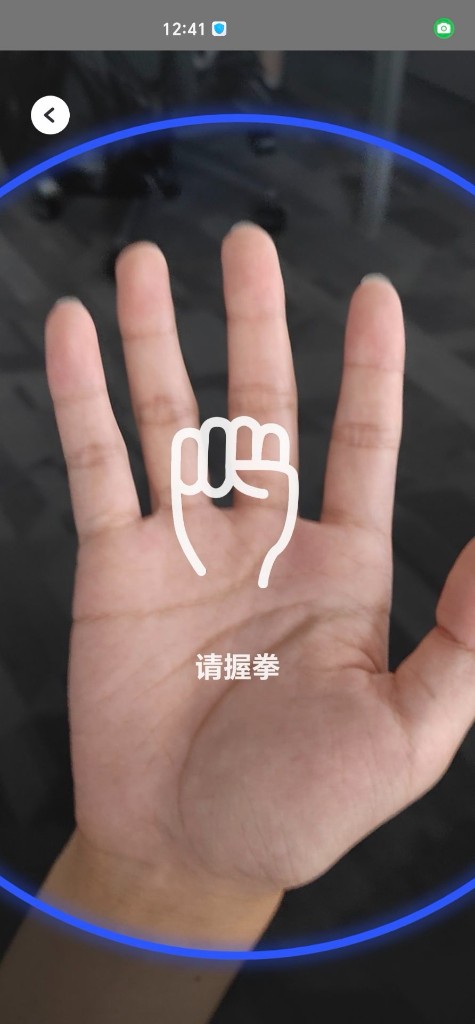
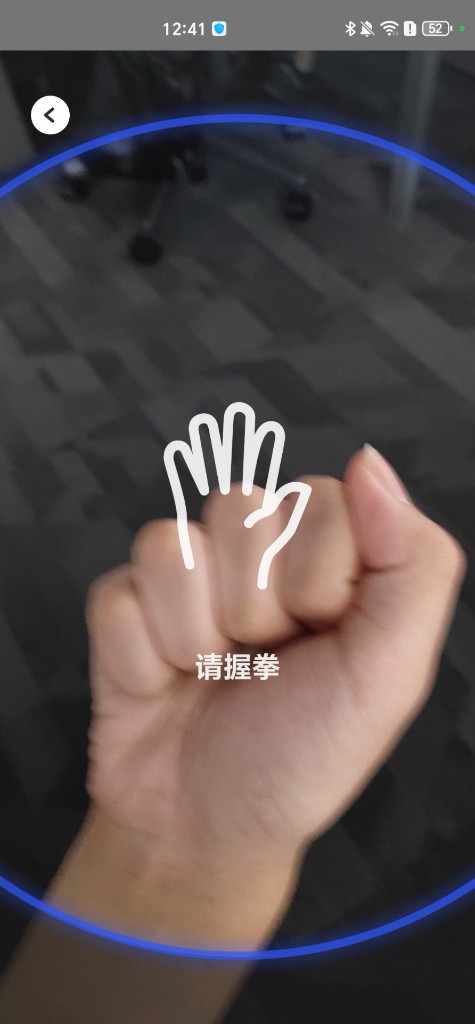
- Scan your palm with the phone's rear camera. Follow the on-screen prompts to open your palm, make a fist, and complete the other required actions in sequence.
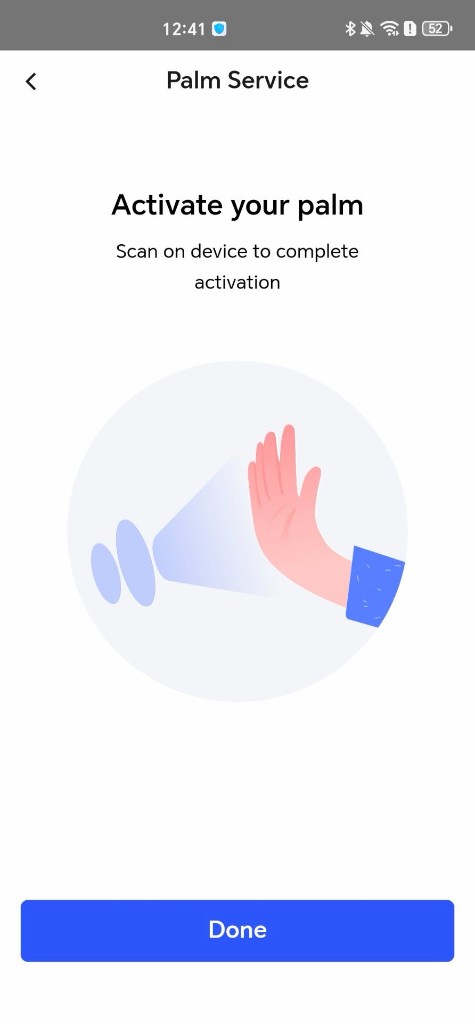
- When preregistration is complete, the page displays Activate your palm, indicating that you must perform a Palm Scan on an on-site device to activate the palm. Tap Done.
- On the My Palm page, verify that the preregistered palm is shown as
Not Activated.
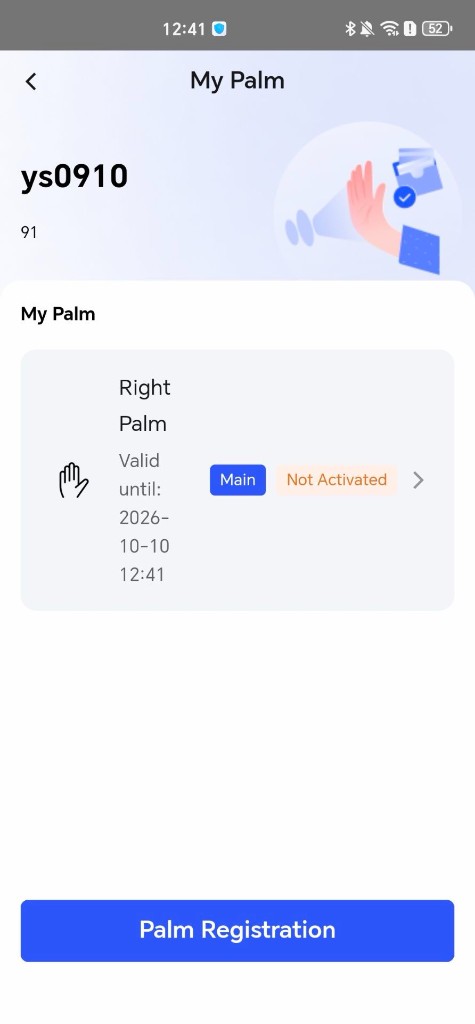
At this point, the palm has only been preregistered and cannot yet be used for Palm Scan verification.
4.5.2 Activate the Palm on an On-Site Device
- Go to an M3 or M4 Palm Verification Device that has been authorized, connected to the network, activated in the backend environment, and associated with a scene.
- Switch the device to Recognition mode.
- Perform the first Palm Scan using the preregistered palm.
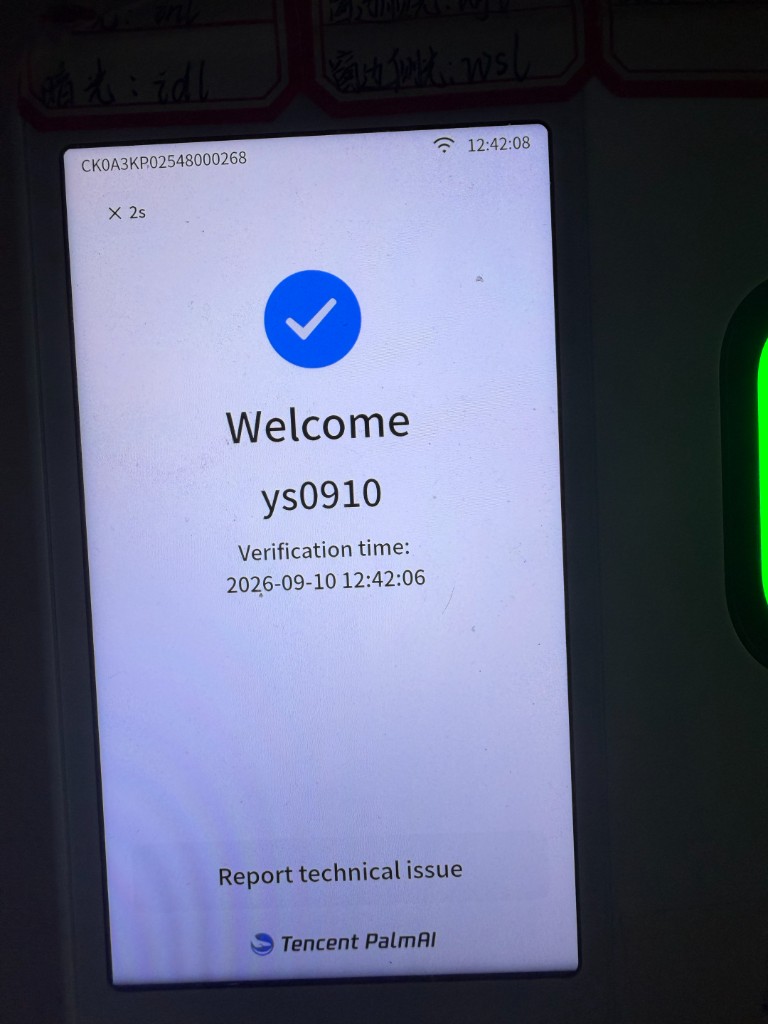
- Wait for the device to complete activation and display the Palm Scan success page.
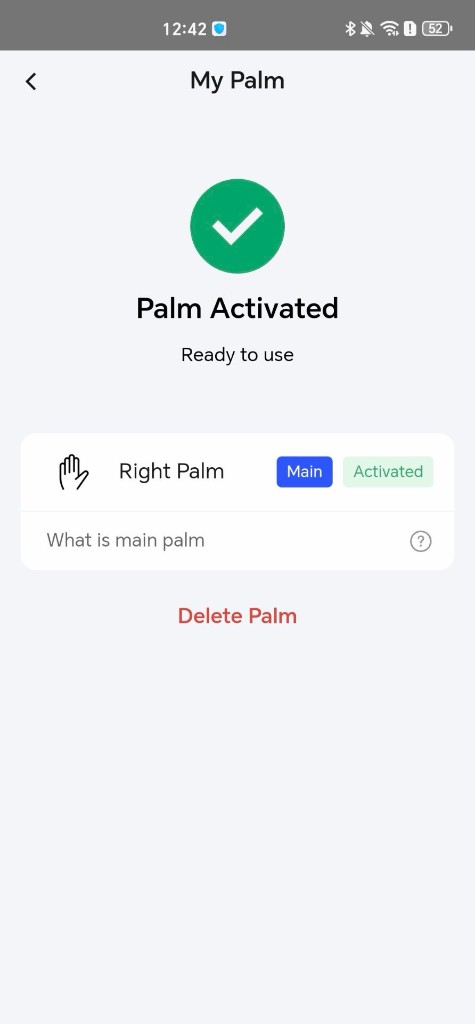
- Return to the PalmMa demo App, open My Palm, and tap the corresponding palm to view its status.
After the palm is activated, the App updates its status to Activated. The first palm to be activated displays the Main indicator.
For device operations, see "5.4.5 Air Enrollment" in the M3 Palm Verification Device User Manual or "6.4.6 Mobile Palm Registration" in the M4 Palm Verification Device User Manual.
4.5.3 Preregister and Activate the Second Palm
The PalmMa demo App supports preregistration of both the first and second palms. The second palm must also undergo its first Palm Scan on an on-site device for activation before it can be used for verification.
- Open the My Palm page.
- Tap Palm Registration or the position for the palm that has not been registered.
- Follow the instructions in "4.5.1 Preregister the First Palm" to preregister the other palm.
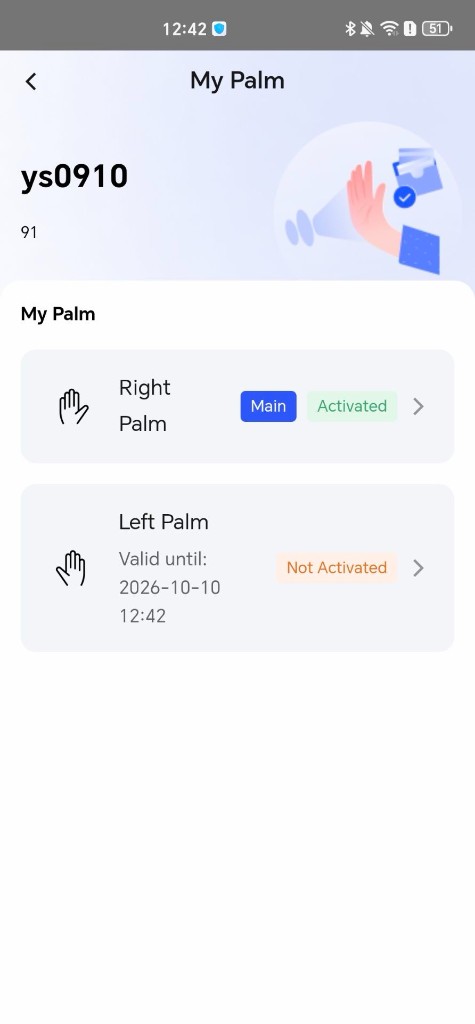
- Verify that the first palm is shown as
Activatedand the newly preregistered palm is shown asNot Activated.
- Switch the device to Recognition mode and perform the first Palm Scan with the second palm to activate it.
- Return to the My Palm page and verify that both palms are shown as
Activated. The first palm activated is the Primary Palm, and the palm activated later is the Secondary Palm.
4.5.4 View and Delete Palms
On the My Palm page, you can view whether each palm is Unregistered, Not Activated, Activated, or Abnormal.
To delete a palm:
- Tap the target palm to open the palm details page.
- Tap Delete Palm.
- Confirm the deletion in the confirmation prompt.
Warning
Palm data cannot be recovered after it is deleted. When you delete the Primary Palm:
- If the other palm is activated, it automatically becomes the new Primary Palm.
- If the other palm is not activated, it does not automatically become the Primary Palm. The user must activate it on an on-site device before normal verification can resume.
4.6 Palm Recognition
- On the feature home page, tap Recognition.
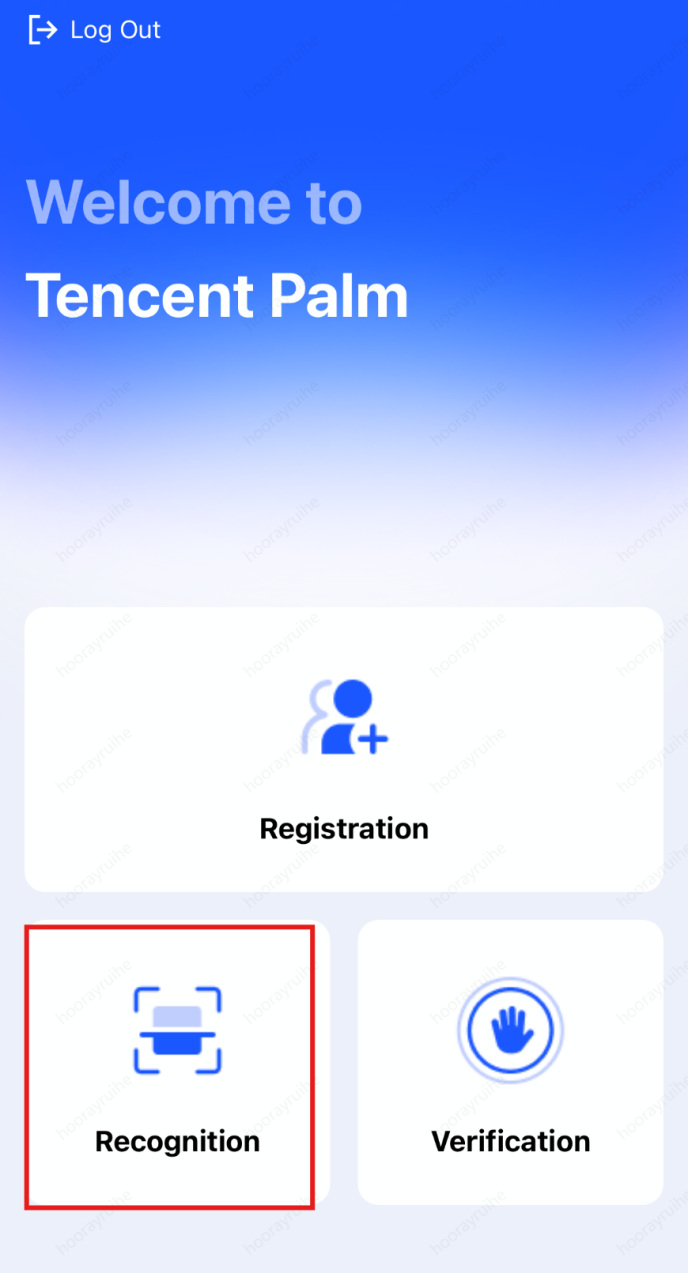
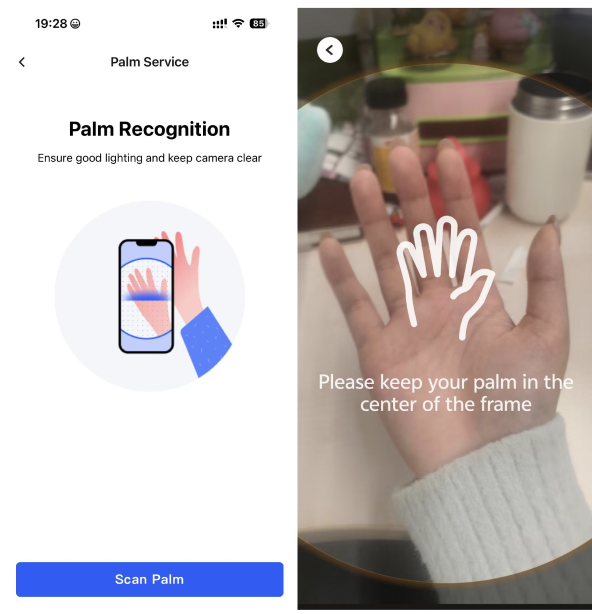
- Tap Scan Palm.
- Follow the on-screen prompts to adjust the palm position and complete the scan.
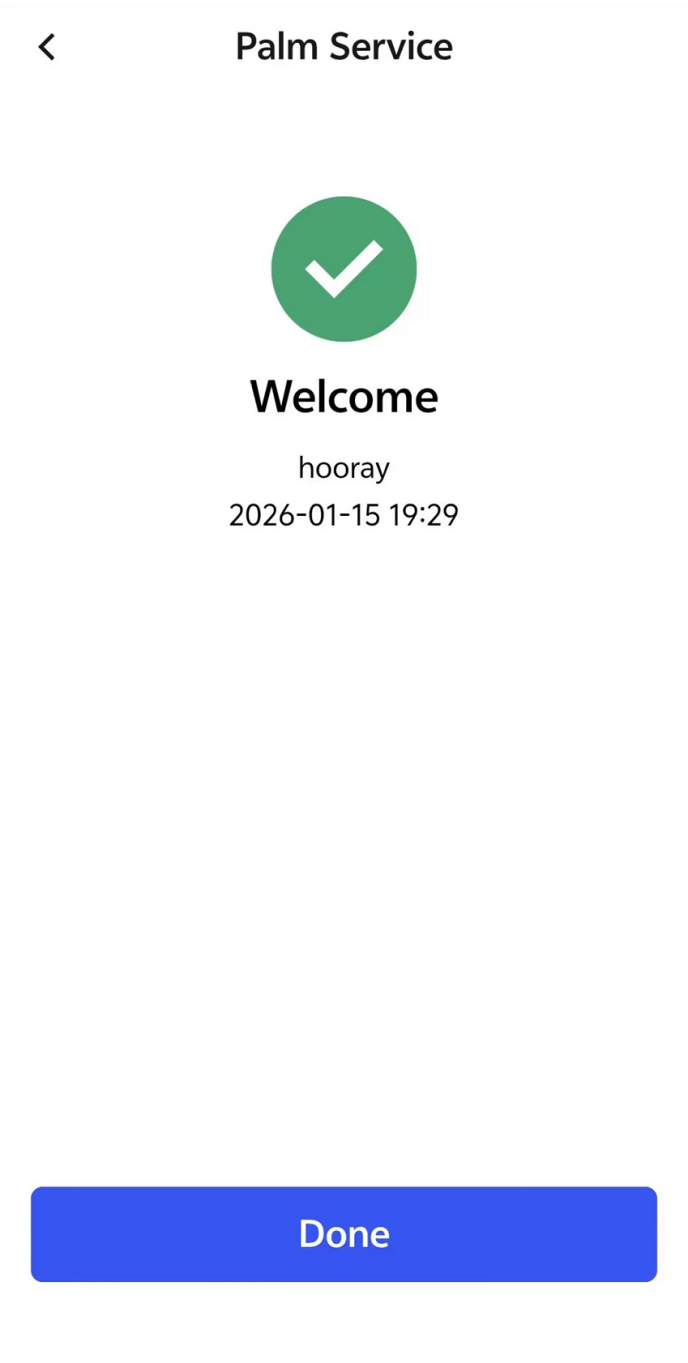
Possible recognition results include:
- Recognition succeeded: The page displays the username, recognition time, and whether the left or right hand was recognized.
- Incorrect palm direction: If the user has registered a palm on only one side but scans the palm on the other side, the system prompts the user to use the other hand.
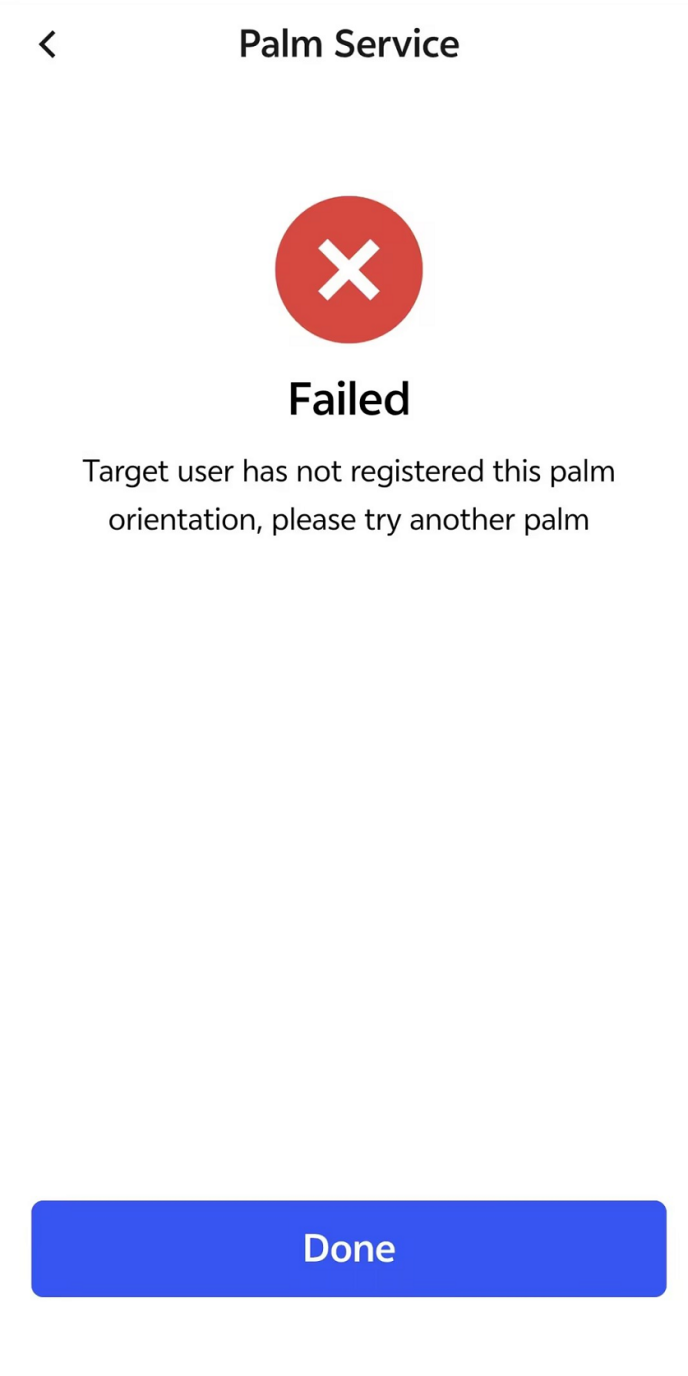
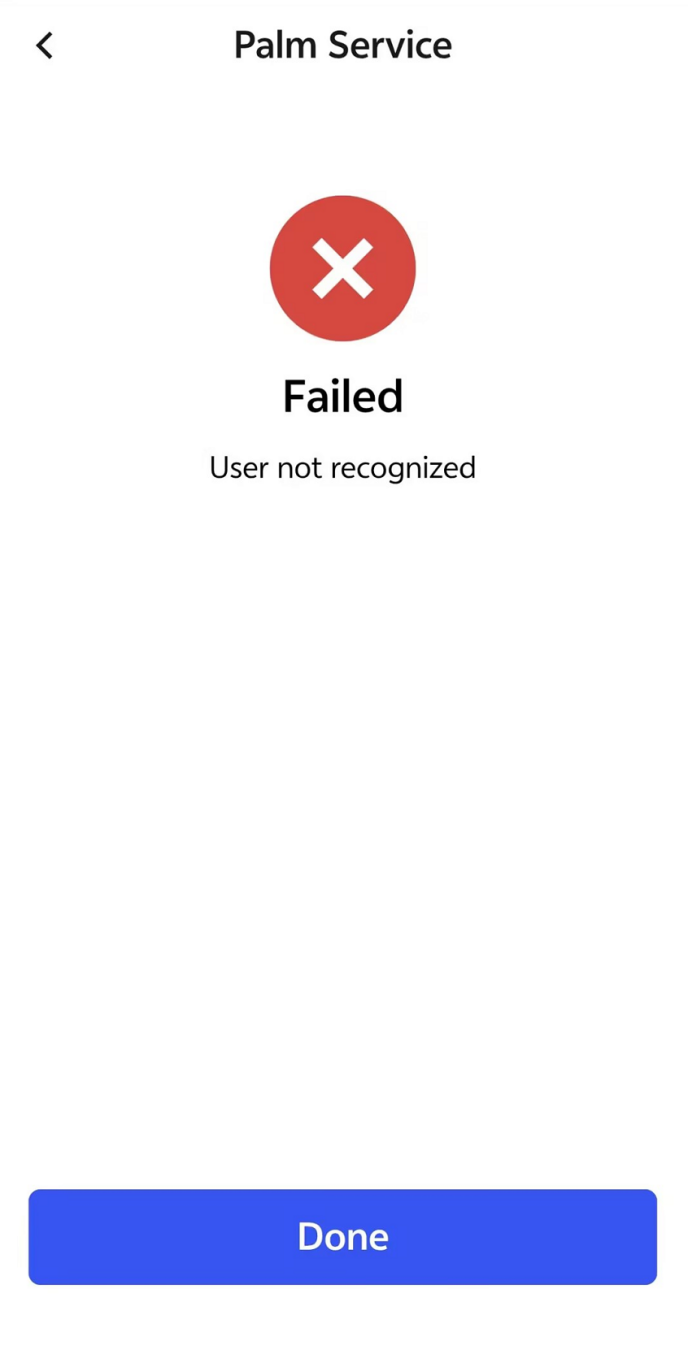
- Unable to recognize: If the scanned palm has not been registered, the system displays an unable-to-recognize message.
4.7 Palm Verification
Palm Verification queries a target user by User ID or Username and performs 1:1 identity verification.
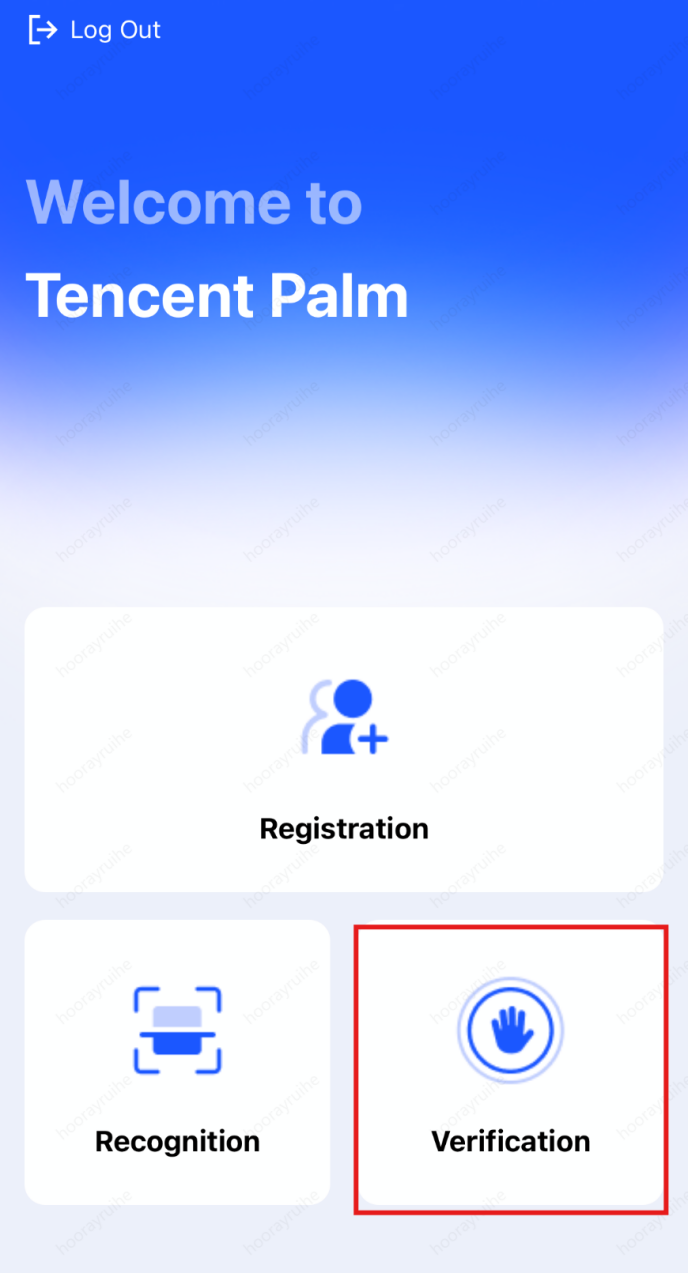
- On the feature home page, tap Verification.
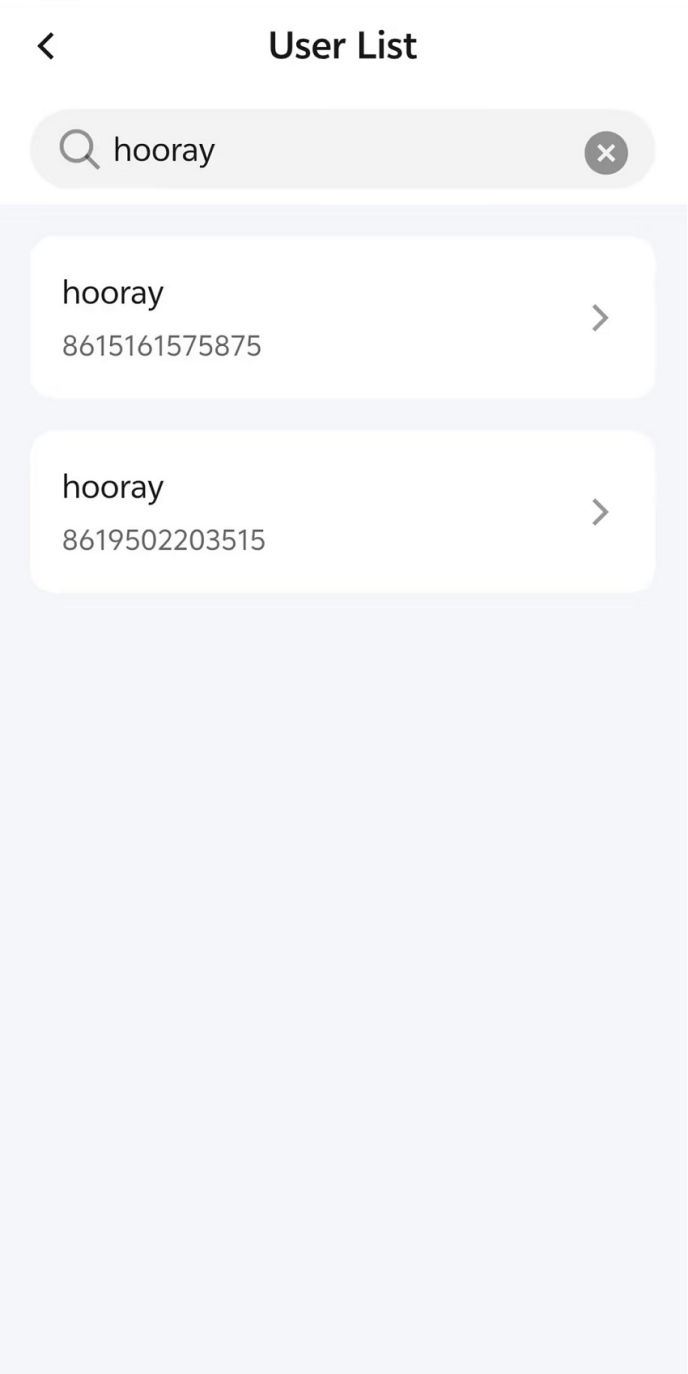
- Enter the User ID or Username.
- Select the target user from the query results.
- Tap Scan Palm.
- Follow the on-screen prompts to scan the palm.
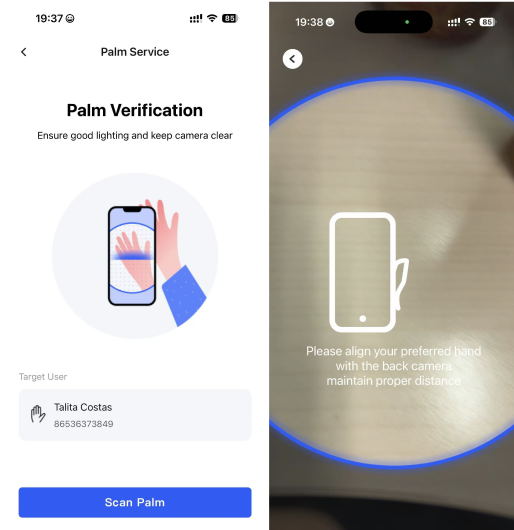
When verification succeeds, the system displays a successful match and whether the left or right hand was recognized. When verification fails, the system displays the corresponding error message.
4.8 Device Code Scan Registration
Device Code Scan Registration generates a registration QR Code on an H5 page and completes registration on the device in the sequence "scan the palm first, then scan the registration QR Code." This method reduces the need to enter user information manually on the device.
4.8.1 Scene Requirements
- Open scene: The user does not need to be created in advance. The system creates the user automatically after the user submits their registration information.
- Closed scene: An administrator must first create the user in PalmAI Admin Web. For details, see "3.5.1 Create User" in the PalmAI Admin Web User Manual.
Before using this feature, verify that:
- Device Code Scan Registration is enabled for the tenant.
- The device has been authorized, connected to the network, activated in the backend environment, and associated with a scene.
4.8.2 Generate a Registration QR Code
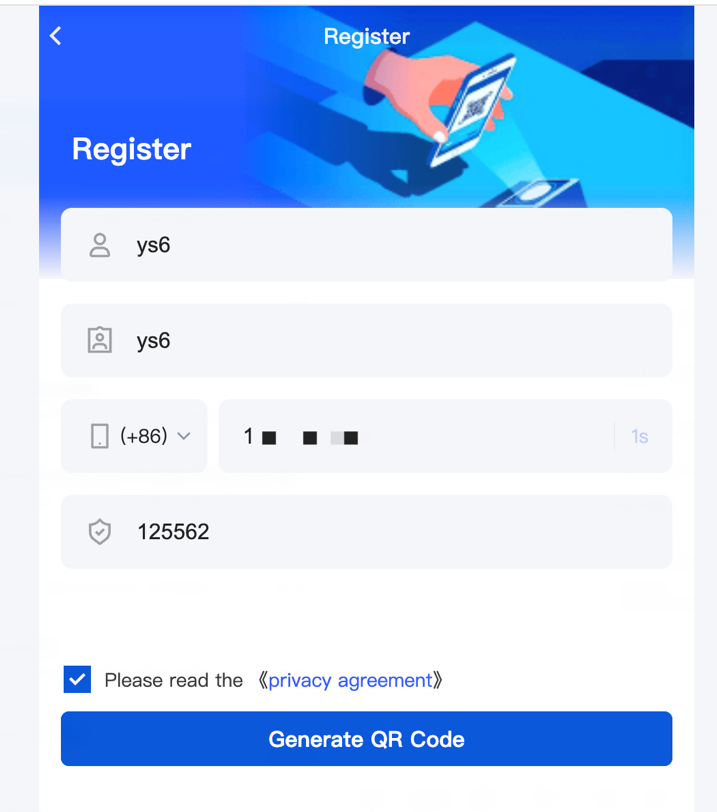
- Open the Device Code Scan Registration H5 page. This URL connects to the Indonesia production environment. The actual URL is subject to the one provided by the vendor.
- Enter the User ID and Username. In a closed scene, the information must match the user already created in PalmAI Admin Web.
- Select a country or region code, enter the phone number, and obtain a verification code.
- Enter the verification code, and read and agree to the privacy agreement.
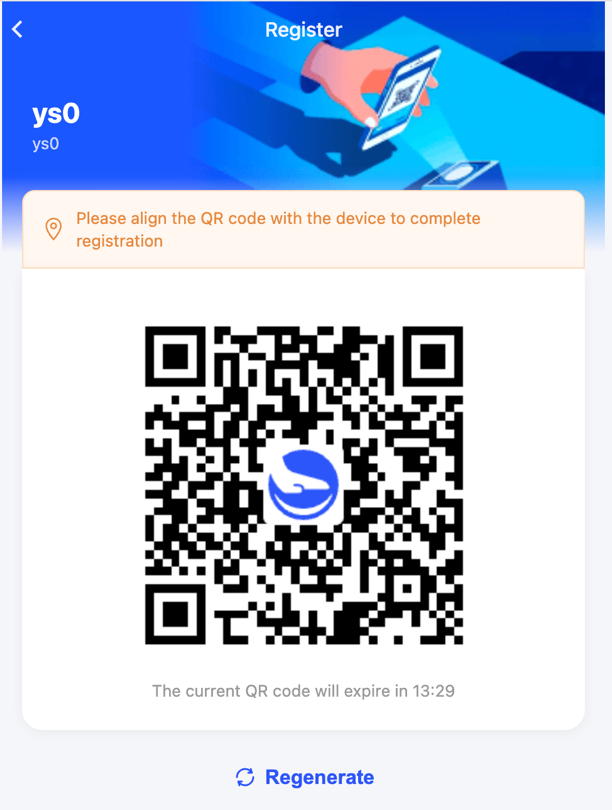
- Tap Generate QR Code to generate a registration QR Code.
Note
The registration QR Code is valid for 15 minutes. Generate a new one after it expires.
4.8.3 Complete Registration on the Device
- Switch the device to Registration - Device Scan QR mode.
- Place the unregistered palm in the device's palm recognition area.
- After capturing the palm, the device automatically opens the QR Code scanning page.
- Present the registration QR Code generated on the H5 page to the device camera.
- The device scans the QR Code and displays the user information confirmation page.
- After verifying that the user information is correct, follow the on-screen prompts to confirm registration.
- The system binds the palm to the user information and indicates that Palm Registration is complete.
The H5 page displays registration progress states such as palm capture in progress, registration succeeded, or registration failed.
Tip
If the device cannot recognize the registration QR Code on the phone, clean the device camera, increase the phone screen brightness, and realign the phone with the device camera.
For detailed device operations, see "5.4.4 Device Code Scan Registration" in the M3 Palm Verification Device User Manual or "6.4.5 Device Code Scan Registration" in the M4 Palm Verification Device User Manual.
4.9 Device QR Code Scan Verification
Device QR Code Scan Verification is an additional identity confirmation process performed after a successful Palm Scan. This feature applies to hybrid or cloud strategies. It is jointly controlled by the tenant's Additional Verification method and the scene verification strategy, so it is not triggered for every Palm Scan.
4.9.1 Generate an Authentication QR Code
- Complete Palm Scan verification.
- The device triggers Device QR Code Scan Verification and activates the camera to scan an authentication QR Code.
- In a mobile browser, open the Device QR Code Scan Verification H5 page. This URL connects to the Indonesia production environment. Contact the vendor for the actual URL.
- On the Login page, enter the userID, select the tenant, enter the phone number, and obtain a verification code.
- Enter the Verification code, select the data processing agreement checkbox, and tap Login.
- Follow the on-screen prompts to enter the Additional Verification information and generate an authentication QR Code.
- Present the authentication QR Code to the device camera.
- The device scans the QR Code and completes Additional Verification.
Note
- The validity period of the authentication QR Code is determined by the QR Code Expiration setting in PalmAI Admin Web. The default is 60 seconds. Generate a new QR Code after it expires.
- The device waits up to 60 seconds to scan the QR Code. If it times out, this verification fails and the user must perform another Palm Scan.
- The PalmMa demo App does not generate QR Codes for Device QR Code Scan Verification.
For PalmAI Admin Web configuration, see "3.9.4 Tenant-Level Additional Verification Configuration" in the PalmAI Admin Web User Manual. For device operations, see "5.4.9.3 Device QR Code Scan Verification" in the M3 Palm Verification Device User Manual or "6.4.10.3 Device QR Code Scan Verification" in the M4 Palm Verification Device User Manual.
4.1 Chapter Overview
4.1.1 Scope
This chapter describes how to use the PalmMa demo App, the Mobile Palm Registration H5 page, and the Device Scan QR Registration H5 page.
- PalmMa demo App: A feature demonstration App connected to the Indonesia production environment. It supports Mobile Palm Registration and palm management and is intended only for evaluation and integration reference. For Mobile Palm Registration, customers can integrate the Mobile Palm Registration App SDK or H5 SDK according to the Palm Developer documentation and develop the corresponding features. Actual operations are subject to the customer's integration and usage instructions. See the following image for the download entry point.
- Mobile Palm Registration H5: Used to preregister a palm in a mobile browser. The trial URL is https://app.intl.palm.tencent.com/palm_h5. After preregistration, the user must still perform their first Palm Scan on an on-site device to activate the palm.
- Device Scan QR Registration H5 page: Used to enter registration information and generate a registration QR Code. The trial URL is https://app.intl.palm.tencent.com/local_h5/register. The user first scans their palm on the device and then presents the registration QR Code to the device to complete registration.
The PalmMa demo App supports multiple languages. Its interface language follows the device system language.
4.1.2 Feature Overview
| Feature | Description |
|---|---|
| Mobile Palm Registration | The user uses the phone camera to prerecord their palm. After preregistration, the user must perform their first Palm Scan on an on-site device to activate the palm. |
| Palm Management | View the status and Main indicator of the left and right palms, and delete an individual palm. |
| Device Scan QR Registration | The user generates a registration QR Code on the H5 page, scans their palm on the device, and then scans the QR Code to complete registration. |
4.2 Glossary of Terms
| Term | English | Description |
|---|---|---|
| Mobile Palm Registration | Mobile Palm Registration | The user uses a phone camera to capture palm data online and complete preregistration. After preregistration, the user must perform their first Palm Scan on an on-site device to activate the palm. |
| Preregistered Palm | Pre-enrollment | An intermediate status after palm capture is completed on a mobile device. The palm data has been uploaded but has not been activated on an on-site device, so it cannot be used for Palm Scan. |
| Activation | Activation | After the user performs their first Palm Scan on an on-site device, the palm status changes from Not Activated to Activated. |
| Primary Palm | Primary Palm | The user's first palm to be activated. |
| Secondary Palm | Secondary Palm | The user's second palm, activated later. |
| Device Scan QR Registration | Device Scan QR Registration | The user enters registration information on the H5 page and generates a registration QR Code, scans their palm on the device, and then scans the QR Code to complete registration. |
| Palm Status | Palm State | The current palm status, including Unregistered, Not Activated, Activated, and Abnormal. |
| User Status | User State | A status derived from the states of both palms, including No Valid Palm, Left Palm Available, Right Palm Available, and Both Palms Available. |
4.3 Before You Begin
4.3.1 Get the PalmMa demo App
The PalmMa demo App download page provides installation options for iOS and Android. The current installation packages are intended only for feature demonstration and reference in the Indonesia production environment.
4.3.2 Scene Modes and Registration Requirements
A tenant can use either an open scene or a closed scene. You can check whether the current tenant uses an open scene or a closed scene in PalmAI Admin Web under System Management > Tenant Management. For details, see "3.5 User Management" in the Admin Console User Manual.
- Open scene: An administrator does not need to create the user in PalmAI Admin Web before registration. The system creates the user automatically after the user submits their registration information.
- Closed scene: An administrator must create the user in PalmAI Admin Web before registration.
Device Input is available by default and is not controlled by the tenant's registration method switches. The availability of Phone Scan QR Registration, Device Scan QR Registration, Host Input, and Mobile Palm Registration depends on the current tenant's registration method configuration.
4.3.3 H5 Trial Pages
- Mobile Palm Registration H5: Mobile Palm Registration page. This URL connects to the Indonesia production environment and is intended only for evaluation and integration reference.
- Device Scan QR Registration H5 page: Device Scan QR Registration page. This URL connects to the Indonesia production environment. The actual URL is subject to the one provided by the vendor.
4.4 Log In to the PalmMa demo App or Mobile Palm Registration H5
You can log in with the PalmMa demo App or the Mobile Palm Registration H5 page. The flow is the same for both.
- Open the PalmMa demo App, or open the Mobile Palm Registration H5 page.
- Enter the User ID.
- Select a tenant name. Available tenants include open tenants and closed tenants that already contain this User ID. You can check whether a tenant uses an open scene or a closed scene in PalmAI Admin Web under System Management > Tenant Management.
- Read and agree to the Privacy Policy.
- Tap Submit.
After validation succeeds, the system logs you in and opens the feature home page.
Note
- In an open scene, an administrator does not need to create the user in advance. After logging in and opening the feature home page, tap Registration, enter a username in the Enter user name dialog, and tap OK. The system then creates the user and opens the palm preregistration page.
- In a closed scene, an administrator must first create the user in PalmAI Admin Web. The user information entered during login and registration must match the information in PalmAI Admin Web.
4.5 Mobile Palm Registration and Palm Management
Users can preregister a palm through the PalmMa demo App or the Mobile Palm Registration H5 page. Both entry points use the same process: preregister the palm on a mobile device, then perform the first Palm Scan on an on-site device to activate it. The following instructions use the PalmMa demo App as an example.
4.5.1 Preregister the First Palm
- Log in to the PalmMa demo App or Mobile Palm Registration H5.
- On the feature home page, tap Registration.
- In an open scene, enter a username in the Enter user name dialog during the first registration, and then tap OK. The system creates the user and opens the Palm Registration page. In a closed scene, the system uses the user information already created in PalmAI Admin Web.
- On the Palm Registration page, ensure that the area is well lit and the camera is clean, and then tap Scan Palm.
- Scan your palm with the phone's rear camera. Follow the on-screen prompts to open your palm, make a fist, and complete the other required actions in sequence.
- When preregistration is complete, the page displays Activate your palm, indicating that you must perform a Palm Scan on an on-site device to activate the palm. Tap Done.
- On the My Palm page, verify that the preregistered palm is shown as
Not Activated.
At this point, the palm has only been preregistered and has not been activated.
4.5.2 Activate the Palm on an On-Site Device
- Go to an M3 or M4 Palm Verification Device that has been authorized, connected to the network, activated in the backend environment, and associated with a scene.
- Switch the device to Recognition mode.
- Perform the first Palm Scan using the preregistered palm.
- Wait for the device to complete activation and display the Palm Scan success page.
- Return to the PalmMa demo App, open My Palm, and tap the corresponding palm to view its status.
After the palm is activated, the App updates its status to Activated. The first palm to be activated displays the Main indicator.
For device operations, see "5.4.5 Mobile Palm Registration" in the M3 Palm Verification Device User Manual or "6.4.6 Mobile Palm Registration" in the M4 Palm Verification Device User Manual.
4.5.3 Preregister and Activate the Second Palm
The PalmMa demo App supports preregistration of both the first and second palms. The second palm must also undergo its first Palm Scan on an on-site device for activation.
- Open the My Palm page.
- Tap Palm Registration or the position for the palm that has not been registered.
- Follow the instructions in "4.5.1 Preregister the First Palm" to preregister the other palm.
- Verify that the first palm is shown as
Activatedand the newly preregistered palm is shown asNot Activated.
- Switch the device to Recognition mode and perform the first Palm Scan with the second palm to activate it.
- Return to the My Palm page and verify that both palms are shown as
Activated. The first palm activated is the Primary Palm, and the palm activated later is the Secondary Palm.
4.5.4 View and Delete Palms
On the My Palm page, you can view whether each palm is Unregistered, Not Activated, Activated, or Abnormal.
To delete a palm:
- Tap the target palm to open the palm details page.
- Tap Delete Palm.
- Confirm the deletion in the confirmation prompt.
Warning
Palm data cannot be recovered after it is deleted. When you delete the Primary Palm:
- If the other palm is activated, it automatically becomes the new Primary Palm.
- If the other palm is not activated, it does not automatically become the Primary Palm. The user must activate it on an on-site device before continuing to use it.
4.6 Device Code Scan Registration
Device Code Scan Registration generates a registration QR Code on an H5 page and completes registration on the device in the sequence "scan the palm first, then scan the registration QR Code." This method reduces the need to enter user information manually on the device.
4.6.1 Scene Requirements
- Open scene: The user does not need to be created in advance. The system creates the user automatically after the user submits their registration information.
- Closed scene: An administrator must first create the user in PalmAI Admin Web. For details, see "3.5.1 Create User" in the PalmAI Admin Web User Manual.
Before using this feature, verify that:
- Device Code Scan Registration is enabled for the tenant.
- The device has been authorized, connected to the network, activated in the backend environment, and associated with a scene.
4.6.2 Generate a Registration QR Code
- Open the Device Code Scan Registration H5 page. This URL connects to the Indonesia production environment. The actual URL is subject to the one provided by the vendor.
- Enter the User ID and Username. In a closed scene, the information must match the user already created in PalmAI Admin Web.
- Select a country or region code, enter the phone number, and obtain a verification code.
- Enter the verification code, and read and agree to the privacy agreement.
- Tap Generate QR Code to generate a registration QR Code.
Note
The registration QR Code is valid for 15 minutes. Generate a new one after it expires.
4.6.3 Complete Registration on the Device
- Switch the device to Registration - Device Scan QR mode.
- Place the unregistered palm in the device's palm recognition area.
- After capturing the palm, the device automatically opens the QR Code scanning page.
- Present the registration QR Code generated on the H5 page to the device camera.
- The device scans the QR Code and displays the user information confirmation page.
- After verifying that the user information is correct, follow the on-screen prompts to confirm registration.
- The system binds the palm to the user information and indicates that Palm Registration is complete.
The H5 page displays registration progress states such as palm capture in progress, registration succeeded, or registration failed.
Tip
If the device cannot recognize the registration QR Code on the phone, clean the device camera, increase the phone screen brightness, and realign the phone with the device camera.
For detailed device operations, see "5.4.4 Device Code Scan Registration" in the M3 Palm Verification Device User Manual or "6.4.5 Device Code Scan Registration" in the M4 Palm Verification Device User Manual.